Bob, Thanks very much for confirming. Hope you and your family are enjoying the holidays.
We are, thanks. You as well.
Follow along with the video below to see how to install our site as a web app on your home screen.

Note: This feature currently requires accessing the site using the built-in Safari browser.
Bob, Thanks very much for confirming. Hope you and your family are enjoying the holidays.
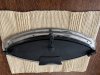
The following is the solution I decided to go with to correct a leaking aft port light on the port side of my 2001 Sea Ray 310 Sundancer. Sea Ray installed this opening port light in an inaccessible area of the cabin behind the fiberglass head module during their manufacturing process. It's not visible from anywhere inside the boat and the inside surface of the acrylic lens was spray painted black to conceal the head's HVAC hose that runs up along the right side of the port light. After using a borescope through the head ceiling light I concluded there was no means of backing out the mounting screws on this port light in order to remove it, reseal the frame and replace the lens gasket.
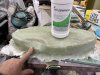
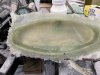
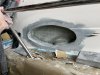
I worked with my fiberglass guy to come up with a faux portlight installation that would preserve the exterior symmetry and aesthetics of the boat. We decided to fiberglass behind the port light to prevent any future leaks. The outer frame of the portlight along with lens, hinge and dogs will remain intact and we will eliminate the inner frame and mounting screws by bonding the outer frame of the port light to the side of the boat's fiberglass deck using 3M 5200 polyurethane adhesive. We will leave a 1" gap at the bottom to allow for drainage should any water find its way behind the frame. First step was to carefully cut out the leaking port light and make sure we didn't go beyond the depth of the deck's fiberglass thickness. This point is critical because the HVAC hose for the head is located directly behind this port light and it's located in an area behind the head module that's inaccessible to replace it.The following is the solution I decided to go with to correct a leaking aft port light on the port side of my 2001 Sea Ray 310 Sundancer. Sea Ray installed this opening port light in an inaccessible area of the cabin behind the fiberglass head module during their manufacturing process. It's not visible from anywhere inside the boat and the inside surface of the acrylic lens was spray painted black to conceal the head's HVAC hose that runs up along the right side of the port light. After using a borescope through the head ceiling light I concluded there was no means of backing out the mounting screws on this port light in order to remove it, reseal the frame and replace the lens gasket.
Bob, I apologize - I'm not directing this post at you.
I simply wanted share what I learned in case other 310 owners are looking for a solution to this inaccessible leaking port light. I initially found it hard to believe there was no content on CSR about this problem. This was clearly a Sea Ray work around when the cabin layout with the jack and jill head and dinette in front of the forward berth wasn't received well by the market and they redesigned the cabin layout part way though the 1998 model year.
Thanks Bob! Detailing is complete except for the repair area so that hull and deck shine you're seeing is the Permanon Yacht Supershine ceramic coating. This is the first time my detailer used this product but so far he's impressed. Time will tell how well this coating holds up in the hot FL sun. It was one of the first ceramic coatings to come on the market and it's water base base so there's no chemical bond to the gelcoat. You also don't need a hazmat suit to touch it up or reapply!No apology needed. I've been watching your progress with interest, as I am sure others are.
Thanks Bob! Detailing is complete except for the repair area so that hull and deck shine you're seeing is the Permanon Yacht Supershine ceramic coating. This is the first time my detailer used this product but so far he's impressed. Time will tell how well this coating holds up in the hot FL sun. It was one of the first ceramic coatings to come on the market and it's water base base so there's no chemical bond to the gelcoat. You also don't need a hazmat suit to touch it up or reapply!


My guy charged $65/ft. which I though was very reasonable for full detail including buffing, compounding, ceramic coating application, cockpit and all seating surfaces. I really needed the help to get her caught up.
View attachment 138516 View attachment 138517 View attachment 138518 View attachment 138519
Thankfully this guy operates out of our marina as an independent contractor. He's there every week and does most of his business there (over 200 boats). He manages to keep his team busy.The challenge in my area is to get someone to show up.
Go to flounder pounder, Searayparts.com they have replacement spray handles for replacement. If that’s the problem if it’s just clogged.Okay, Maybe I'm going about this all wrong... Am I in the right place? New Post? I don't want to hijack anybody's post. I think I'm in the correct place.
2000 31 Sundancer cockpit sink sprayer. It doesn't work much these days. I'm sure I could replace with a single handled faucet. Has anyone done this? How do I gain access to underneath to secure the faucet to the sink deck?
Actually, the handle broke off. Would like the idea of a faucet instead of a sprayer. Just don't know how to access the plumbingGo to flounder pounder, Searayparts.com they have replacement spray handles for replacement. If that’s the problem if it’s just clogged.