58 Sedan Bridge Official Thread

DIMMING THE OVERHEAD DINETTE LIGHTS

DIMMING THE OVERHEAD DINETTE LIGHTS?

Has anyone tried that?

We have dimmers on one set of our saloon lighting, and on one of the light sets over the galley. Both of those sets are AC circuits with low-voltage converters somewhere along the way... and the light fixtures take the same 24VDC LEDs we've used on the DC lighting everywhere else. The dimmers on these circuits are Vimar Idea-series #VM16557 available from Imtra.

Product Search | Marine Products & Accessories | Imtra
Vimar Marine Switches | Cover Plates & USB Outlets | Imtra

The two lights over the dinette are 24VDC... and I don't find a Vimar dimmer compatible with 24VDC circuitry, let alone one from their Idea series that we have throughout our boat.

I also don't know where the low-voltage converter is in the AC circuit... but presumably it happens somewhere before the dimmer? Which means the dimmer would receiving 24V? 24V-ish? Would that be 24VDC or 24VAC? Or...?

How's that AC-to-low-voltage thing work? I've read AC dimmers and DC lighting aren't compatible, but... how did Sea Ray get there from here?

EDIT: Actually, I've only guessed that the low voltage is 24VDC. Our LEDs are rated for 10-30VDC, so I guess it those dimming light fixtures could be 12V instead of 24V.

Ideas? (sort of a pun...)

-Chris

Follow-up to the several previous posts (starting with above) on the topic...

Recently I noticed marinebeam.com has a back-pin G4 LED disc with built-in dimmer:
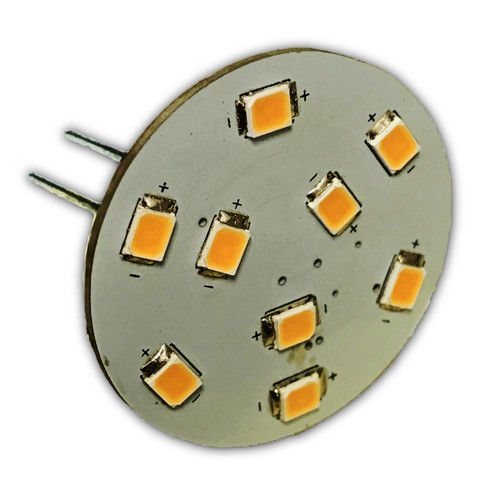
store.marinebeam.com

9-LED Back Pin G4 LED Bulb with Sequential Dimming

Replacement LED G4 bulb with step dimming capability without existing dimmer 12vdc 24vdc compatible warm white light high efficiency
store.marinebeam.com

Sure enough, they seem to work for our purposes. The earlier 10-LED disc we had installed over the dinette is rated at 150 lumens.

These new 9-LED discs are rated at 180/120/60 lumens, so the upper setting is slightly brighter and the lower two settings are both dimmer. All 9 LEDs light up first, then an OFF/ON at the switch changes them to 6 LEDs, then another OFF/ON changes them down to 3 LEDs.

The dimmest setting (60 lumens) isn't exactly as dim as you'd normally think of lights on a dimmer circuit, but its a good improvement. And the brightest setting (180 lumens) complements the 12-LED discs (170 lumens) that we have installed over the galley.

-Chris
 
DIMMING THE OVERHEAD DINETTE LIGHTS


Follow-up to the several previous posts (starting with above) on the topic...

Recently I noticed marinebeam.com has a back-pin G4 LED disc with built-in dimmer:

store.marinebeam.com

9-LED Back Pin G4 LED Bulb with Sequential Dimming

Replacement LED G4 bulb with step dimming capability without existing dimmer 12vdc 24vdc compatible warm white light high efficiency
store.marinebeam.com

Sure enough, they seem to work for our purposes. The earlier 10-LED disc we had installed over the dinette is rated at 150 lumens.

These new 9-LED discs are rated at 180/120/60 lumens, so the upper setting is slightly brighter and the lower two settings are both dimmer. All 9 LEDs light up first, then an OFF/ON at the switch changes them to 6 LEDs, then another OFF/ON changes them down to 3 LEDs.

The dimmest setting (60 lumens) isn't exactly as dim as you'd normally think of lights on a dimmer circuit, but its a good improvement. And the brightest setting (180 lumens) complements the 12-LED discs (170 lumens) that we have installed over the galley.

-Chris
Thanks for sharing this! Any issues with these running off the existing wiring? I feel like I have read that in order to switch to LED lights one would have to do all kinds of changes to wiring and such? Or is it this simple to swap out the bulb?
 
Any issues with these running off the existing wiring? I feel like I have read that in order to switch to LED lights one would have to do all kinds of changes to wiring and such? Or is it this simple to swap out the bulb?

This one is a simple swap. As are most, except in some dimming circuits.

The DRSA "Li'l Inagua" overhead light fixtures in this case are a bit fiddly -- springs holding the fixture to the ceiling, smaller springs holding the reflector to the lens -- but that's just a some "mechanical" details to address.

In most cases, an LED swap is straightforward... with only some attention necessary to deal with potential polarity issues. (If the new LED doesn't light, turn it around.)

In some dimming circuits, it depends on what kind of dimmer is in the wiring. Sometimes the circuit needs one remaining incandescent bulb, sometimes not... and sometimes there's some flicker issues possible. (Dimmer tutorial on the DRSA website, last I saw... or maybe it was on the marinebeam site...)

-Chris
 
This one is a simple swap. As are most, except in some dimming circuits.

The DRSA "Li'l Inagua" overhead light fixtures in this case are a bit fiddly -- springs holding the fixture to the ceiling, smaller springs holding the reflector to the lens -- but that's just a some "mechanical" details to address.

In most cases, an LED swap is straightforward... with only some attention necessary to deal with potential polarity issues. (If the new LED doesn't light, turn it around.)

In some dimming circuits, it depends on what kind of dimmer is in the wiring. Sometimes the circuit needs one remaining incandescent bulb, sometimes not... and sometimes there's some flicker issues possible. (Tutorial on the DRSA website, last I saw.)

-Chris
Some of the Galley and Solon lighting is low voltage AC. The wall switches are 120V AC and they turn on and off the transformers. At least true on my 52DB. Did these lamps work on the AC circuits?
I put Marinebeam lamps which were not polarity sensitive in the AC lighting circuits and they seem to work just fine.

I don't know if these new self-dimming LEDs will work in the low voltage AC circuits. Ours in the galley and saloon already have dimmers on those circuits, so I saw no need to try.

The original LED discs we tried from marinebeam do work in the low voltage AC dimming circuits, though... mostly. Not entirely sure why they work at all, given they're rated for 10-30VDC, not AC at all...

Anyway, there are some places in the dimming settings on those two circuits that do show some flicker -- notably, ALL ON does flicker a little, but just below ALL ON is fine. I think we have a low voltage AC circuit in the master stateroom too, without dimmers, and the marinebeam LEDs work fine there, no flicker at all...

-Chris
AC is DC that flips polarity and varies voltage from zero to around 12 volts when doing it. The Marinebeam circuits, which makes their LED's the best, are not polarity sensitive and are current driven. So the flip flop that AC circuits do won't affect the LED operation. And, I suspect that as they are current driven the change in voltage will dampen the tendency to flicker. I have them in my AC lighting also and they work just fine.
I was curious on the self dimming ones you show.
 
I was curious on the self dimming ones you show.

Yeah, I didn't check those in any of the low voltage AC systems.

I'd assume they'd work with the ON/OFF switch as advertised... just guessing, though. Also dunno if there might be any intermediate brightness control also possible on one of the two low voltage AC dimming circuits.

-Chris
 
Any 58 Sedan Bridge owners with a FLIR thermal camera? I’m trying to find the best mounting location. I had a 420 SB before with a FLIR camera and it was mounted directly in front of the radar pedestal. The array was above the camera and I didn’t seem to have any issues with the radar. On the 58, if I mounted the FLIR in that way, I would have roughly 5 feet of hardtop in front of the camera. I want to make sure that I’m able to get good visibility out of the FLIR and not block the radar. anybody out there they can help? I really don’t want to add big bulky pedestals.
 
TNT Lift chocks for a dinghy/Jetski.

We have a Jetski that we would like tote around on short trips.

The boat only has one set of chocks that I can find, so we am likely going to have to buy another set.

Should I go to TNT or is there an aftermarket source?
 
TNT Lift chocks for a dinghy/Jetski.

We have a Jetski that we would like tote around on short trips.

The boat only has one set of chocks that I can find, so we am likely going to have to buy another set.

Should I go to TNT or is there an aftermarket source?
I got mine from GHS.

(855) 791-0128 ask for Rick.
 
RUDDER ANGLE INDICATOR SENSOR/GAUGE

RUDDER ANGLE SENSOR


Revisiting this again.

This VDO single-station unit seems to be compatible with the display gauge on the upper helm:


This VDO product is made by Veratron AG in Switzerland is a 12/24VDC unit (uses 24VDC on our boat), and uses a 10-180 Ohm resistance curve. Preliminary testing yesterday indicates it does control the display gauge as expected.

It doesn't include what VDA calls the "balance lever" -- the rod that connects the boat's rudder arm to the unit's "sensor lever" -- but I'm expecting I can re-use the original. I didn't actually try to complete the mounting yesterday (working on other projects), but I wanted to test for viability right away.

There are other similar white sensors, with various screw positions... some with a 0-190 Ohm resistance curve... and some much less expensive (although the $87 VDO price didn't seem unfair to me).

I mentioned KYS, earlier. I suspect that's a typo in the Parts Manual, maybe really meant to be KUS. One of the less expensive rudder angle sensors out there is from KUS. I don't find a current KUS display that matches ours, though. Also, I don't know if KUS existed in 2006; tank level gauges in our previous boats were from WEMA and that's now KUS.... but I don't know if that was an acquisition from a pre-existing KUS, or just a name change sometime after our previous 2002 boat was built.

-Chris

Looking at it yet again. <sigh>

I spoke too soon, earlier. The 10-180 Ohm VDO sensor does indeed move the needle on the existing display gauge, but... not perfectly. My earlier trial was only about whether the display needle moved, and I hadn't thought to confirm it would actually work across the full range of rudder swing.

And it doesn't. In our installation, it'll move the display needle full starboard, but not full port... and roughly center on the sensor isn't roughly center on gauge.

So... this time I dismounted and removed the old sensor, then checked its resistance levels. Looks like 0-90 Ohms or maybe ~7-90 Ohms) and I'm not finding any single station 0-90 Ohm sensors out there. VDO has a 0-90 but it's for dual stations.

Preliminary shopping suggests KUS Sea V 2" analog gauges -- black face and stainless 316 bezel available -- may be a close visual match to the "black chrome" (bezel?) cited in the Parts Manual for the "Prestige" fuel gauges. And then that would likely work with the VDO sender, or KUS pairs it with their own 0-190 Ohm sender that looks similar to the VDO unit.

And then if its too much visual clash with the original fuel gauges, I'd guess maybe possible to swap those displays out too with a new KUS Sea V equivalent. Latter assumes the original displays are either 10-180 or 240-33 Ohm units, so original fuel level senders (wherever they are) wouldn't have to be changed too.

I think when we get back home, I'll have another go at the rudder angle sensor, swap the display to the KUS unit, and at the same time measure resistance for the fuel gauges... to know whether swapping those for 2" KUS black/black stainless units might work or not.

-Chris
 
LOCKED OUT!

Our sliding glass door lock failed, recently… horrible timing because friends had been visiting and needed to get inside to retrieve their stuff so they could leave on schedule.

And it turns out there’s no other graceful way to get inside the boat. Forward hatch? Mean breaking stuff, with leaks until fixed. Side windows? More breakage, more leaks. Through engine room? We could maybe do that on our previous boat – through day hatch from the cockpit and then up through one of the saloon hatches (never tried) – but there’s no way to do that on this boat.

We were able to get a locksmith out, relatively quickly, and he was (we were) eventually able to force the door apart from the jamb to be able to lift the latch and slide the door open. Then he sprayed the latch opening with WD-40. And of course then he charged us an arm and a leg. (Said because of risk breaking the door, then becoming liable for that.) Uh, huh. And I exacerbated that by automatically adding a 20% tip (knee-jerk) to the already exhorbitant bill. Duh!

We haven’t been able to recreate the problem, since then… but we’re not locking the door until we get it sorted.

So since then, I’ve been trying to learn about lock stuff. Ours are Schwepper brand “mortise latches” designed to work with “locking cylinders.”

The symptom was that the key would continually rotate 360 degrees, we think without moving the tab… and the locked handle wouldn’t lift the latch to disengage. The key spinning had begun to happen earlier, occasionally, but always seemed to correct itself after a few backward or forward key rotations. When the actual lockout event happened, no amount of key rotation in either direction had any affect at all.

I haven’t done exact measurements yet, but the parts are Schwepper’s GSV 3801 SZ or similar (a “for cylinder” model) and a GSV 391 or similar locking cylinder. Views available to schwepper.com/en or at thebrassworksinc.com (the U.S. distributor for Schwepper locks):

Store (schwepper.com)

The Brassworks Inc – The Brass Works, Inc. – Suppliers of quality non-ferrous (Brass and Stainless Steel) Locks and Hardware for the Marine Industry.

Some of the best info, though, has come from some YouTube videos, once I figured out enough of the jargon to be able to search a bit better:

Simple steps in changing a cylinder lock | Screwfix (youtube.com)

How to replace a Euro Cylinder Lock (youtube.com)

Euro Lock Removal and Snapping (youtube.com)

(picking 603) Reassembling a full euro cylinder lock with plug follower & pinning shoe (youtube.com)

Our sliding door assembly is from Taylor Made, and it seems to me somebody here suggested a new sliding glass door would be in the neighborhood of $7k or some such. Taylor Made told me a lockset replacement, their part #5101780, would be $2268.80.

My contact at The Brass Works Inc told me the fault we experienced might be because the “actuator” (the cylinder part that turns) may be wearing out, or maybe wasn’t lubricated. Yep, certainly wasn’t lubricated. And WD-40 not recommended. Yep, knew that. Can’t tell yet, about the “wearing out” part. He also said we could send ours to them and they could disassemble/examine/repair… or we could buy a new one. I don’t know prices for each yet, but it might be that the locking cylinders go for something in the neighbor hood of $90 or so. If so, we might prefer a new cylinder, since that might offer slightly more confidence than a rebuilt one.

We're not worrying this one further until we get back home, I’m still working on inventing an emergency entrance tool…

-Chris
 
Chris-

Mine has done that “spinning” before, but usually working the key up and down will allow it to grab.

We’ve been at the Yacht Club now for three years and it’s fairly secure, and since we leave the boat in the water over the winter, I leave the door unlocked in case they have to get in and start the generator in a freeze/shore power loss situation

A couple of years ago, when I checked with Taylormade, they wanted $3600 for the lock set and didn’t have any available anyway. When Taylormade told me $3600 – I told him I don’t need the whole door just the lock set! LOL!

I’m tied up this morning, but I’ll look in my records and see if my part number that I had for the Lock said is the same as yours.

I would think you could just remove the whole thing, and take it to locksmith and have him rebuild it – I would at least hope that!
 
This happened to us on a cruise. Somehow the lock was engaged and when my wife came out to join me on the bridge, her last protocol was to slide the door shut. We arrived two hours later and got tied up. The dog was inside looking out like it’s time for shoreside relief. Damn, the door won’t open - it’s locked. Key is sitting on the galley counter.

Anyway, after calling a locksmith on a Friday night from a town 45 minutes away, he arrived and said those locks are like Fort Knox. He couldn’t get it to open.

All the sudden, my buddy cruising with us on his boat appears inside my salon with a big smile on his face. He discovered that by standing gently on the plastic “buttons” on the foredeck deck hatch, he could pivot his foot the quarter turn it took to release the hatch dawgs. So as long you don’t deploy those little blue clips on the inside hatch handles, you can turn them from outside and gain entry.
 
I would think you could just remove the whole thing, and take it to locksmith and have him rebuild it – I would at least hope that!

Yep, I think that's exactly what The Brass Works guy intends, although not exactly "local".


All the sudden, my buddy cruising with us on his boat appears inside my salon with a big smile on his face. He discovered that by standing gently on the plastic “buttons” on the foredeck deck hatch, he could pivot his foot the quarter turn it took to release the hatch dawgs. So as long you don’t deploy those little blue clips on the inside hatch handles, you can turn them from outside and gain entry.

Ahhh!!!!! Excellent! I'll undo our locking clips there!!! Thanks!!!!

-Chris
 
He discovered that by standing gently on the plastic “buttons” on the foredeck deck hatch, he could pivot his foot the quarter turn it took to release the hatch dawgs. So as long you don’t deploy those little blue clips on the inside hatch handles, you can turn them from outside and gain entry.

Ha! Unleash the dawgs!

That worked. Ours had been locked, but I unlocked the blue clips -- and slightly turned the handles so the clips can't fall back into their locking raceway...

And then went outside to test. I didn't fully unlock one, but I turned it enough to prove the concept!

Thanks again!!

-Chris
 
LOCKED OUT!

Our sliding glass door lock failed, recently… horrible timing because friends had been visiting and needed to get inside to retrieve their stuff so they could leave on schedule.

And it turns out there’s no other graceful way to get inside the boat. Forward hatch? Mean breaking stuff, with leaks until fixed. Side windows? More breakage, more leaks. Through engine room? We could maybe do that on our previous boat – through day hatch from the cockpit and then up through one of the saloon hatches (never tried) – but there’s no way to do that on this boat.

We were able to get a locksmith out, relatively quickly, and he was (we were) eventually able to force the door apart from the jamb to be able to lift the latch and slide the door open. Then he sprayed the latch opening with WD-40. And of course then he charged us an arm and a leg. (Said because of risk breaking the door, then becoming liable for that.) Uh, huh. And I exacerbated that by automatically adding a 20% tip (knee-jerk) to the already exhorbitant bill. Duh!

We haven’t been able to recreate the problem, since then… but we’re not locking the door until we get it sorted.

So since then, I’ve been trying to learn about lock stuff. Ours are Schwepper brand “mortise latches” designed to work with “locking cylinders.”

The symptom was that the key would continually rotate 360 degrees, we think without moving the tab… and the locked handle wouldn’t lift the latch to disengage. The key spinning had begun to happen earlier, occasionally, but always seemed to correct itself after a few backward or forward key rotations. When the actual lockout event happened, no amount of key rotation in either direction had any affect at all.

I haven’t done exact measurements yet, but the parts are Schwepper’s GSV 3801 SZ or similar (a “for cylinder” model) and a GSV 391 or similar locking cylinder. Views available to schwepper.com/en or at thebrassworksinc.com (the U.S. distributor for Schwepper locks):

Store (schwepper.com)

The Brassworks Inc – The Brass Works, Inc. – Suppliers of quality non-ferrous (Brass and Stainless Steel) Locks and Hardware for the Marine Industry.

Some of the best info, though, has come from some YouTube videos, once I figured out enough of the jargon to be able to search a bit better:

Simple steps in changing a cylinder lock | Screwfix (youtube.com)

How to replace a Euro Cylinder Lock (youtube.com)

Euro Lock Removal and Snapping (youtube.com)

(picking 603) Reassembling a full euro cylinder lock with plug follower & pinning shoe (youtube.com)

Our sliding door assembly is from Taylor Made, and it seems to me somebody here suggested a new sliding glass door would be in the neighborhood of $7k or some such. Taylor Made told me a lockset replacement, their part #5101780, would be $2268.80.

My contact at The Brass Works Inc told me the fault we experienced might be because the “actuator” (the cylinder part that turns) may be wearing out, or maybe wasn’t lubricated. Yep, certainly wasn’t lubricated. And WD-40 not recommended. Yep, knew that. Can’t tell yet, about the “wearing out” part. He also said we could send ours to them and they could disassemble/examine/repair… or we could buy a new one. I don’t know prices for each yet, but it might be that the locking cylinders go for something in the neighbor hood of $90 or so. If so, we might prefer a new cylinder, since that might offer slightly more confidence than a rebuilt one.

We're not worrying this one further until we get back home, I’m still working on inventing an emergency entrance tool…

-Chris
Here's what I have in my files on our sliding door:

I believe our Taylor Made door part # is 7031050007

Taylor Made sells a replacement door lock set # 5101780. That agrees with upu.
 
I believe our Taylor Made door part # is 7031050007

Taylor Made sells a replacement door lock set # 5101780. That agrees with upu.

Yep, I have 5101780 for the $$$$ lockset replacement kit. Confirmed just recently by the nice Taylor Made lady. Includes plates and levers...

Our door part number is apparently 7031050006. Which may explain the technical differences in the way yours works (I think you said earlier that you've got that vertical rod thing... we don't have).

-Chris
 

Forum statistics

Threads
113,186
Messages
1,428,161
Members
61,095
Latest member
380Thumper
Back
Top