I saw this on FB. Very nice boat sir.
Thank you. She's been very good to us. Gonna be a little sad to see her go.
Follow along with the video below to see how to install our site as a web app on your home screen.

Note: This feature currently requires accessing the site using the built-in Safari browser.

I saw this on FB. Very nice boat sir.
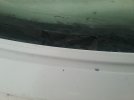
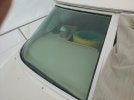
Those plastic pieces are where a lot of water get by, when I did mine I took them out. I left them in then resealed around them and after sealant dried sprayed with hose and water seeped by them so I took them all out and and resealed where they were and everything was fine. I ran a strip of tape around glass, in enough so trim would hide it and filled in with a solid bead up to where the trim pushes in to metal frame and smoothed with my finger then removed tape. I removed all the old sealant down to foam that glass sits on then all new sealant with new rubber trim. I think the plastic pieces were to keep glass in place when made till original sealant dried.Resealing leaking windshield per ZZ13 instructions he has posted and hoping ZZ will chime in here. Po had irregular globs of goo smeared under the weatherstrip trim. Removing it with sharp putty knive and a razor.
Pic below shows outer corner of starboard side. Note the hard rubber block at the edge of the glass. These are about every foot around the glass. Where the glass is close to the metal frame they are almost completely over the glass. Here where there is a large cap they barely touch the glass. I don't know their function but plan to leave them alone.
As there is about 3/4 of an inch gap between the glass and the frame I not sure if I should run a normal size bead of the Dow 795 at the glass edge and another at the frame edge, or multiple passes, or one big glob from the glass edge to the frame edge. Any feedback would be most welcomed.
For anyone planing to do this ZZ s posts on resealing are really helpful.
Ps I promise more pics to follow.
Those blocks actually held the glass in place when it was first installed (at least I assumed that) before they sealed it up. I left mine in as well. Some of mine were angled up rather than flat. I shaved down the excess sticking up so they wouldn’t push up against the new rubber trim.Resealing leaking windshield per ZZ13 instructions he has posted and hoping ZZ will chime in here. Po had irregular globs of goo smeared under the weatherstrip trim. Removing it with sharp putty knive and a razor.
Pic below shows outer corner of starboard side. Note the hard rubber block at the edge of the glass. These are about every foot around the glass. Where the glass is close to the metal frame they are almost completely over the glass. Here where there is a large cap they barely touch the glass. I don't know their function but plan to leave them alone.
As there is about 3/4 of an inch gap between the glass and the frame I not sure if I should run a normal size bead of the Dow 795 at the glass edge and another at the frame edge, or multiple passes, or one big glob from the glass edge to the frame edge. Any feedback would be most welcomed.
For anyone planing to do this ZZ s posts on resealing are really helpful.
Ps I promise more pics to follow.
I think this is worthy of a new thread under the Diesel Engines/Drive/Transmission/Props section. I think it will get a lot more traction as many of us have these same era Westerbekes. The whole line from about 5Kw to 15Kw are about the same, and I try to keep up with what others are experiencing, as I'm likely to see the same in the not too distant future.Westerbeke btd8, I’ll try here first before starting a new thread as I expect many of us have this unit with a single remote switch on the searay panel for start/stop. This week thatcabin on/off switch decided after regular remote shutdown it would keep its little green light on. Normally after a period of a few seconds after shutdown it goes off. So it’s as if whatever that process is that switches the cabin switch indicator off , is for some reason not executing. I can get around it by either turning off the generator with the on/off switch on the back of the actual generator, then turn back on again . Or by pretending to restart the generator from the remote switch in the cabin, i.e just flicking it on for a half second. That ‘time out’ does turn off the indicator. I changed the oil and filter and anode this week, and had the valve cover off, but didn’t touch any electrical stuff. Thoughts appreciated.
I just cut to fit. No extra length. I mitered the corners and smoothed a line of black sealant over the miter to bind them together. I had no problem making nice cuts with the utility knife. You can’t even tell the sealant is there. Then I filled the underside of the mitered corner with sealant to glue both pieces of trim to the window to hold it in place over time. Been a little over 9 years now and no shrinkage. At the nine year mark the factory trim was severely shrunk off the corners. My boat is out in the sun and weather 24/7. If you want I can post a picture of one of my corners.As promised attached are pic of our progress. Have removed all of old mess of caulking in pic 1 and close up in pic two. Apparently PO just sqeezed globs of caulk under the trim. Plan to cut trim to size before caulking then add a day afterward.
How much should trim be cut long to allow for shrinkage? Best tool? First practice cuts with box cutter were not pretty. Going to try kitchen shears next.
THEE best tool for cutting that is aviation snips. I use them for tons of thick trim pieces of various types.I haven't done this job but cutting rubber in the past I've used as you say shears, whether kitchen or garden or even metal cutting shears should work. My screen has been done sometime in the past, I know this because the trim that wraps around the bottom internally (port side) I removed last week and it's rotted out under the vinyl, yet I have no leaks. I have to get some bendy ply and make a new one somehow. Some hack used sealant to stick the inner vertical trims back up as the xmas tree clips were not holding. I'm in the process of both replacing xmas tree clips which is quite laborious , drilling the old ones out, gluing in new ones, hoping they will hold. As we are messing with the same part of the boat am watching your posts closely.