Beautiful and I like how CSR is on your tv in the pic!!!! Suck up!!! Great craftsmanship :thumbsup:
Navigation
Install the app
How to install the app on iOS
Follow along with the video below to see how to install our site as a web app on your home screen.

Note: This feature currently requires accessing the site using the built-in Safari browser.
More options
You are using an out of date browser. It may not display this or other websites correctly.
You should upgrade or use an alternative browser.
You should upgrade or use an alternative browser.
Teaking a 420 DA
- Thread starter jrirvine1
- Start date

IanBat
New Member
- Nov 19, 2011
- 2,297
- Boat Info
- Pro Tournament 36' 1999
- Engines
- Twin Cummins 5.9L 370hp B Series
I'm impressed, that really looks good
- Aug 17, 2010
- 1,160
- Boat Info
- 2005 Cruisers Yachts 500 Express
Zodiac Yachtline 340DL w/ Yamaha 40 hp
- Engines
- Twin 715 hp Volvo D12s with V-Drives
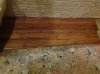
It gladdens my heart to see that floor. Makes me think I should have gone with teak instead.....
Dale
Dale
BritLady
Active Member
- Jul 30, 2011
- 2,424
- Boat Info
- 2006 - 340 SeaRay Sundancer, Garmin 840XS GPS & Garmin 7401XS GPS
2019- Zodiac 300 RIB Dink 10'- 5"
- Engines
- Inboard 8.1 Horizon Mercruiser & 2015 6HP Tohatsu O/B.
Wow, looks excellent, great job!
Tomco
Active Member
- Aug 16, 2012
- 455
- Boat Info
- 2004 420 Sedan Bridge
GHS Hydraulic Lift
11' Walker Bay, 30hp
- Engines
- Cummins 6CTA 8.3M
Very nice Jim ... thanks for posting the materials used and links - this is one upgrade on my bucket list and I'll use yours for reference.
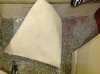
Just one question - in the aft cabin where you still have carpet on the vertical panels, did you do anything special where it meets the wood flooring? looks like you just kept the wood floor snug upagainst the carpeted panel.
/Tom
Just one question - in the aft cabin where you still have carpet on the vertical panels, did you do anything special where it meets the wood flooring? looks like you just kept the wood floor snug upagainst the carpeted panel.
/Tom
jrirvine1
Member
Very nice Jim ... thanks for posting the materials used and links - this is one upgrade on my bucket list and I'll use yours for reference.
Just one question - in the aft cabin where you still have carpet on the vertical panels, did you do anything special where it meets the wood flooring? looks like you just kept the wood floor snug upagainst the carpeted panel.
/Tom
Tom, the flooring is cut tight to the existing carpeted seat panels and baseboard, as I did not want to use any moldings that would have cluttered up the lines. As a rule, wood flooring should not be cut absolutely tight to anything. Typically is necessary to provide for some expansion that will prevent buckling of the product. In this case the carpet does provide some measure of an expansion joint.
Southpaw II
Active Member
You did a great job. Do we have a title for "Administrator of Flooring"? This would be it.
Don
Don
HUMPH
Well-Known Member
- Nov 4, 2009
- 7,618
- Boat Info
- 2003 410DA
2009 Walker Bay 13’
- Engines
- CAT 3126TA's 350HP/
50HP Honda
Just saved this again as it was a thread I was looking for. Sitting with the Admiral contemplating this move as a winter project. I am afraid my cockpit will look like that this winter...
stephens013
Active Member
- Oct 8, 2009
- 756
- Boat Info
- 2001 510 Sundancer
1997 400DA Sundancer
1994 Chaparel 310 Signature
- Engines
- 3196 Cat; 660 PHP
3116 Cat; 340 PHP
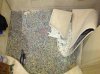
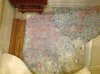
Very impressive job. I changed my carpet out two years ago and as you mentioned; getting the old stuff unglued was a major challenge. The SeaRay folks used way more glue than anyone would imagine. I used a heat gun and putty knife with notable success.
Have a question; after I removed all the old carpet and glue my floor was dimpled up fiberglass. I momentarily considered doing something along the lines of a wood product or even the simulated teak but worried about the extreme texture and level of raw fiberglass deck. Did you have to use a leveling agent or sand before applying you flooring?
Once again; nice work.
jrirvine1
Member
Very impressive job. I changed my carpet out two years ago and as you mentioned; getting the old stuff unglued was a major challenge. The SeaRay folks used way more glue than anyone would imagine. I used a heat gun and putty knife with notable success.
Have a question; after I removed all the old carpet and glue my floor was dimpled up fiberglass. I momentarily considered doing something along the lines of a wood product or even the simulated teak but worried about the extreme texture and level of raw fiberglass deck. Did you have to use a leveling agent or sand before applying you flooring?
Once again; nice work.
The decking was somewhat irregular and anything but smooth. I considered using an underlayment, but did not want to create problems by raising the floor around the cabinets, under the pull out couch and under the pocket doors. The adhesive chosen does fill small voids quite nicely and did act as both adhesive and leveling agent. I recommend installing several pieces of flooring with the adhesive as test samples before proceeding with the entire floor.
HUMPH
Well-Known Member
- Nov 4, 2009
- 7,618
- Boat Info
- 2003 410DA
2009 Walker Bay 13’
- Engines
- CAT 3126TA's 350HP/
50HP Honda
I am preparing to do a similar upgrade but instead of cutting the hatches, I am looking to hinge them as Jim did and use gas assist struts like what is on the transom locker. The admiral wants me to try completing the wood floor without framing the hatches. She wants the seamless look like on some of the newer boats. Am I crazy to try without framing the hatches? Also, I am planning on using an air hammer with a sharpened chisel to make it easier to get through the old glue. After carpet removal, a flooring glue removal chemical will help me get to the base fiberglass covered wood. When I have everything ready to go I will start a thread and post as I go.The decking was somewhat irregular and anything but smooth. I considered using an underlayment, but did not want to create problems by raising the floor around the cabinets, under the pull out couch and under the pocket doors. The adhesive chosen does fill small voids quite nicely and did act as both adhesive and leveling agent. I recommend installing several pieces of flooring with the adhesive as test samples before proceeding with the entire floor.
ziekman@cox.net
Active Member
I don't know how I missed this thread the first go-around, but I'm glad it was resurrected, so I could appreciate the great post, and spectacular project. Thanks, Jim. I would love to do this.
katricol
Active Member
How is the floor holding up Jim "carissima"??
jrirvine1
Member
Flooring is holding up nicely – a light cleaning is all that is needed for maintenance. My only issue is that the family has grown in dramatic fashion since the install and I need to figure out how to add 2 additional state rooms and 1 more head. (Pictures to follow)
Jim if you pull that off can you make my boat a 420 DB with cummins? Pleeeeeeease?Flooring is holding up nicely – a light cleaning is all that is needed for maintenance. My only issue is that the family has grown in dramatic fashion since the install and I need to figure out how to add 2 additional state rooms and 1 more head. (Pictures to follow)
HUMPH
Well-Known Member
- Nov 4, 2009
- 7,618
- Boat Info
- 2003 410DA
2009 Walker Bay 13’
- Engines
- CAT 3126TA's 350HP/
50HP Honda
Jim, Can you respond to my hatch question?I am preparing to do a similar upgrade but instead of cutting the hatches, I am looking to hinge them as Jim did and use gas assist struts like what is on the transom locker. The admiral wants me to try completing the wood floor without framing the hatches. She wants the seamless look like on some of the newer boats. Am I crazy to try without framing the hatches? Also, I am planning on using an air hammer with a sharpened chisel to make it easier to get through the old glue. After carpet removal, a flooring glue removal chemical will help me get to the base fiberglass covered wood. When I have everything ready to go I will start a thread and post as I go.
techmitch
Well-Known Member
- May 1, 2008
- 8,384
- Boat Info
- 1999 270 DA
- Engines
- Twin 4.3s W/Alpa I Gen II's
Hey Ken, I have one of these and highly recommend it. This price is excellant (I paid almost 3 X this when they first cameout} and bet it will make short time of your carpet removal with that wide blade.

http://www.propertyroom.com/l/snapon-air-scraper/9098682
http://www.propertyroom.com/l/snapon-air-scraper/9098682
HUMPH
Well-Known Member
- Nov 4, 2009
- 7,618
- Boat Info
- 2003 410DA
2009 Walker Bay 13’
- Engines
- CAT 3126TA's 350HP/
50HP Honda
Thanks, I'll look into one of those immediately!
jrirvine1
Member
Jim, Can you respond to my hatch question?
You want me to answer if you are crazy? I thought this was a rhetorical question. (just kidding)
The hatches can be constructed without a frame, but they may not look finished when open, as you will see the cut edge of the flooring. The trim I made is like an outside "L" corner and provides a clean look.
The air hammer may work if the blade is almost razor sharp. Most of these tools are made for the removal of ceramic tile, VCT or other similar products. The carpet has a fiber backing (not sure if it is jute or polyester) and the fibers seem to be imbedded in the adhesive SeaRay used. A sharp tool is needed to cut the carpet loose from the adhesive.
Not certain you need to do the chemical glue removal. If you scrape the surface and rough it slightly the flooring will adhere exceptionally well. of course using those chemicals in confined space will require a good canister type respirator.
I thought about using the gas struts, but the few I looked at limited the opening of the hatches to less than 90 degrees.
HUMPH
Well-Known Member
- Nov 4, 2009
- 7,618
- Boat Info
- 2003 410DA
2009 Walker Bay 13’
- Engines
- CAT 3126TA's 350HP/
50HP Honda
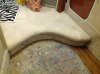
Well, I went and did it! I wanted to try a test area so I went for the floor in the mid berth. Came up in one piece! Turns out that I have carpet pad under the carpet so the pad is the part I have to scrape off. Easier than carpet I am assuming? I took the hatches home and took out 372,000 staples and will head down this weekend to strip the remaining carpet and pad. I will be trimming the hatches so I'll pick up some material for that this week also. Time to have some blades sharpened, make sure the marina is cool with my upcoming noise and off we go! I am also looking at straightening the curved floor outside of the aft head. Bad design that causes the need to step down and back up to access the head from the cabin. It will also make the transition piece much easier to build!
Attachments