

jrirvine1
Member
http://s214.photobucket.com/albums/cc210/jrirvine/Boat Flooring/?albumview=slideshow
For the past three seasons, I have wanted to replace the carpeting in the master cabin, salon and aft cabin with teak flooring. For reasons that presently escape me, I recently did find the motivation to tackle the project and jotted down a few random, rambling notes and musings to accompany pictures of the install.
Flooring selected: http://www.uafloors.com/AsianTeak.htm
This manufacturer was selected because the material is a prefinished engineered floor (plywood) with a relatively thick face layer and a very durable finish applicable for commercial and high traffic area uses. The manufacturer claims that the flooring can be sanded and refinished one time, should this become necessary. This type of product is preferred over solid wood as it will be much more dimensionally stable and also eliminate the need for most onsite finishing. The application of the product, below decks on a boat, over resin coated wood substrate is not within the design specifications for use of the material, however, I think this is the best possible choice for the given extreme changes in temperature and humidity that will occur in this environment. If you choose to do a project such as this, it should be noted that the engineered flooring manufacturers likely will not provide warranty for what they would consider an atypical install. I suspect this to be the case as I did call them to explain what my intended use was to be and could they recommend an adhesive. For whatever reason, they did not get back to me regarding this inquiry.
Removal of the existing carpet was an unexpectedly difficult chore as the glue used to adhere it to the deck would not surrender to the most determined brute force attack. The situation certainly provoked some choice comments directed at the original installers, a certain political party that was likely responsible and then directly at the daunting task at hand, so clearly a new tactic was needed. I found that the best technique for removal was to take a standard 16” flat pry bar and sharpen the end on a grinder to a razor sharp edge. Sliding the sharpened bar under the carpet would cut and release the bond enabling the carpet to be removed in large pieces.
After carpet removal, the substrate, which is resin covered plywood, needed further attention to remove carpet / glue residue and to provide an acceptable surface for the flooring adhesive. This was best accomplished using a variety of sharp long handled floor scrapers. Power sanding here is ill advised as the heat generated by the sanding will make a sticky mess out of the remaining carpet adhesive. I also briefly considered installing a 3/8” birch underlayment over the existing deck but decided against this knowing that modern adhesives would be up to the task of adhering wood to the fiberglass.
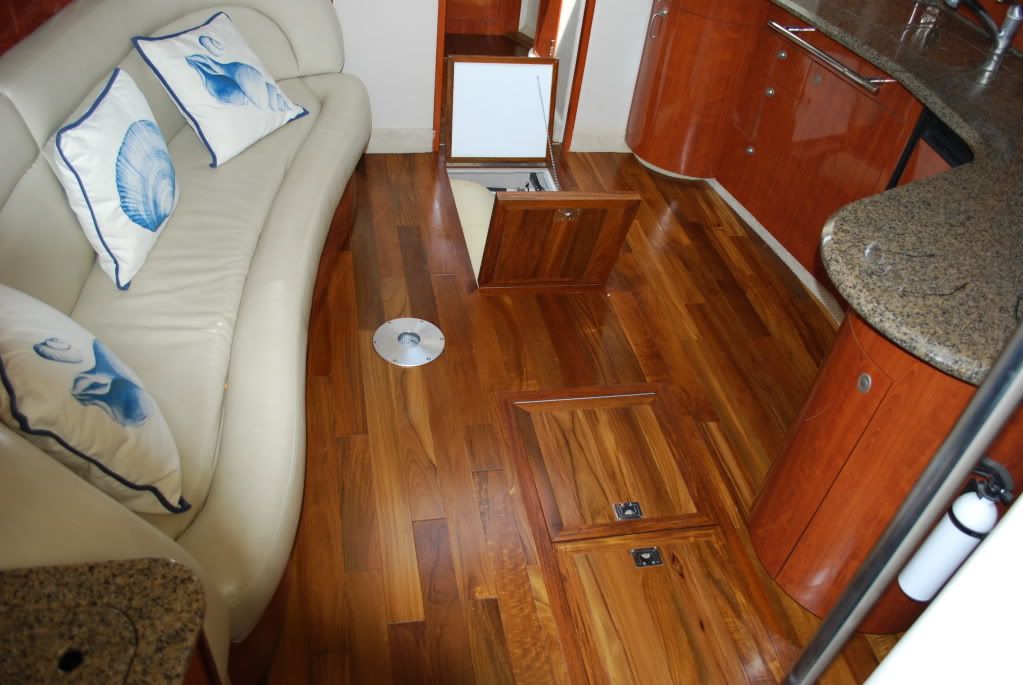
Regarding the floor hatches, there are two schools of thought here as to how to approach installing the flooring around these areas. One would be to blend the openings into the new flooring and make them disappear as much as possible - a minimalist design. The other is to treat or celebrate them as a design element and show off in a utilitarian way what can not be hidden. I chose the latter approach. The hatches were removed, resized slightly, cut in half and converted to doors. I made these units completely off site in the same manner that one would make pre-hung doors or perhaps a cabinet face frame with inset cabinetry doors – only stronger because we do not typically walk on our cabinetry.
The trim features were an issue. All pre-finished flooring manufactures do have matching trim profiles for their flooring such as nosing, T’s, reducers, shoe and various other shapes. The problem is that they become cost prohibitive when the project requires an abundance of these specialty pieces. For example, one piece of matching nosing 6’ long costs about $80, making the cost of all needed trim actually exceed the total cost of the flooring. Also, many of the stock trims would not work here as I wanted the install to be flush throughout without any raised trim or hardware features. The solutions was to purchase S4S 5/4 teak at a fair price and make all the trims. The finish was fairly easy to match as the flooring has a natural finish. Minwax Helmsman satin spar varnish provided an acceptable job here.
The flooring product is made for a glue down application although it can also be blind staple applied. The question then became what would be the best adhesive and application method to use over a substrate that is not within the product application specs. After a few tests with some scrap flooring I chose this adhesive:
http://www.loctiteproducts.com/p/12...VANCED-Polyurethane-Construction-Adhesive.htm
The flooring manufacturers recommend a urethane based adhesive that is trowel applied. I was not interested in this application and instead wanted to apply the adhesive using a caulking gun. The reasoning here is that this work is what I like to refer to as fussy. That is, there is much more time involved in cutting and fitting the pieces than time spent actually installing them. This being the case, it then becomes necessary to spread only small amounts of adhesive in the direct work area rather than trowel out large sections.
So what does all this cost? I would shy away from square foot prices here as so much of the cost is in trim features, hardware, hatch fabrication, with the flooring coming in at about half the total material cost. But for those curious as to total cost perhaps these numbers may be of some assistance. Total materials: flooring, trim, hardware, glue, finish = about $1,000 or about $11/sf.
Labor: (priceless) I have no real time estimate of how long this project took as it was completed very gradually over several months, whenever the time was available, it was not too cold for the adhesive and the mood was right.
As a final note, should anyone be considering such a project, I would be terribly remiss if I were to not very respectfully suggest that the skill level required for something like this is without question several notches above the “handyman” level. This is not to say that many talented “do it yourselfers” on CSR couldn’t handle this project. This is just my crude attempt, using the only vehicle available, to tactfully offer up a dose of reality and perhaps a bit of caution as well. Overall, I did enjoy the install (after the annoying carpet was removed) and when in the zone doing the work it did provide a source of good karma.
For the past three seasons, I have wanted to replace the carpeting in the master cabin, salon and aft cabin with teak flooring. For reasons that presently escape me, I recently did find the motivation to tackle the project and jotted down a few random, rambling notes and musings to accompany pictures of the install.
Flooring selected: http://www.uafloors.com/AsianTeak.htm
This manufacturer was selected because the material is a prefinished engineered floor (plywood) with a relatively thick face layer and a very durable finish applicable for commercial and high traffic area uses. The manufacturer claims that the flooring can be sanded and refinished one time, should this become necessary. This type of product is preferred over solid wood as it will be much more dimensionally stable and also eliminate the need for most onsite finishing. The application of the product, below decks on a boat, over resin coated wood substrate is not within the design specifications for use of the material, however, I think this is the best possible choice for the given extreme changes in temperature and humidity that will occur in this environment. If you choose to do a project such as this, it should be noted that the engineered flooring manufacturers likely will not provide warranty for what they would consider an atypical install. I suspect this to be the case as I did call them to explain what my intended use was to be and could they recommend an adhesive. For whatever reason, they did not get back to me regarding this inquiry.
Removal of the existing carpet was an unexpectedly difficult chore as the glue used to adhere it to the deck would not surrender to the most determined brute force attack. The situation certainly provoked some choice comments directed at the original installers, a certain political party that was likely responsible and then directly at the daunting task at hand, so clearly a new tactic was needed. I found that the best technique for removal was to take a standard 16” flat pry bar and sharpen the end on a grinder to a razor sharp edge. Sliding the sharpened bar under the carpet would cut and release the bond enabling the carpet to be removed in large pieces.
After carpet removal, the substrate, which is resin covered plywood, needed further attention to remove carpet / glue residue and to provide an acceptable surface for the flooring adhesive. This was best accomplished using a variety of sharp long handled floor scrapers. Power sanding here is ill advised as the heat generated by the sanding will make a sticky mess out of the remaining carpet adhesive. I also briefly considered installing a 3/8” birch underlayment over the existing deck but decided against this knowing that modern adhesives would be up to the task of adhering wood to the fiberglass.
Regarding the floor hatches, there are two schools of thought here as to how to approach installing the flooring around these areas. One would be to blend the openings into the new flooring and make them disappear as much as possible - a minimalist design. The other is to treat or celebrate them as a design element and show off in a utilitarian way what can not be hidden. I chose the latter approach. The hatches were removed, resized slightly, cut in half and converted to doors. I made these units completely off site in the same manner that one would make pre-hung doors or perhaps a cabinet face frame with inset cabinetry doors – only stronger because we do not typically walk on our cabinetry.
The trim features were an issue. All pre-finished flooring manufactures do have matching trim profiles for their flooring such as nosing, T’s, reducers, shoe and various other shapes. The problem is that they become cost prohibitive when the project requires an abundance of these specialty pieces. For example, one piece of matching nosing 6’ long costs about $80, making the cost of all needed trim actually exceed the total cost of the flooring. Also, many of the stock trims would not work here as I wanted the install to be flush throughout without any raised trim or hardware features. The solutions was to purchase S4S 5/4 teak at a fair price and make all the trims. The finish was fairly easy to match as the flooring has a natural finish. Minwax Helmsman satin spar varnish provided an acceptable job here.
The flooring product is made for a glue down application although it can also be blind staple applied. The question then became what would be the best adhesive and application method to use over a substrate that is not within the product application specs. After a few tests with some scrap flooring I chose this adhesive:
http://www.loctiteproducts.com/p/12...VANCED-Polyurethane-Construction-Adhesive.htm
The flooring manufacturers recommend a urethane based adhesive that is trowel applied. I was not interested in this application and instead wanted to apply the adhesive using a caulking gun. The reasoning here is that this work is what I like to refer to as fussy. That is, there is much more time involved in cutting and fitting the pieces than time spent actually installing them. This being the case, it then becomes necessary to spread only small amounts of adhesive in the direct work area rather than trowel out large sections.
So what does all this cost? I would shy away from square foot prices here as so much of the cost is in trim features, hardware, hatch fabrication, with the flooring coming in at about half the total material cost. But for those curious as to total cost perhaps these numbers may be of some assistance. Total materials: flooring, trim, hardware, glue, finish = about $1,000 or about $11/sf.
Labor: (priceless) I have no real time estimate of how long this project took as it was completed very gradually over several months, whenever the time was available, it was not too cold for the adhesive and the mood was right.
As a final note, should anyone be considering such a project, I would be terribly remiss if I were to not very respectfully suggest that the skill level required for something like this is without question several notches above the “handyman” level. This is not to say that many talented “do it yourselfers” on CSR couldn’t handle this project. This is just my crude attempt, using the only vehicle available, to tactfully offer up a dose of reality and perhaps a bit of caution as well. Overall, I did enjoy the install (after the annoying carpet was removed) and when in the zone doing the work it did provide a source of good karma.
")
