

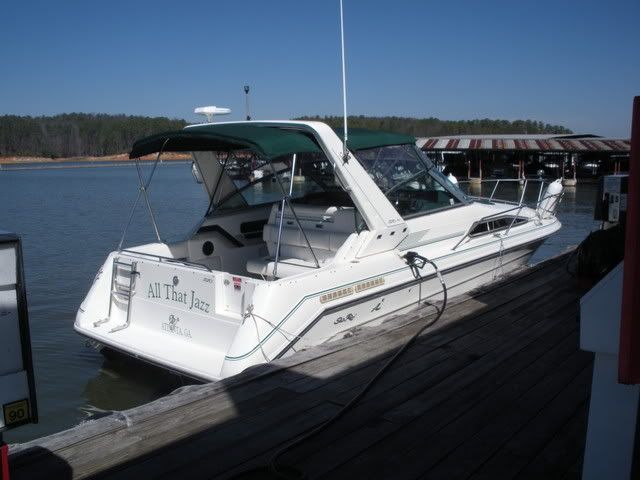
We bought this boat seven years ago because it is a great layout for a trailerable boat. Since then we have made a few mods:
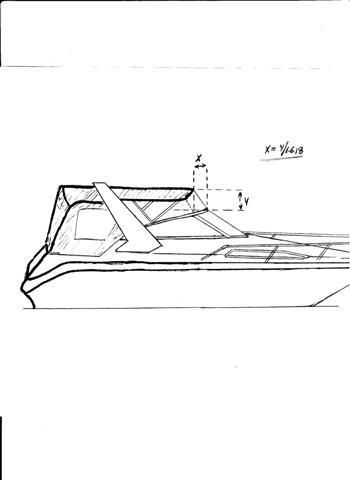
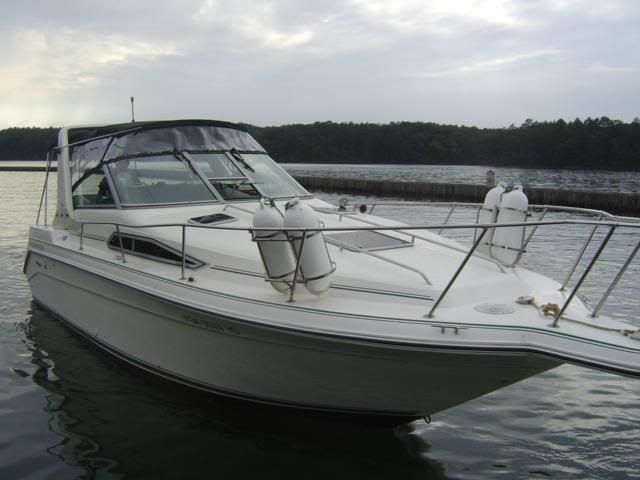
Top re-configured from a Convertible to a Bimini. Gives a better view, more air flow and I believe a little bit of an updated look. First, I traced an outline from a picture of the boat and then drew in what I wanted the top to look like. One issue is where the new top should stop. For that, I applied the golden ratio as you will see in the sketch below:

Also, I had to move the mast light from the middle of the windshield to the top of the radar arch. I discarded the old light, ran the wires up the arch and attached to a new mast light. Additional SS framework had to be made for the new top configuration. The front rail is permanent, so, zippers were put in the top pockets so that it can be folded back or removed. An eisenglass windscreen and side windows had to be fabricated:

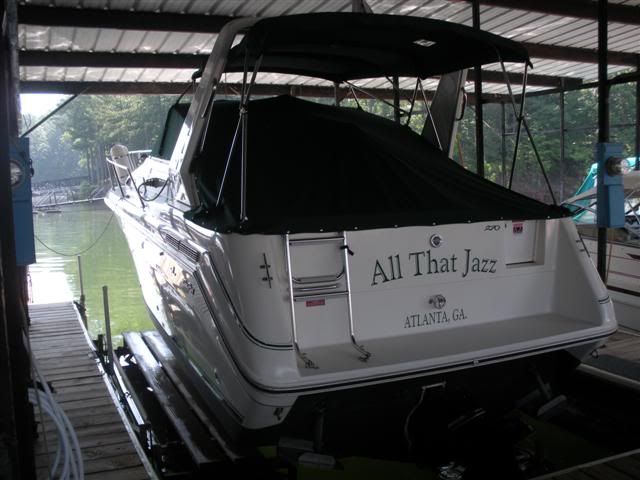
Next, since I had a new top configuration, I could have a full, over the winshield, cockpit cover fabricated.
Also had eisenglas "windows" put in the aft part of the top for the lights in the arch:
Next was replacement of the am/fm cass. radio with a xm ready radio and 6-disc cd player. Owners of these models know that the radio is in a shelving unit. The radio was placed in the unit with a open shelf below it. I filled the whole space by cutting a piece of maple(?) and then covering it with Black Formica. I then cut out for the radio and CD player:
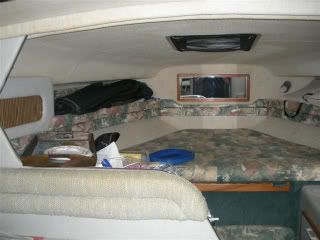
The old interior materials had to go, so we re-did everything in outdoor (sunbrella) type of fabrics. (Sorry about all of the pillows - wife, you know):
Old Interior:
New Interior:

New Dash Panels (2/2011)

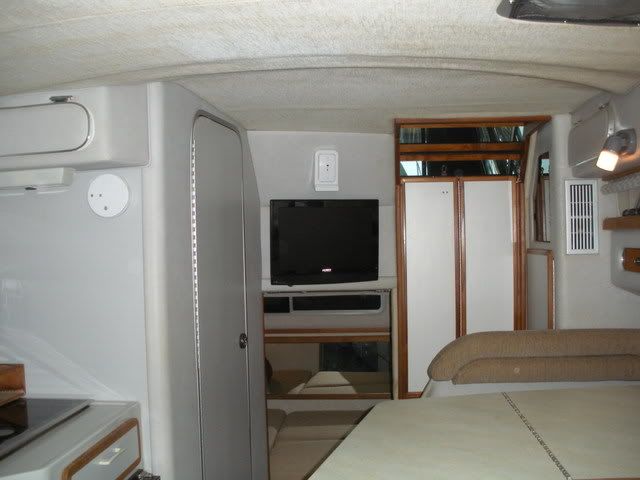
I just completed an install of a new TV/DVD player and Shakespeare SeaWatch 2025 antenna.
This is my system:
-Naxa 19” TV/DVD player.
-Articulating VESA wall mount
-Shakespeare SeaWatch 2025 Antenna
-Shakespeare 4365 Straight antenna mount
Naxa TV: Digital HD with built in DVD player. Comes with two power cords. One cord is for 12VDC and has an accessory plug on it. The other cord is for 120VAC and has a “brick” on it. I used the 12VDC cord, cutting the accessory plug off and direct wireing it to a 12V source. (Note: there is a fuse built into the accessory plug, so if you do as I did, you have to add a fuse in the power source line.
SeaWatch 2025 antenna: This antenna comes with an rf pre-amp. The pre-amp can be purchased separately for about 100 bucks.
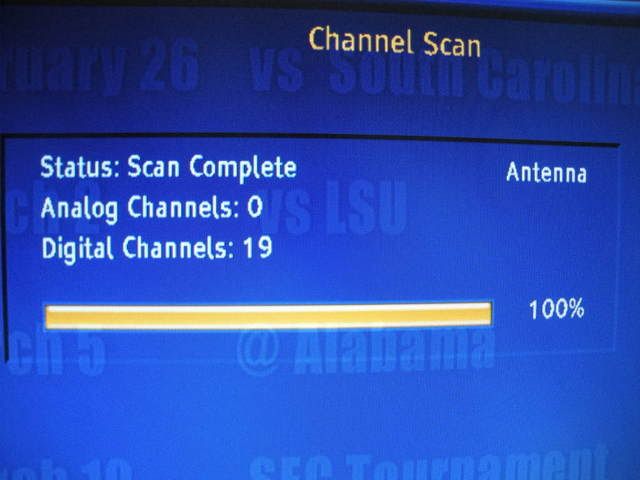
My results: I first hooked the antenna cable directly to the TV and then took the boat out in the lake and did a channel scan. I was able to lock in nine (9) channels. Next, I wired in the rf pre-amp and took the boat out to the same spot in the lake. With the pre-amp I was able to lock in nineteen (19) channels. For reference purposes, I am on a lake which I would guess is about 30 miles out of Atlanta, GA and 40 miles from Rome, GA. I appear to be picking up all of the Atlanta and Rome stations. (Of course, reception is dependent on location)

Top re-configured from a Convertible to a Bimini. Gives a better view, more air flow and I believe a little bit of an updated look. First, I traced an outline from a picture of the boat and then drew in what I wanted the top to look like. One issue is where the new top should stop. For that, I applied the golden ratio as you will see in the sketch below:
Also, I had to move the mast light from the middle of the windshield to the top of the radar arch. I discarded the old light, ran the wires up the arch and attached to a new mast light. Additional SS framework had to be made for the new top configuration. The front rail is permanent, so, zippers were put in the top pockets so that it can be folded back or removed. An eisenglass windscreen and side windows had to be fabricated:
Next, since I had a new top configuration, I could have a full, over the winshield, cockpit cover fabricated.
Also had eisenglas "windows" put in the aft part of the top for the lights in the arch:
Next was replacement of the am/fm cass. radio with a xm ready radio and 6-disc cd player. Owners of these models know that the radio is in a shelving unit. The radio was placed in the unit with a open shelf below it. I filled the whole space by cutting a piece of maple(?) and then covering it with Black Formica. I then cut out for the radio and CD player:
The old interior materials had to go, so we re-did everything in outdoor (sunbrella) type of fabrics. (Sorry about all of the pillows - wife, you know):
Old Interior:
New Interior:
New Dash Panels (2/2011)
I just completed an install of a new TV/DVD player and Shakespeare SeaWatch 2025 antenna.
This is my system:
-Naxa 19” TV/DVD player.
-Articulating VESA wall mount
-Shakespeare SeaWatch 2025 Antenna
-Shakespeare 4365 Straight antenna mount
Naxa TV: Digital HD with built in DVD player. Comes with two power cords. One cord is for 12VDC and has an accessory plug on it. The other cord is for 120VAC and has a “brick” on it. I used the 12VDC cord, cutting the accessory plug off and direct wireing it to a 12V source. (Note: there is a fuse built into the accessory plug, so if you do as I did, you have to add a fuse in the power source line.
SeaWatch 2025 antenna: This antenna comes with an rf pre-amp. The pre-amp can be purchased separately for about 100 bucks.
My results: I first hooked the antenna cable directly to the TV and then took the boat out in the lake and did a channel scan. I was able to lock in nine (9) channels. Next, I wired in the rf pre-amp and took the boat out to the same spot in the lake. With the pre-amp I was able to lock in nineteen (19) channels. For reference purposes, I am on a lake which I would guess is about 30 miles out of Atlanta, GA and 40 miles from Rome, GA. I appear to be picking up all of the Atlanta and Rome stations. (Of course, reception is dependent on location)
Antenna Pros and Cons: I liked that the cable is fed to the antenna thru the antenna mounting pipe to the center of the antenna. This helps to shield the connector from the elements. I did not like that Shakespeare provided four (4) carriage bolts and lock nuts to secure the antenna to the mount. I would suggest that you purchase four(4) 1/4”x1” SS bolts and flat washers and use them instead of the carriage bolts. This is because the carriage bolt heads mate into the plastic female counterpart on the antenna mount and the plastic can easily be stripped out when trying to tighten down the bolts. Eliminate the problem up front by getting rid of the carriage bolts.
Rf per-amp Pros and Cons: Pro:It can be wired for 12VDC or 120VAC operation. It can give you up to 20db gain and it does work! When it is on, it automatically selects the antenna as it's signal source. When turned off, it automatically selects dockside cable as it's signal source. It can be purchased separately and added to an existing antenna system. Con: It is large, unsightly and limited as to where it can be located. I would suggest to Shakespeare that they make a model that separates the gain control, on/off switch and indicator light out from the rf pre-amp. That way the rf pre-amp could be made a “black box” and mounted out of sight. The controls could then be be mounted on small face plate and mounted where they are convenient to the operator.
Pictures:
Here is the procedure to make that "bushing" install to make your job look neat:
Ok, you have to bring TV cable and a power cord thru that upholstered panel that the TV is mounted to. As you know, that makes a messy hole in the panel. To make that as clean as possible, I put a bushing in the hole to dress it up and to protect the wires.
Details:
- After deciding on the location, I drilled a small pilot hole.
- Then, I stuck the point of a 1" spade drill bit in the pilot hole and turned it while I made a trace of the circle. (You, of course, could do that with a compass)
- Using a sharp knife, I cut around the circle and removed the vinyl and backing material.
- Then, I drilled a 1" hole in the panel.
- I bought a bushing (specifics below) and forced it into the hole.
- Looks good, no ragged upholstry edges and the wires are protected.
Specifics on the bushing:
- Home Depot SKU# 34481 06262 2
3/4" PVC Adapter (Electrical Dept)
ID is 3/4", OD is 1 1/16".
(So, you have to wiggle the spade drill around a little and tap the bushing in with a hammer
- Home Depot SKU# 34481 06262 2
3/4" PVC Adapter (Electrical Dept)
ID is 3/4", OD is 1 1/16".
(So, you have to wiggle the spade drill around a little and tap the bushing in with a hammer
Last edited:


