480 DB Owners Club

So, still working on rainwater leaks. Before I tackle the windshield I thought I would caulk all the obvious places that the caulking was lacking, so here is what I'm currently doing:
50973150271_3569775b47_o.jpg

The top red arrow is obvious that it needs replacing (as well as the bottom arrow, but there is a question, below).

The bottom of the two ancient caulk lines up close:
50973150261_5eb4f2d5fc_o.jpg

Yeah, so I need to scrape that out and replace it. Seems to be actual caulk or putty (not silicone), because it is messy under the crust.

BUT HERE IS THE ACTUAL QUESTION: Should that caulk extend all the way around the the boat above the windshield? I don't see any evidence of antique caulking. (The lower area between the two fiberglass panels.)
50973254927_e20b37677e_o.jpg

Please don't judge the dirtiness, I moor under a very active flight path. NAS Oceana

Hi SeadawgVB, not sure if anyone responded - My 2001 480 DB Sedan bridge (which looks very similar in configuration/build) has caulking all the way around this joint - hope that helps
 
Excellent - Thanks Seadawg - much appreciated. The drawings are very helpful
I will wait for summer (November here in WA), remove as much caulking as possible and I am thinking of removing or partially removing the broken 'retaining clips' that show signs of leaking; and re-caulk (3M Window-Weld Super Fast Urethane, Black); and then replace the seal (#8319400).
I will post some photos etc
Thanks again mate - much appreciated
I would see if there is something better than 3M window Weld. I have used this a couple times after digging out. It seems to never fully cure as the layering is quite think (once you dig everything out). I am jot sure what would be better. But it you boat in an area that is calm, it might work. BTW it is super messy.
 
I would see if there is something better than 3M window Weld. I have used this a couple times after digging out. It seems to never fully cure as the layering is quite think (once you dig everything out). I am jot sure what would be better. But it you boat in an area that is calm, it might work. BTW it is super messy.
Thanks mquiet - I will do some more searching - much appreciated
 
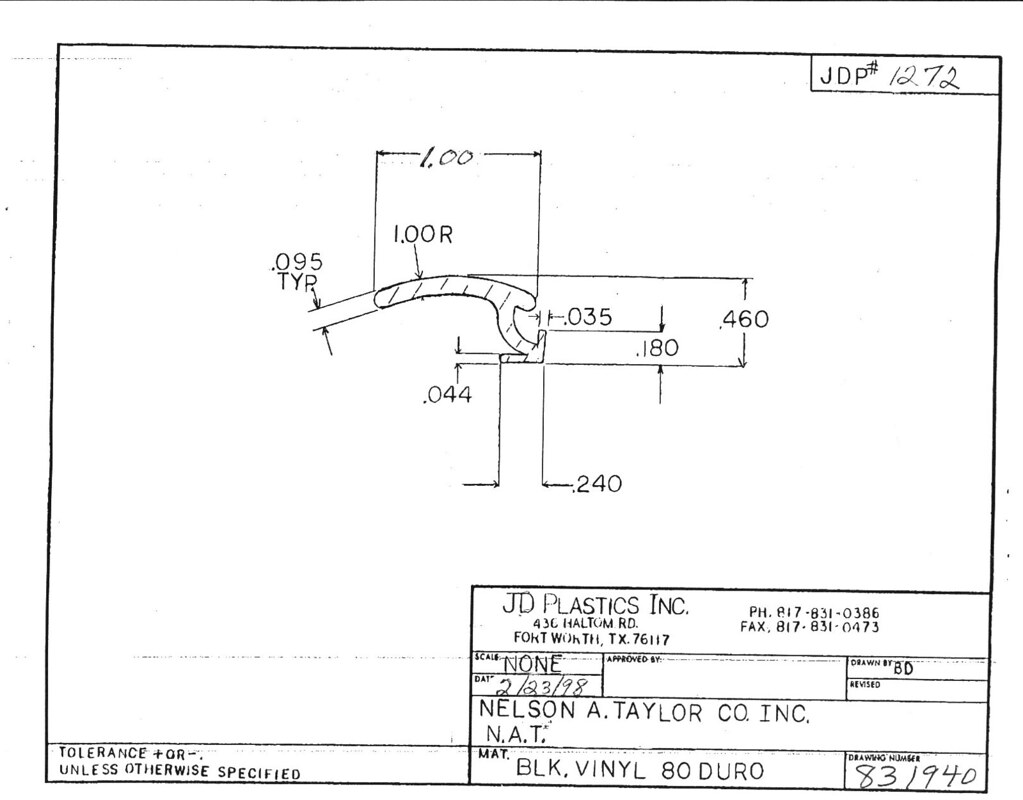
Here is the drawing for the visible vinyl trim piece. I bought some a few weeks back and is still available.

51322233109_85a2218934_b.jpg


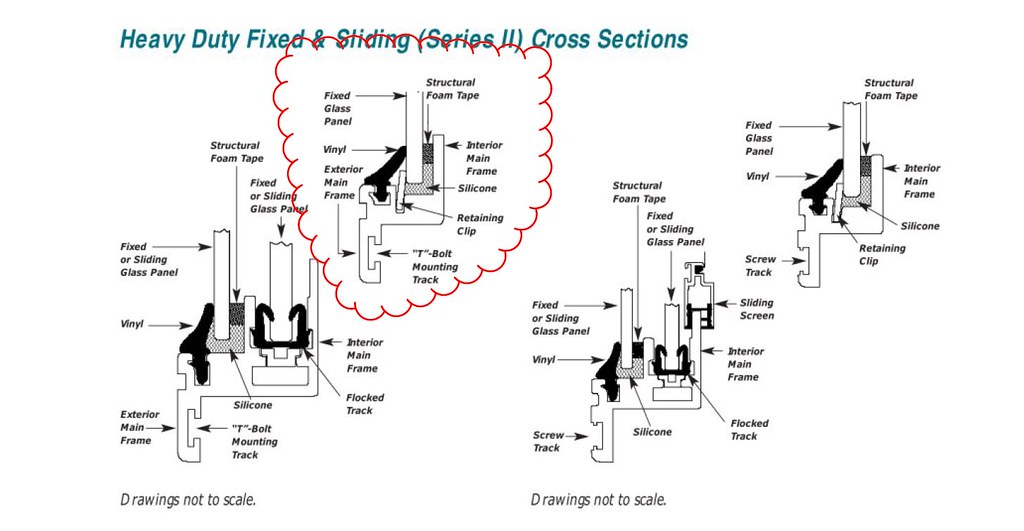
Here is a section of a flyer that shows a cross section of how our windows are installed. Our windshield is circled in red.

51320779617_1e90f7ff36_b.jpg

Hi Dave, thank you for posting this. I also have a leak and looking to replace the screw cover. You say in your post that you purchased some a few weeks ago, was that through Taylormade or a dealer?
thanks,
Joe
 
I
Hi Dave, thank you for posting this. I also have a leak and looking to replace the screw cover. You say in your post that you purchased some a few weeks ago, was that through Taylormade or a dealer?
thanks,
Joe
I bought it direct thru Taylor Made Systems. My contact was Jenn VanAllen (JVanAllen(@)taylormadesystems.com) $3.20 per foot
 
I would see if there is something better than 3M window Weld. I have used this a couple times after digging out. It seems to never fully cure as the layering is quite think (once you dig everything out). I am jot sure what would be better. But it you boat in an area that is calm, it might work. BTW it is super messy.

Yeah, my boat is not always in calm water. I slammed across the Pamilco for three hours last week. But no current leak. The Chesapeake can get pretty bad at times as well.....

Might it cure if you apply in a couple of layers? My last application was 3M 4200 UV, I'm wondering how often I will need to recaulk.

PS, my leak was at the bottom of the starboard side windshield. The water traveled behind the trim piece. My first awareness was water dripping out of the light fixtures in the starboard side bunk room!
 
All three of mine have leaked. I am only fighting the middle now in the lower starboard side of it. We roll out in 6ft at 8s conditions ( real 6ft, as in...when we go into the trough the wave are equal to the flybridge) to go after mani and tuna. After a day on burying the bow those windows are not happy with me.
 
I have been trying to find the source of water entering the salon and wetting the carpet by the door. It happens after a rough ride when spray is hitting the port side or after washing the boat. Suppose rain also. I have tried to hose boat with helper and look for water in engine room looking up towards rub rail. Can't see anything. Anyone have water showing up as you step into salon? About an 1.5' circle of carpet getting wet right at the salon door. Not coming from the door or frame. When I wash, I don't spray the door or most times don't soak the cockpit. Anyone ever have water show up here and ideas of how it is coming in? Dave
 
I've been fighting the same thing and originally thought it was the trim around the bridge but it wasn't. I found that my salon A/C condensate pan drain was blocked and the pan was full and splashing out while running. Pull the hose off of the sump box in the bilge and see if the very tiny passage in the manifold is plugged.
 
The AC when installed inside the helm will do this. Clean out the drain line as mentioned. Unfortunately they did not seal the helm tightly and there are holes that water will work down. Usually you end up seeing it in the ceiling first.
 
Thanks, mquiet and quality time. I will check for both areas next time I am down at boat. Appreciate the suggestions.
 
Quality time... you were right. A/C drain line is clogged. Assuming it is coming from there. the plastic three hose manifold it attaches to on the outside of the drain box snapped off for the A/C drain, so just dripping into bilge. But it is clogged solid. Any idea where to get that plastic manifold piece? Thinking I need to replace the hose. I tried dry vac both directions and it is blocked real good. Can't even get to the drain pan hose. Might need to take some of A/C apart. Thanks for help. Dave
 
Quality time... you were right. A/C drain line is clogged. Assuming it is coming from there. the plastic three hose manifold it attaches to on the outside of the drain box snapped off for the A/C drain, so just dripping into bilge. But it is clogged solid. Any idea where to get that plastic manifold piece? Thinking I need to replace the hose. I tried dry vac both directions and it is blocked real good. Can't even get to the drain pan hose. Might need to take some of A/C apart. Thanks for help. Dave
Dave - I got a small plumber's snake from "China" (Harbor) Freight. I was able to unblock mine with that...
 
Quality time... you were right. A/C drain line is clogged. Assuming it is coming from there. the plastic three hose manifold it attaches to on the outside of the drain box snapped off for the A/C drain, so just dripping into bilge. But it is clogged solid. Any idea where to get that plastic manifold piece? Thinking I need to replace the hose. I tried dry vac both directions and it is blocked real good. Can't even get to the drain pan hose. Might need to take some of A/C apart. Thanks for help. Dave

Sorry for the late reply. I've never seen that manifold for sale and frankly think it's a bad design with such small passages. I'm thinking about adding a 90 degree thru hull fitting to the side of the box for the salon A/C pan drain and capping the manifold. I'm surprised they don't clog more often.
 
Sorry for the late reply. I've never seen that manifold for sale and frankly think it's a bad design with such small passages. I'm thinking about adding a 90 degree thru hull fitting to the side of the box for the salon A/C pan drain and capping the manifold. I'm surprised they don't clog more often.
I found the part number in Sea Ray parts... 1426857 which is a Rule 800 GPH Shower Drain System. Rule's old part number is RUL 98A which is obsolete. The new design and close replacement is the RUL 98B, but the input ports are a little bit different offset and not sure my hoses will reach or bend into the different locations. Not sure what I am going to do. Temporary might be to drill hole in top clear cover and drop a/c drain into it, so not to have it draining right there into the bilge... it is rusty colored water.
 
I have been trying to find the source of water entering the salon and wetting the carpet by the door. It happens after a rough ride when spray is hitting the port side or after washing the boat. Suppose rain also. I have tried to hose boat with helper and look for water in engine room looking up towards rub rail. Can't see anything. Anyone have water showing up as you step into salon? About an 1.5' circle of carpet getting wet right at the salon door. Not coming from the door or frame. When I wash, I don't spray the door or most times don't soak the cockpit. Anyone ever have water show up here and ideas of how it is coming in? Dave

Hi BigStick - From when I purchased our 480DB the carpets (and Port side internal panels) were water damaged. I found the blocked AC drain as others have mentioned; and also found that water was coming down through the 'inside cavity' where the 'hard top' joins the 'cabin' in the sedan bridge. This was due to the 'drain hole' being blocked by a piece of candy wrapped (I assume was a token of generosity - left by one of the assembly workers at the factory). The 'drain hole' is located outside, above the rear of the side window, directly below the Four Eighty badge on the join between the 'Top Section' or 'Sedan Bridge floor' and 'Lower Section' or 'Saloon Sidewalls' (there is a drain hole on both port and starboard sides). 'Drain holes' are only visible when looking up, underneath the 'Top Section'. Carpets were wet after rough ride/port side, heavy rains or wash down. External water enters 'inside' the cavity via deteriorated sealant/caulking around the sedan bridge (note: the inside edge of the joint - behind removable panel in sedan bridge had no sealant/caulking allowing external water to freely enter cavity). Due to blocked drain hole, water accumulates within the cavity and then flows down through the glad/opening and a compromised seal around DB AC drain hose, behind panels to 'saloon floor' near the Saloon AC, then flows under the cabinetry and carpet.
I only discovered the blocked drain hole(s) when I was investigating water damage and removed/replace Port side internal panels (see photos below).
Unfortunately, bad design means that these drain holes direct water to the vulnerable 'radius' area of the side window and creates havoc with the window seal and vinyl cover.
 

Attachments

  • Drain Hole.png
    Drain Hole.png
    903.8 KB · Views: 124
  • Carpet Damage.JPG
    Carpet Damage.JPG
    266.8 KB · Views: 111
  • DB AC drain.jpg
    DB AC drain.jpg
    205.6 KB · Views: 130
  • Panel Damage.jpg
    Panel Damage.jpg
    99.2 KB · Views: 129
  • Panels removed.jpg
    Panels removed.jpg
    105.1 KB · Views: 127
  • Rebuild Panels.jpg
    Rebuild Panels.jpg
    169.8 KB · Views: 123
  • Rebuilt.jpg
    Rebuilt.jpg
    110.7 KB · Views: 117
Hi All - has anyone identified the correct match and/or supplier for the veneer paneling on the cabinets/furniture. I have separation/cracking of the plastic of the veneer paneling on the cabinets/furniture (see photos below).
And/or any suggestions on a permanent fix
- has anyone replace veneer panels; and
- How did the vinyl wrap end up. I am interested to know if the parent material underneath the veneer is smooth enough to take just a vinyl wrap - or can it be sanded smooth?

So far I have PlayDate's earlier thread:
Different model years and different suppliers. Vitricor supplied laminate from the mid-90s to early 2003. Four different cherry finishes and a more than a few off cherry finishes near the end of the production run before they slid into insolvency.
and

LG111 https://restorationmarine.com/ they have many of the original cherry veneers Searay used during the late 90s early 00s.
and
https://www.fpmarine.com/ did have a couple of sheets listed 12 months ago - but seems to have been sold.
and
Some unfinished threads were hafnutz67 and creekwood were doing some vinyl wrap
and
just now saw very helpful http://www.clubsearay.com/index.php?threads/interior-delamination.92172/
dated Apr 20, 2019 from PlayDate - Feel free to email him at: john@restorationmarine.com
 

Attachments

  • IMG_2532.jpg
    IMG_2532.jpg
    81.4 KB · Views: 131
  • IMG_2533.jpg
    IMG_2533.jpg
    90.8 KB · Views: 121
  • IMG_2535.jpg
    IMG_2535.jpg
    127 KB · Views: 116
  • IMG_2537.jpg
    IMG_2537.jpg
    82.1 KB · Views: 110
Last edited:
Peter, that is some horrible cracking. Unfortunately I don't know of anyone producing that product anymore. Maybe remove, sand, and then use a wrap. Also, good job on the port side rebuild. It looks good. The corner cabinet looks much better than the original.
 

Forum statistics

Threads
113,236
Messages
1,429,054
Members
61,119
Latest member
KenBoat
Back
Top