NoThanksDad
New Member
- Jun 21, 2009
- 314
- Boat Info
- 330 Sundancer 1994
- Engines
- twin 5.7L Mercruiser w/ Alpha I drives
Thanks to many of you on this forum, I've decided to tackle this project on my own. :smt021
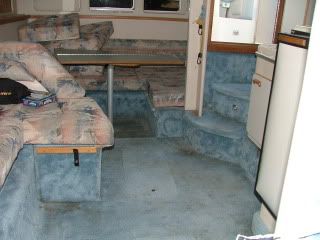
My wife and I have owned this boat for a few years now and have had a great time with her despite the "lovely" early 90's decor. While I'm sure the blue splash pattern that we've all seen was attractive to someone back then, it really gets on our nerves (not to mention - it's 16 years old). So for starters, we've decided to completely replace ALL the carpeting, completely re-upholster all the cushions, and lay a vinyl floor (wood look). While this project is still underway, I thought I would start this thread now that I've got much of the prep work done. While our boat currently sits in it's slip 1:45min away, I hope to have this project completed by the 2nd week in May.:lol:
I'll try the best I can to keep this logical in progression so anyone crazy enough to tackle this size job as their "first" can get a glimps into what they're in for...
A few quick facts about the floor. I chose to go with a 100% semi-rigid vinyl product that comes in planks like hard wood, and looks just the same. The flooring is called Dura Plank and was recommended to be by a friend that owns a flooring store. It's sort of a floating floor in the sense that you don't glue it to the deck directly. There is an underlayment (linoleum like) that you cut to fit (make a template - it's much easier that way). The underlayment simply gets rolled out onto the floor (no glue/no staples). You then apply the DuraCeramic DS100 adhesive directly to the underlayment and then put the pre-fit vinyl planks on the semi-dry adhesive. Once completely dry, the floor basically becomes one big piece. I chose to go in this direction to minimize moisture worries, and b/c it's not glued or nailed directly to the deck...I can always pull it up later and go in a different direction if I don't like how it performs.
Pre-work Picture taken from the steps looking forward

Pre-work Picture taken forward looking aft
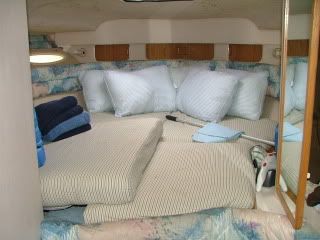
Pre-work V-Berth
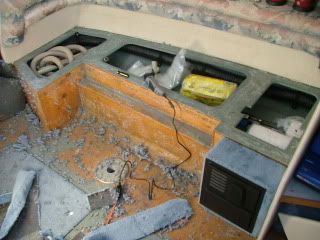
So we began by tearing out the old carpet. I read through MANY of the threads on this site prior to this step and feel VERY FORTUNATE that the original glue guy sniffed more of the marine adhesive than he actually used on the floor. The floor came up quite easily with the help of a Dremel Multi-max tool using a rigid scraper blade. The real PIA was the incredible number of staples used...there had to be millions. (note to anyone trying this - have a good pair of pliers handy)
Picture of the carpet removal process - there was carpeting over all the storeage areas you see with a ton of staples on the under side.
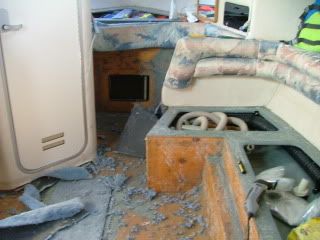
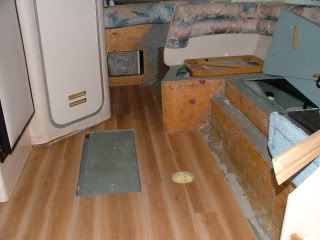
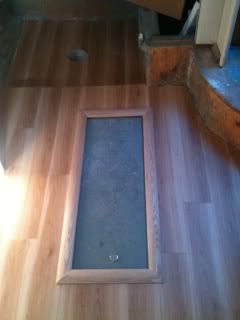
Once the carpet came up and everything got cleaned I noticed a good amount of rippling along the edges where the fiberglass needed leveling before any flooring could be installed. The picture below is one of those areas, although the picture really doesn't show the problem very well. The area to the right of the table base plate all along the edge of the bench seat area had a pretty significant valley prior to it angling up on the approx. 40 degree angle you see in the pic. You'll see the patched area in a later photo.
So the next step was to level out the areas that needed leveling, and I got a "quick drying" product from a friend of mine that owns a flooring store. Of course I can't think of the name right now so if anyone cares, send me a message and I'll ask him what I put down. After taking care of all the leveling areas I layed down uncut pieces of flooring to show the admiral what the finished product will look like. I went home for the day and returned again to begin the dry fitting of the flooring.
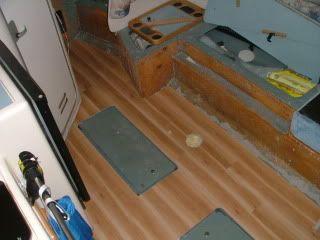
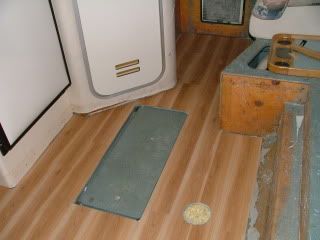
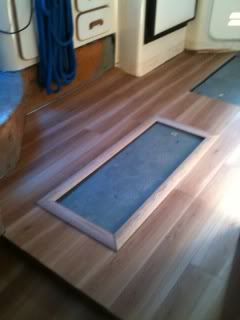
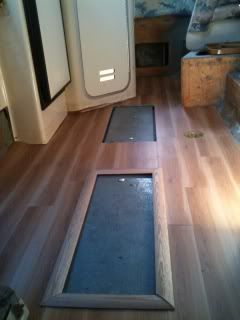
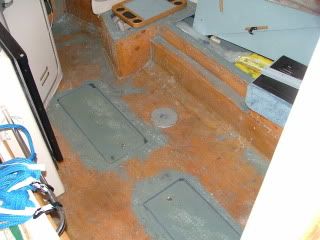
You can see the patch to the left in front of the galley area, in front of the entrance to the head, as well as the area I spoke about earlier at the base of the bench seat (the table base has been removed and will be re-installed over the finished floor.
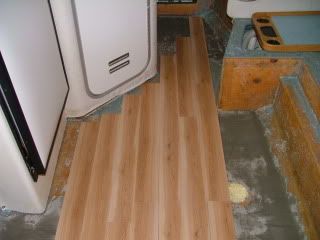
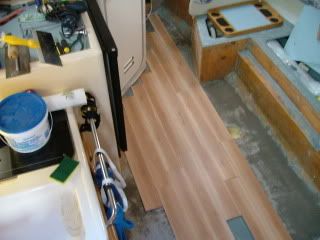
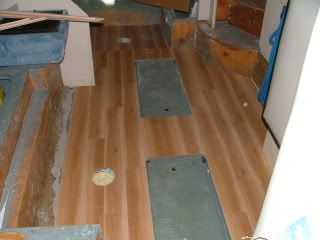
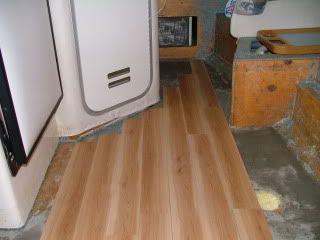
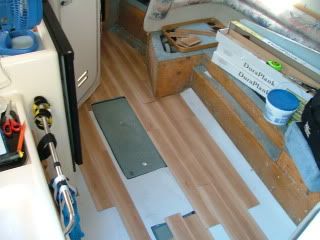
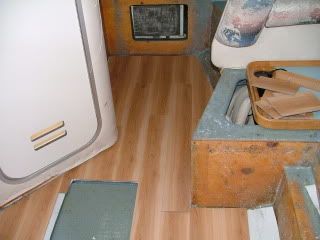
I didn't have much time on day three so I just made a template out of newspaper and some packing tape - I transferred the outline to the underlayment and cut it to fit. (actually worked out fairly well.) I then began dry fitting the floor which was fairly easy. The Dura Plank floor is a score and snap product that was surprisingly easy to work with. Below are a few pictures of the dry fit over the underlayment.
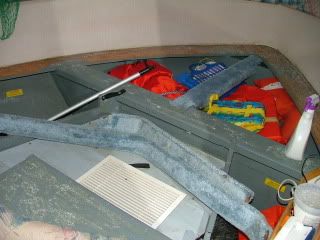
The plan is to take another vacation day this Thursday, and go glue the floor in place...more pic and info to follow. I think the carpeting we selected should be in the following week and my wife and I have begun the process of re-appolstering the cushions at home (pics of that process to follow as well)
Joe
My wife and I have owned this boat for a few years now and have had a great time with her despite the "lovely" early 90's decor. While I'm sure the blue splash pattern that we've all seen was attractive to someone back then, it really gets on our nerves (not to mention - it's 16 years old). So for starters, we've decided to completely replace ALL the carpeting, completely re-upholster all the cushions, and lay a vinyl floor (wood look). While this project is still underway, I thought I would start this thread now that I've got much of the prep work done. While our boat currently sits in it's slip 1:45min away, I hope to have this project completed by the 2nd week in May.:lol:
I'll try the best I can to keep this logical in progression so anyone crazy enough to tackle this size job as their "first" can get a glimps into what they're in for...
A few quick facts about the floor. I chose to go with a 100% semi-rigid vinyl product that comes in planks like hard wood, and looks just the same. The flooring is called Dura Plank and was recommended to be by a friend that owns a flooring store. It's sort of a floating floor in the sense that you don't glue it to the deck directly. There is an underlayment (linoleum like) that you cut to fit (make a template - it's much easier that way). The underlayment simply gets rolled out onto the floor (no glue/no staples). You then apply the DuraCeramic DS100 adhesive directly to the underlayment and then put the pre-fit vinyl planks on the semi-dry adhesive. Once completely dry, the floor basically becomes one big piece. I chose to go in this direction to minimize moisture worries, and b/c it's not glued or nailed directly to the deck...I can always pull it up later and go in a different direction if I don't like how it performs.
Pre-work Picture taken from the steps looking forward
Pre-work Picture taken forward looking aft
Pre-work V-Berth
So we began by tearing out the old carpet. I read through MANY of the threads on this site prior to this step and feel VERY FORTUNATE that the original glue guy sniffed more of the marine adhesive than he actually used on the floor. The floor came up quite easily with the help of a Dremel Multi-max tool using a rigid scraper blade. The real PIA was the incredible number of staples used...there had to be millions. (note to anyone trying this - have a good pair of pliers handy)
Picture of the carpet removal process - there was carpeting over all the storeage areas you see with a ton of staples on the under side.
Once the carpet came up and everything got cleaned I noticed a good amount of rippling along the edges where the fiberglass needed leveling before any flooring could be installed. The picture below is one of those areas, although the picture really doesn't show the problem very well. The area to the right of the table base plate all along the edge of the bench seat area had a pretty significant valley prior to it angling up on the approx. 40 degree angle you see in the pic. You'll see the patched area in a later photo.
So the next step was to level out the areas that needed leveling, and I got a "quick drying" product from a friend of mine that owns a flooring store. Of course I can't think of the name right now so if anyone cares, send me a message and I'll ask him what I put down. After taking care of all the leveling areas I layed down uncut pieces of flooring to show the admiral what the finished product will look like. I went home for the day and returned again to begin the dry fitting of the flooring.
You can see the patch to the left in front of the galley area, in front of the entrance to the head, as well as the area I spoke about earlier at the base of the bench seat (the table base has been removed and will be re-installed over the finished floor.
I didn't have much time on day three so I just made a template out of newspaper and some packing tape - I transferred the outline to the underlayment and cut it to fit. (actually worked out fairly well.) I then began dry fitting the floor which was fairly easy. The Dura Plank floor is a score and snap product that was surprisingly easy to work with. Below are a few pictures of the dry fit over the underlayment.
The plan is to take another vacation day this Thursday, and go glue the floor in place...more pic and info to follow. I think the carpeting we selected should be in the following week and my wife and I have begun the process of re-appolstering the cushions at home (pics of that process to follow as well)
Joe
")