Official 2003.5-2008 340 Sundancer Thread

Looking to put a JL subwoofer and JL XD 700 5v2 5 channel amp I'm my 2006 340 sundancer and need to knowhow to route the wire to sub and amp. Sub is on port side in front of seat.Going to put amp under salon bench seat.
Thanks for your help.

You'll need to take the closet apart in the aft cabin where the charger and vacuum are installed and start the wire run from there. You will see various lines that run aft to the bilge with copious amounts of silicone and with some effort you can get the wire into the bilge. On my install, I ended up going through the compartment that is behind the cockpit refrigerator, which required taking the plastic tub that the cooler sits in out as well. (PIA) Once the wire is in the bilge, you cross the beam and then fish the line through the starboard side.

If you remove the plastic compartment at the helm, you will see the major chase for the wiring going fore and aft. Again, fight your way through the copious amounts of silicone to get a wire fish into the bilge so that you can pull the wire into that compartment. Over the years, I have added several items to the boat which required running wires back and forth, so I eventually used a hole saw to drill a new hole rather than fighting with the silicone. Just make sure you seal it, as it forms a barrier against CO entering the cabin.

You can then fish the wire forward into the electrical panel and route it under the salon with relative ease.

To power the amp, I used 1/0 cable directly from the batteries to the amp.
 
I have the swim platform lights option on my 2007 340 (lights under platform). One of the glass broke and I need to replace. I like the lights but they are a bug magnet. Are there other lights I could install in their place that won't attract so many bugs?


Sent from my iPad using Tapatalk

Red lights don't attract as many bugs as blue....
 
Thanks so much for the tips. Going to be installing this project in the spring. Will be cutting hole for sub over the winter.
 
I'm looking at having a full transom graphic done for our new boat name. Does anyone have a breakdown or digital file of the transom including the trunk cutout, transom light, and power cable hole positions?
 
I owned a sign company in Woodbridge for 12 years, so I have a bit of experience with this one. There is a very easy way to accomplish what you are tying to do. Most sign shops use this on a regular basis. Find a small, 12" or so ruler, and tape it to the transom. Take a full transom photo from as straight on as you can. In your editing software, bring the ruler up to scale (1" on the ruler = 1" on your editing software). Build your design directly on top of the photo. It's not going to be absolutely perfect, so verify any critical measurements before printing/ cutting. There are templates available for most vehicles, but I was never able to find any boat transom templates. Even if you happen to find a template, I wouldn't trust SeaRay to be consistent in the positioning of holes. There seems to have been quite a bit of inconsistency in the construction of these boats during this era.
 
I owned a sign company in Woodbridge for 12 years, so I have a bit of experience with this one. There is a very easy way to accomplish what you are tying to do. Most sign shops use this on a regular basis. Find a small, 12" or so ruler, and tape it to the transom. Take a full transom photo from as straight on as you can. In your editing software, bring the ruler up to scale (1" on the ruler = 1" on your editing software). Build your design directly on top of the photo. It's not going to be absolutely perfect, so verify any critical measurements before printing/ cutting. There are templates available for most vehicles, but I was never able to find any boat transom templates. Even if you happen to find a template, I wouldn't trust SeaRay to be consistent in the positioning of holes. There seems to have been quite a bit of inconsistency in the construction of these boats during this era.
Thanks. After asking around I was directed to The Sign Shop. They apparently did the name on my last boat as the marina uses them. They already have have a template for a full transom but the more we are talking about it we are re considering name port and separate graphic.
 
Hello. Was looking to get a prop knocker tool to remove my props for reconditioning and balancing and need to know what size to get if anyone has used one of these before. I have a 2006 340 sundancer with 8.1 mercruisers with v drives. I believe the shafts are 1 1/2 "

thanks,Eddie
 
The stock location is next to the port side passenger seat, which in my opinion looked to easy to damage with both physical damage and UV. I went with 4 larger speakers in the stock cockpit locations and what a difference. Super easy to enlarge the openings. I clearly did not need a subwoofer just a better amp. The bass these put out was incredible. I was almost kicked out of a marina for a dance party we were having on the boat one night while traveling.

http://www.crutchfield.com/p_136MX770CW/JL-Audio-MX770-CCX-CG-WH.html?tp=61755
 
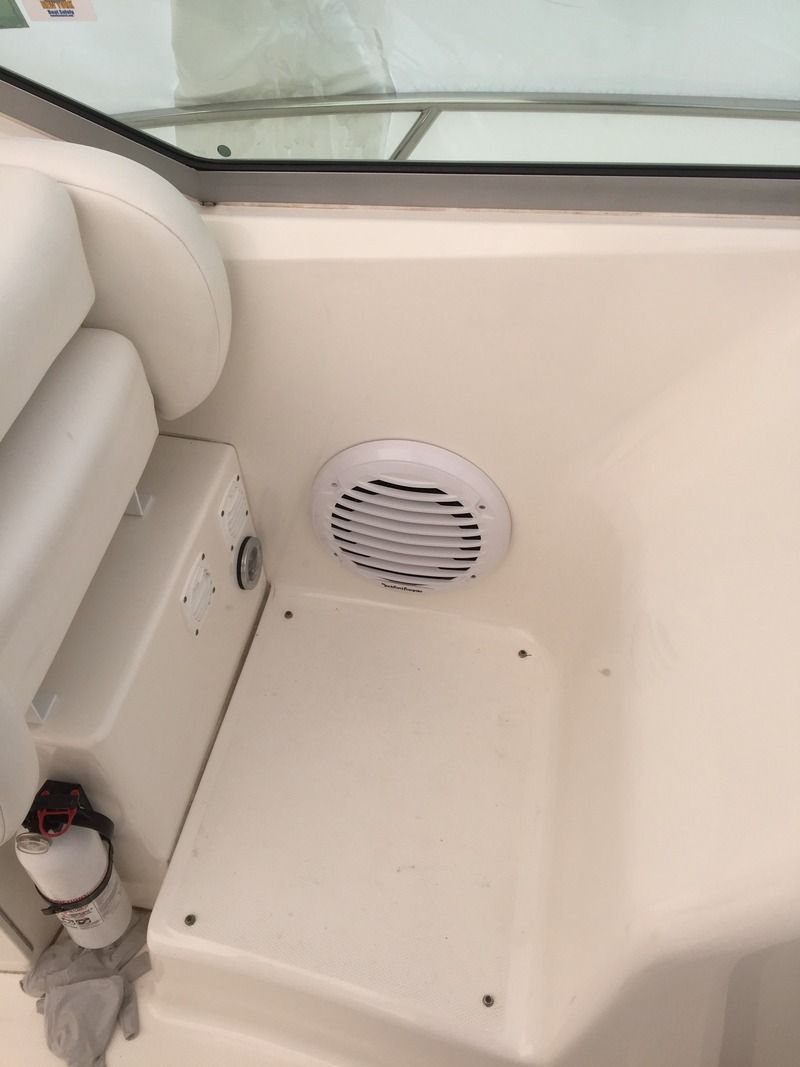
I installed this 10" sub last weekend. I used a jigsaw but it was very tight. Not much room to swing the saw around. There seems to be plenty of room if you want to install a 12" sub. I was debating the 12" but went with the 10" since it sounded great on my last boat.

 
Thanks for the input! I debated on installing one under one of the front seats (captains or passenger not sure) and facing it upwards right between the brackets that the seats bolt to, but im not sure if it will fit.

saopm, how much clearance (depth wise) did you have in that location?
 
Last edited:
Thanks for the input! I debated on installing one under one of the front seats (captains or passenger not sure) and facing it upwards right between the brackets that the seats bolt to, but im not sure if it will fit.

saopm, how much clearance (depth wise) did you have in that location?

Under the seat between the brackets is a tight fit. You could probably make it work by modifying the flange on one of the brackets. The Captions seat has a little more going on since it slides forward and back.

If I remember correctly there was about 7" of depth where I mounted mine on the port wall before you run into issues hitting the outside walk around. That depth decreases as you move up the wall. The fiberglass is about 3/8" thick in this area as well.
 
Thanks for the input! I debated on installing one under one of the front seats (captains or passenger not sure) and facing it upwards right between the brackets that the seats bolt to, but im not sure if it will fit.

saopm, how much clearance (depth wise) did you have in that location?

I wouldn't do that, the storage doors on the passenger side will vibrate notably with a sub. On the Capt. side, it wouldn't but anytime you spray down the cockpit, you run the risk of filling the sub with water.

I installed a 10 inch sub in the side wall just as Saopm did, it was not a very difficult job, and there is plenty of clearance behind it, as that space is open, same space as your vacuum system and battery charger live. In addition to the fiberglass, I made a ring of ½" plywood and glued it on the inside of the cavern to further support the screws.
 
Im planning on putting my amp somewhere near the factory head unit. So I was wondering where the best place to run the power and ground cables through the aft cabin wall into the engine compartment. I would like to take the shortest route straight thru on the starboard side, but does anyone have any better suggestions?
 
You probably already have amps wired in. The factory amps are behind the electrical panel, right underneath the stereo head. One amp for the cabin speakers and one for the cockpit speakers. I left the factory amp alone for the cabin speakers, didn't need any more juice inside. I upgraded the cockpit amp and used the existing wires. If you do need to run wires, there is a channel with a lot of wire that run to the area behind the cup holder panel next to the helm seat.
 
Last edited:
Juggernaut1, you were right.

The tech who did the manifolds had clipped one of the wires on portside engine. Replaced the wire and it now runs almost perfect, except I noticed it still revs 300 rpms lower than stbrd at WOT. She was still able to hit 31knts with a semi dirty bottom.
I'm now wondering if the revs were always this way but I just now noticed since I recently had a Vessel View installed and can now clearly see the revs on the digital display at a glance.

Thanks again...
 
Last edited:
I installed this 10" sub last weekend. I used a jigsaw but it was very tight. Not much room to swing the saw around. There seems to be plenty of room if you want to install a 12" sub. I was debating the 12" but went with the 10" since it sounded great on my last boat.


How is the acoustics for the sub at this location? I've been thinking of installing a 10" JL in the same spot but have been wondering how it would sound there.
 
How is the acoustics for the sub at this location? I've been thinking of installing a 10" JL in the same spot but have been wondering how it would sound there.

Can't speak for his, but mine sounds awesome. The stereo on my boat is better than the Bose system I have at home. (Bose 535)

There really is no where else to put it. If you mount it in the face of the passenger seat base, the doors for the storage and refrigerator will rattle. Keep in mind there is a huge cavern behind the sub, so expect it to rattle the hoses around the head. You can't hear it when you are above, but down in the cabin, it will sound like your boat is coming apart.

I've added a subwoofer to the cabin as well, so now I can listen to the same high quality sound, above and below.
 
Last edited:

Forum statistics

Threads
113,357
Messages
1,431,074
Members
61,209
Latest member
96dancer250w454
Back
Top