Towing - Bimini Up, Down, or Sideways?

Gary,

I have a 1999 230BR, which is similar but not identical to yours. In 2001, SR redesigned the 230. Our interiors have the same basic layout, but yours has clearly been refreshed. My 230 has an aft circular/u-shaped bench with two bucket seats (helm/passenger) forward. With this configuration, I am able to lay the bimini across the forward section of the bench with the aft strut and jaw slides resting just above the cup holders. The bimini struts will rest inside the lower storage panels. Then I use towels to cushion/protect the areas where the bimini comes in contact with vinyl. FYI, my upper and lower storage panels are completely open without a curvature. I think they added a bit of a curvature and more of an enclosed look to the 2001 and newer models, which could present a problem for you.

My procedure is pretty simple. Turn the bucket seats back to back and flip up the seat bolsters which allows me to slide one side of the bimini into the lower storage panel. Then lower the other side of the bimini into the opposing storage panel. Once again, this works for my seating configuration and may work for you if you have the same seating configuration. However, I think the enclosures and curvature of the lower storage panel may present an issue for you, but it's worth a shot.
 
Dennis - Interesting. Didn't know you can reuse the shrink wrap. I'm not sure if anyone here does that, but I'll check. Thanks! And, thanks for the info on storing the top in the boat.

SeaRide - Our boat's confirguration doesn't/didn't exist. The shot below from the 2002 230 BR brochure shows three config's, none of which is ours. Ours is actually the bottom one except that we have two bucket seats. (In addition, the description of the bottom config says "Sun Pad, Aft w/Gas-Assist Lifts" and we have an electric lift.)

Anyway, I can check next week when I get the boat home to see if the Bimini will store the way you'uns say. But, since it takes two people to put back on I'd really rather make a short leg - if it'll work. But, it is good to know that I can do it if needed.

Seating Plan.jpg

(Yippee!!! I got a pic to attach!)
 
Gary, one person CAN do the bimini top removal/install - but it helps if you've done it a few times before you do it once... if that makes sense!
 
Makes sense. Not sure when I'll get out to the boat. For sure on Thursday, but maybe I can go in a day or two to check the Bimini out. I'm wanting to find out what size the tubing is to see if I have some, as well as how easily I can take the whole thing off.

My brother and his wife are coming down to go out on the lake Thursday, so he and I can look the Bimini over. And, he's going to help me pull the boat out and then we'll take it for a short check-out tow. Gotta find out how well the new truck does and also bed the new brakes in. Then we'll take it home and I can start the final prep for the trip - inc doing something with the Bimini.
 
Keep in mind what I said above about the "short leg" idea. In order for it to work, you'd need to install new fittings further aft on the boat. You won't be able to reuse the existing rear mounts. This means you'd also have to cut/sew new opening in the cockpit cover - seems like a lot of work for a single tow.
 
Keep in mind what I said above about the "short leg" idea. In order for it to work, you'd need to install new fittings further aft on the boat. You won't be able to reuse the existing rear mounts. This means you'd also have to cut/sew new opening in the cockpit cover - seems like a lot of work for a single tow.
You, sir, are a spoil-sport! Here I was on a roll and you burst my bubble. :smt013 I don't want to know about reality. I just want to go blindly on, forgetting about geometry. Why do you have to keep bringing me back to reality!?!? :grin:

Ok, I've got it. And, thank you. I'm not about to add new hardware to the boat, much less cut/re-sew the cover. But, grasping at the straws of my dreams, is there any chance the fitting the "leg" goes into is movable?

I know, I know. Reality sucks. :smt001

It's a slide fitting, so it is movable. In other words, the main "bow" part is formed from one, long piece. Just depends on whether or not it's a rivet or a set screw. I think it's a rivet. BUT... yes, another "but"... the problem there is that I wouldn't be too comfortable with the amount of weight behind the mount - since you'd end up mounting about halfway up the main leg. Maybe it wouldn't be as bad as I'm thinking, though.
 
Yeah, I'm with you on the leverage bit. (My background is math & physics, but I'm basically an engineer - my school just didn't have an engineering degree.) Guess I need to go out to the boat and see. I'll take some pics and measurements and report back. Perhaps if we go out around 2:00 we can get back to town during Sonic's happy hour. My wife will usually fall for that one. :grin:
 
Happy hour... Good thinking!

Aha! I had a feeling you might be an engineer with all the questions and "what if's"! Engineers always think too much!!! :smt001 Funny enough, though, I actually started my college career in mech E, but later changed to a different line of work (this boating thing is not my main job).
 
Most people that know me consider me an engineer. But, w/o the degree I shouldn't say that. On the other hand, I did spend two years as a EE student - until the lack of study caught up with me. :smt009 So, a transfer to a college where I had a special "in" got me back in school - in the late 60's when those out of school went to Nam. (Then, the lottery happened and my birthday was #366.) Upon graduation I got caught up in the computer craze and wound up in Information Technology. So, I have extensive experience in electrical/electronic things. And my hobbies have also included mechanical things. All of that put together says "engineer" to outsiders.

Well, my wife of 47 years has agreed to a trip to the lake this afternoon - as long as we stop at the Sonic going or coming. So, I should have info and, hopefully, pictures to share later......
 
Looks like the "short leg" plan is going to work. I have pictures, but I'm back to not being able to upload them, regardless of what I do. Is there a moderator or someone that could help me?

Anyway, the "leg" that goes down from the bimini to the fitting on the boat is 26 1/2" center-to-center on the eyes, and it is made up of two pieces: the bottom piece is 12" long and is 3/4" tubing, and the top piece is 7/8" tubing and is 24 1/2" long. I pulled the top/outer piece off the bottom piece on each side and gently lowered the top down - and the fitting where the top piece attaches to the bimini rested neatly on top of the bottom piece. (I wish I could show the pics!) In other words, it is going to work! :thumbsup:

All I have to do is to cut two 12" pieces of the 7/8" tubing I have, insert an "inside eye end", and install. Unfortunately the inside eyes on the top piece are crimped on, so I have two new ones on hold at West Marine and I'll pick them up on Tuesday. And I'll put a hole in the short top piece that will catch the "button" when the piece is resting on the bottom eye so that it can't somehow bounce up. That will put the bimini about 6" off the cockpit cover and well out of the windstream. :grin:
 
That's good! So one of my concerns was that there was too much of the "canvas" end sticking aft of the rear mounts... by dropping the bimini down, you're saying that there isn't too much? And you'll also end up with the new (shorter) rear support leg being vertical (or very close to vertical)? I really would of thought that as the top piece/fitting for the rear leg arcs downwards, it would have landed behind the rear boat fitting. But that's great that I was wrong!

Yes, I'd like to see a picture of what you got going on there. Are you saying you're completely replacing the existing rear leg setup? I'm confused how a new 12" leg will keep the bimini only 6" off the canvas?

For pics, I think it's easier if you're a contributing member here (although I'm not positive on that), but another way to do it is to just use a free hosting site like Photobucket and copy/paste from there.

Can you also show a pic of the top fitting where the rear leg attaches to the main bimini bow/pole?

Crimped? Does that mean the "eye" is nylon? That might change things with what I've been thinking as it might be an aftermarket top and not the factory one.
 
Last edited:
Ok, I'm making progress on posting pics. Photobucket appears to work if the pic is small, like under 200k.

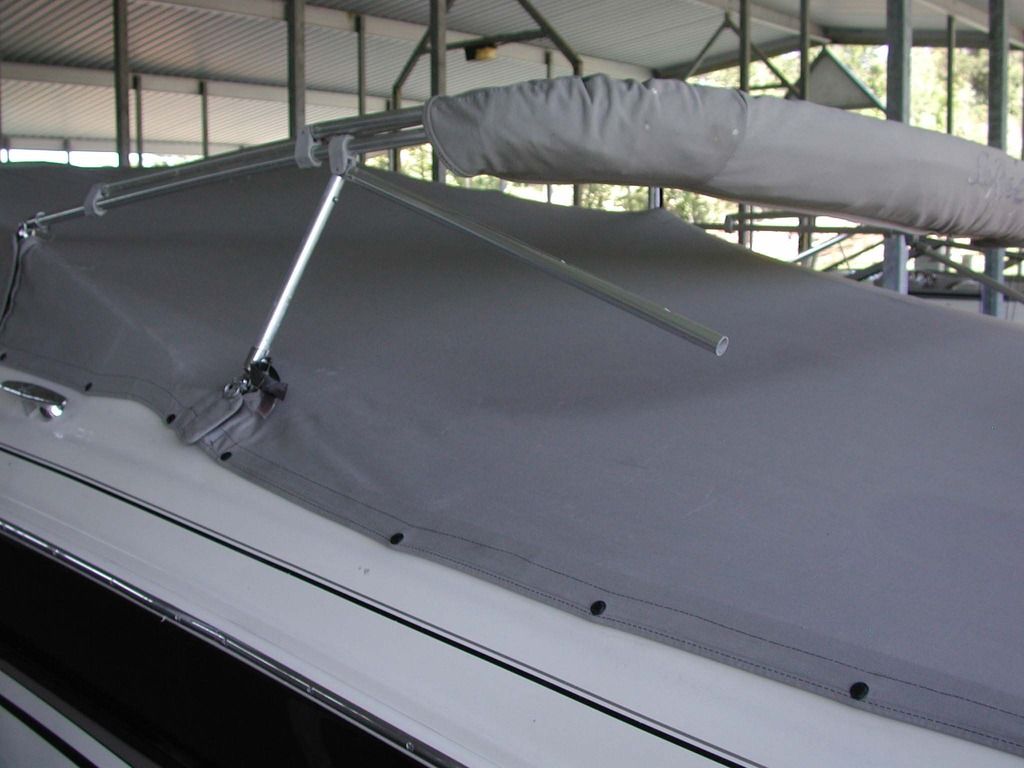
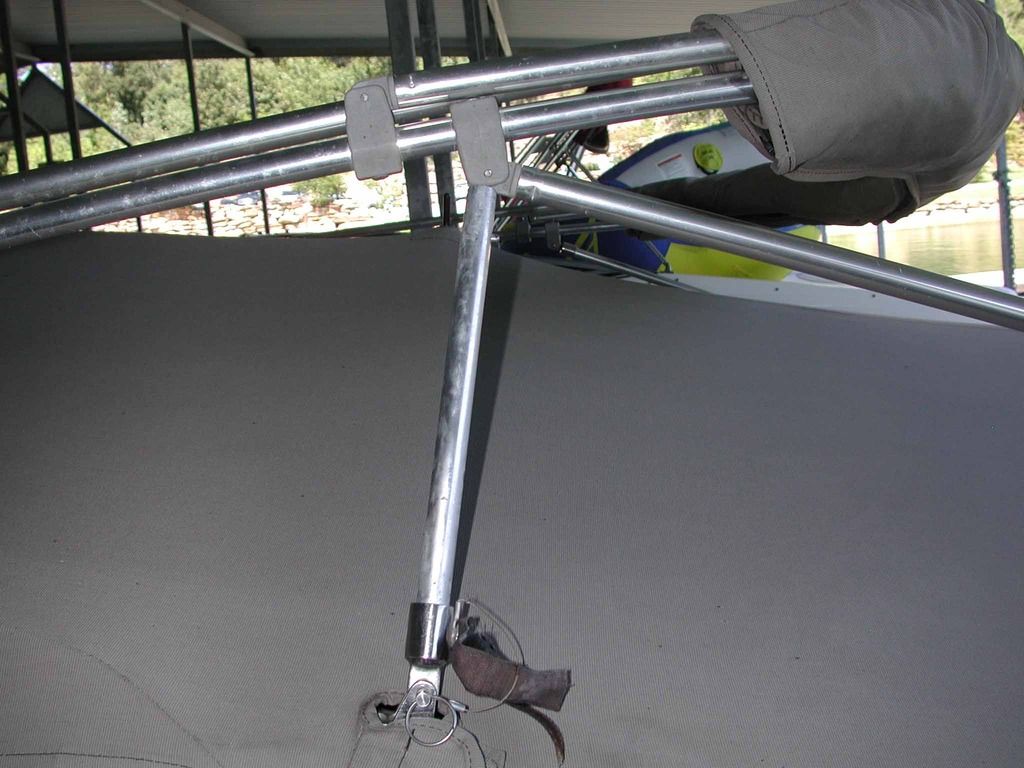
Here's a shot of the top half of the leg swung out of the way and the lower half resting against the fitting on the bimini. I'll only be replacing the upper part, the one sticking out to the right/rear in this pic. I'll cut a piece of tubing just long enough to fit over the lower piece and have room for the inside eye's piece to fit in. The lower leg is 10 1/2" and I'm assuming the inside eye will go into the new piece 1 1/2", so the upper piece will probably be 12" long. Given how close the leg is to the top of the bimini I'm guessing that the extra 1 1/2" will raise the bimini 2", so it'll be about 8" off the cover.


This is a bit closer view of the bottom half of the leg against the fitting on the bimini. I'm sure one of the questions is if the angle will work. The answer is "yes". The fitting on the bimini will rotate a bit more than it is in the pic, and it lines up nicely with the bottom part of the leg.


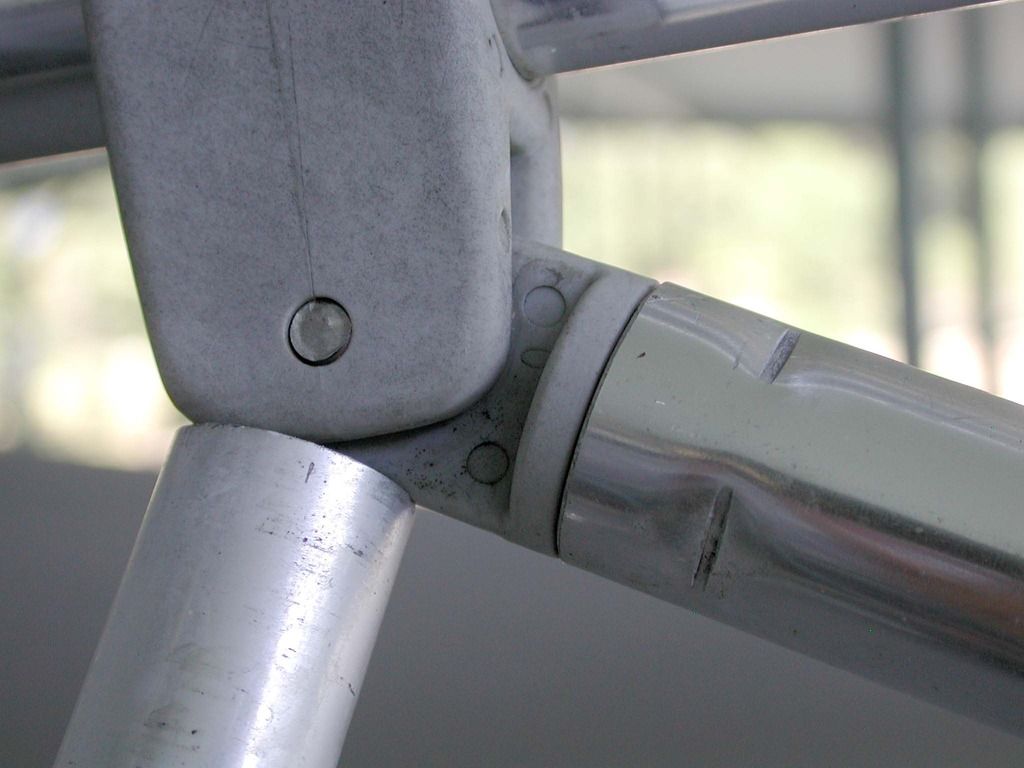
And, if you want to see what the fitting looks like, here ya go. I'm fairly sure this is all original. And all it takes to swap the upper part of the leg out is to pull the screw you see the end of in this pic, swap the legs, and put the screw back. Done.

 
You're right - those are original. I forgot that there was a few years where nylon fittings were used.

I like the idea. Quick and easy swap. You could make it even easier if you swap the screw for a pin.

Here's a couple thoughts I'll throw out... One of the reasons Sea Ray stopped using nylon fittings is that the UV rays weaken them over time and they all of sudden crack. Give them a good going's over - not just look, but twist/bend them a bit with a pliers to make sure they feel solid. You're ending up with those rear leg fittings taking pretty much the whole weight of the bimini so just make sure that they're all in good shape. Even with the upper fitting turned a little to be more in line with the rear pole, that male part of the upper fitting is still going to take some extra stress because of the advanced inward angle of the pole.

Again, though, just some thoughts! Read 'em, chew 'em up, spit 'em out... whatever you want to do with them! :smt001

How was Sonic?
 
Oh, on the off chance that you want to change that nylon fitting to SS, the "issue" is that the one mounted to the bimini bow can't just come off (which I'm sure you're aware of). Typically, you have to disassemble everything and then build it back up. However, there are "hinged" fittings available where you could cut the nylon one off and then put the SS one right back on. Take a look here for an example: http://www.marinepartdepot.com/newststdehi.html

FYI, those "ball and socket" SS ones you see are made by Taco Metals (there's more styles available than what that website, above, shows). They are VERY nice. They make it even easier for one person to do it as you don't have try and line up 3 holes and stick a pin/screw through at the same time. Plus they have a liner so the bimini doesn't shake/rattle as much. You could rebuild the bimini with those fittings, shine up the poles a bit and have a brand new (and stronger/easier to use) looking bimni! Yes... it's always fun to spend other people's money! :lol:
 
First things first - Sonic was good!. Tried the frozen limeade and really liked it. Heretofore I've bounced back and forth between a cherry/grape slush and a traditional cherry limeade, but this was a good combination thereof.

As for the fittings, I'll check them out closely. Thanks for the tip. The new eyes are metal so they'll be quite solid, but I'll check the fittings closely.

Yes, a pin would be faster. I'll look into that. Thanks again. :thumbsup:


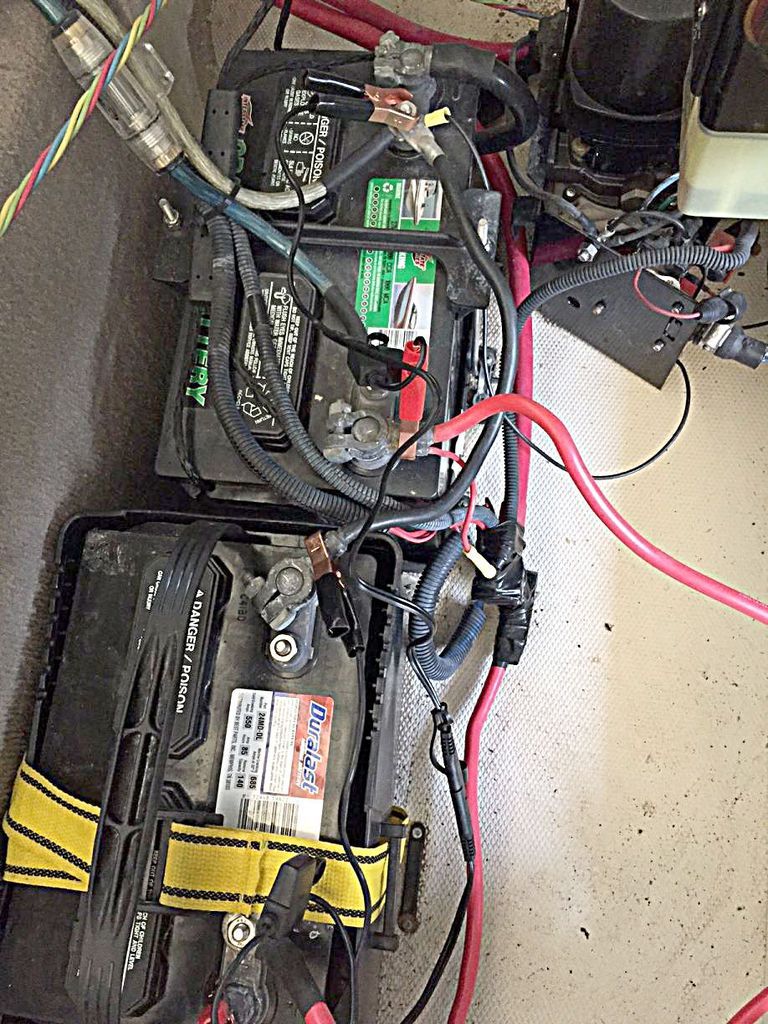
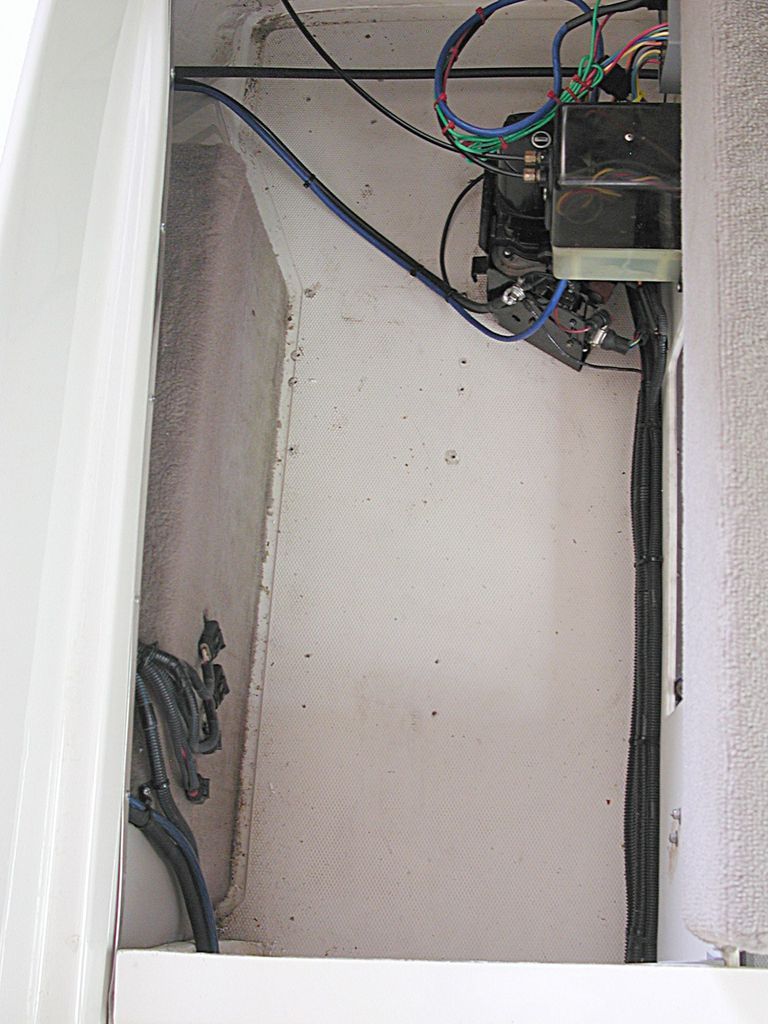
And, since I now can post pics, here's what I did on the batteries. There was a learning here and I thought someone might want to know. This is the "before" pic on the batteries. Notice that someone has added a second battery and instead of using 2/0 cable they actually used some #2 and some #4. Further, that ball of electrical tape is hiding something I didn't know existed - a male/male adapter to connect two female battery cables. :smt009


And, here's the same compartment afterward - but before I filled all the holes with epoxy:


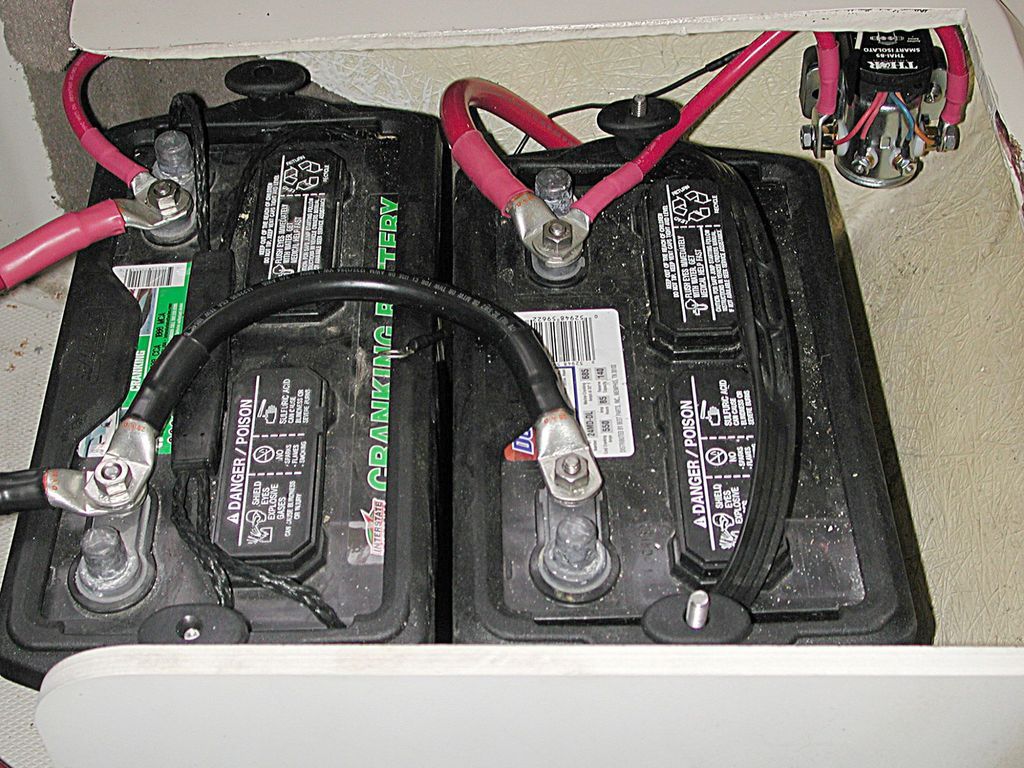
And, here's where I moved the batteries to - the port side under the step/seat that is used as the passageway to the swim platform. Our seating plan puts more people on the starboard side so this balances things out. All of the new battery cables are 2/0, crimped with a 16-ton hydraulic crimper, and covered with adhesive-lined heat shrink tubing. (There's a lot more to the story about the crimper if anyone is interested.)

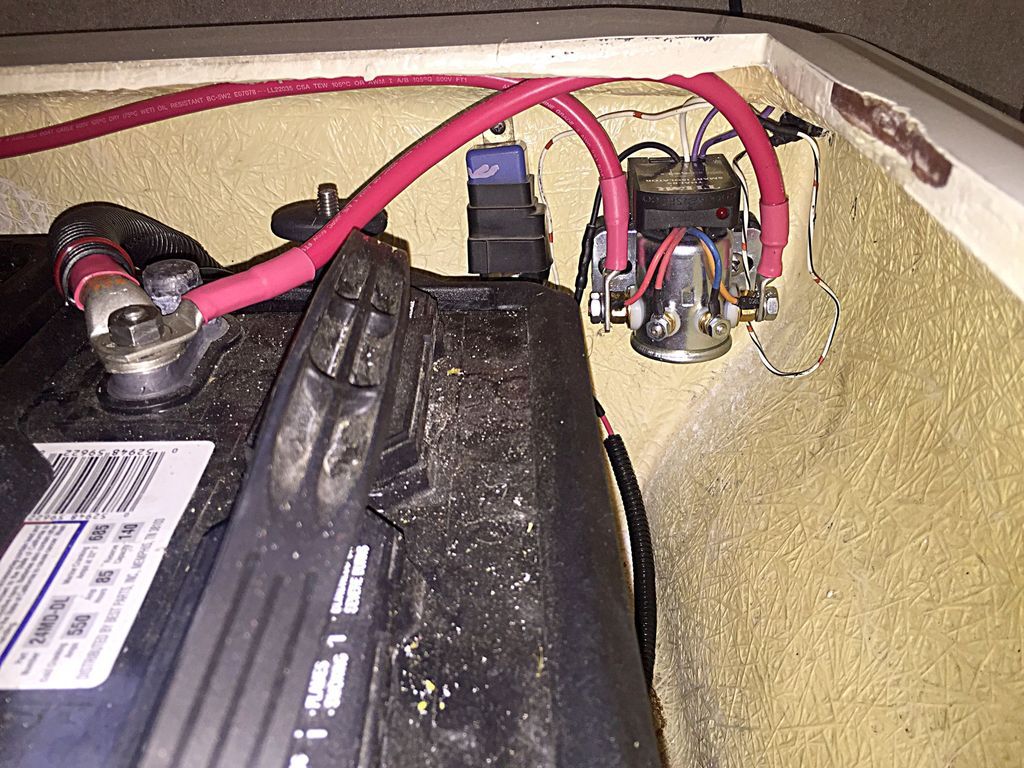
Also, note the Cole Hersee Smart Battery Isolator. This thing parallels the batteries (via #4 wires) when either battery gets to 13.2 volts for more than 2 minutes. It works well, but note that its negative lead, shown between the two batteries, is not connected in this picture. That's because the HF chargers I have take the batteries to 14.0 volts initially and then drop back to about 13 volts. So, the solenoid comes in and parallels the batteries while they are being charged. And the solenoid pulls 650 ma, but a single charger only puts out 750 ma and you probably shouldn't run the chargers in parallel. And, the solenoid gets warm, so....


Here's the solution - I installed a relay in the ground circuit of the isolator. The relay is pulled in by the ignition circuit so it won't come in unless the key is in On. And, when the relay isn't "in" the isolator has no ground so it cannot function. Now I can put chargers on both batteries and know the isolator won't parallel them unless the engine is running.

 
First things first - Sonic was good!. Tried the frozen limeade and really liked it. Heretofore I've bounced back and forth between a cherry/grape slush and a traditional cherry limeade, but this was a good combination thereof.

Ah, steppin' outside your comfort zone, are 'ya?!

Those batteries were a mess!
 
Yes, I wasn't sure I wanted to risk trying a new drink. After all, we only go to the Sonic 2 or 3 times a week, and at my advanced age that doesn't leave very many more so I don't want to waste them. :grin:

And yes, the batteries were a mess. I posted that stuff for two reasons. One was to show the lengths I've gone to in order to have the boat ready for Powell. Second, I don't know if there are some on here that could benefit in my story on battery cable making, parallel relays, etc. As you can see, I'm not averse to typing, so could do a thread on what I learned.

Oh, and I missed your post on upgrading the bimini. Thanks. I can see how that could help. But, since I'm gearing up for Powell I'll file that info - unless I find a cracked fitting.
 
My boat is stored in my house garage, so I tow to any body of water bigger than a puddle in order to be on the water. My typical local tow is an hour each way, and once a year we usually do a lake vacation. Just got back from the Ozarks, about a 7 hour drive each way.

For a local day on the lake, I tow with my snap on canvas covers on. I don't want beach towels or my back seat cushions flying out on the highway. I'm lucky in that my boat has an unusual feature, I can lift my sunpad and my bimimi fits around the engine compartment - by design, not coincidence. A two year only feature on the older 205 Sport that I really like. Since I have easy dedicated storage, and its a fairly easy one man job, I almost always tow with the bimimi stored, and I don't have to take it down at home to get in the garage.

For a long tow, I'd vote to put the bimimi in the boat somehow, under the canvas cover. If not possible, I don't think I'd want it laying down, bumping on the top of the cockpit. So, I'd go with it up, consider Zip Ties to keep the bimimi cover from coming unzipped, and maybe consider shrink wrap or even plastic food wrap to protect it from the dead bug mess that you will get - I know this from experience. You may need to bungee the wrap to keep it on, and be sure to remove promptly at your destination in case it gets wet underneath.

I have not added much to this thread, yet.

For long tows, I usually put on my "travel cover" over my canvas covers and poles. This is a semi-custom Sharkskin (purchased through Overton's) cover with a drawstring stern close, and periodic tie downs to the trailer rails. This cover does not have holes for the bimimi, so the bimimi must be stored in the boat. This cover gives me an added sense of security regarding any possessions in the boat. The best benefits are that it eliminates wind whip, dirt, bugs, and rain from my canvas covers. My canvas covers do show wear from my local tows. A long trip would be like a full season of additional wear on the canvas in a week's time.

Rain is a major consideration - even with proper poles under (just) my canvas, a drive home in a torrential ran the other day put gallons upon gallons of water in the boat. So much that when I backed into the garage, and lifted the front of the boat with the trailer jack, the pump float fired off my bilge pump, shooting 20 or so gallons of water into my garage! My garage drains well toward the door, so no big deal. The travel cover keeps the boat almost bone dry - tested through several torrential rains on the road, and when the boat was parked on the trailer.

In hindsight, this raises a question about trailering with the plug in, or out - but I'd hate the risk of launching with the plug out - even though I check it with a religious ferocity!

So, my recommendation is bimimi in the boat, snap canvas on with proper poles, and a storage / travel cover to keep everything clean and (relatively) dry and secure.

Best of luck with your trip!
 
Last edited:
Thanks, Dave. That's a good design on the boat. It would make stowing the Bimini much easier. But, I think my "short leg" plan will get it down out of the breeze so that I won't need to stow it in the boat. And, it'll take a lot less time to redeploy when we get to Powell. However, I really like the idea of the tie wraps around the Bimini cover to insure it doesn't come off.

As for the shrink wrap on it to protect from bugs, I do have a big roll of the stuff so it would be easy to wrap it before placing the tie wraps on, which would hold the film on. But, with the thing dropped down to ~8" off the cover wouldn't you think the bugs would have ended their lives on the windshield? Or will some make an end-run around the sides of the windshield in an effort to reach the Bimini?

And I wish I had a trailering cover as that would simplify everything. Perhaps I will after this trip if the cockpit covers don't survive.
 

Forum statistics

Threads
113,182
Messages
1,428,047
Members
61,088
Latest member
SGT LAT
Back
Top