Raw water pump impeller---89 300 Weekender---454 inboards

Yes, remove it! Here's how I did it. Drape the engine with a big blanket or piece of rug and climb aboard. Get the hose clamps off the intake/output which is under the engine. Don't use a screwdriver - use a socket on a screwdriver handle - 5/16"

gm4202_p.jpg


Take note of which is which - ie: which nozzle and which hose is IN and which is OUT. The pump housing tells you by denoting for LH or RH engines. You should have LH engines. I also wrote on the housing IN and OUT in whiteout.

Remove the bracket from the alternator, as tmal explained. Remove the two bolts on the front end. There's not enough adjustment in the adjustment swing to remove the belt until this point - I would also suggest you replace the belts while you've got all this stuff off.

Go sit somewhere comfortable and mark the housing and bracket so it lines back up correctly. Pull it all apart, shove the impeller in with some dish soap - some use KY jelly - depends how kinky you are. Reassemble and assume the position in the ER. Have all your wrenches handy - once you're in there you don't want to come out.

You'll be cussing up a storm, you'll get all sorts of small cuts and abrasions, and the first one will take you 3x as long as the second one. All in all, not that bad a job.

rondds
Thankyou for the additional detailed instructions regarding the pump removal and disassembly. Also for the moral support. I already have the bandages ready as tmal suggested. I don't think cussing will be an issue either but I will have to be polite as my wife will be the one to pull me out if I get stuck.
I have a newbie dumb question : does LH/RH indicate the rotation of the engine ? I have been reading through the Merc manuals that came with the boat and quite honestly I am a bit confused as to which way each of the engines does rotate. Also thought I read on the xm serial plate the ratio was 1.6/1 however that does not agree with the manual information either. It seems to be either 1.5 or some other ratio but not 1.6 depending on the type of transmission (Borg Warner or Hurst). I thought the boat had Hurst.

I realize I am starting to jump all over the place and getting more confused as I do and wasting others time as well. I will try and get these facts straight next time I get to the boat.

Thanks
Ken
 
Yes, remove it! Here's how I did it. Drape the engine with a big blanket or piece of rug and climb aboard. Get the hose clamps off the intake/output which is under the engine. Don't use a screwdriver - use a socket on a screwdriver handle - 5/16"

gm4202_p.jpg


Take note of which is which - ie: which nozzle and which hose is IN and which is OUT. The pump housing tells you by denoting for LH or RH engines. You should have LH engines. I also wrote on the housing IN and OUT in whiteout.

Remove the bracket from the alternator, as tmal explained. Remove the two bolts on the front end. There's not enough adjustment in the adjustment swing to remove the belt until this point - I would also suggest you replace the belts while you've got all this stuff off.

Go sit somewhere comfortable and mark the housing and bracket so it lines back up correctly. Pull it all apart, shove the impeller in with some dish soap - some use KY jelly - depends how kinky you are. Reassemble and assume the position in the ER. Have all your wrenches handy - once you're in there you don't want to come out.

You'll be cussing up a storm, you'll get all sorts of small cuts and abrasions, and the first one will take you 3x as long as the second one. All in all, not that bad a job.

Ron, on mine the top pump bracket bolt does not have to be removed. Just loosened. Once the bottom bolt is removed and the top one is loose I just have to lift the bracket straight up and over the bolt head. This makes installation much easier since I do not have to attempt to hold the pump in place while trying to get the bolt behind the circulating pump caught. You can see what I'm talking about in the photo below. The bottom/rounder part of the top bolt hole will come right over the head of the bolt without removing it.This is not my exact bracket but my factory one has the same feature.

bracket.jpg

Good advice on labeling the in and outs on the housing. I forgot to mention that to Ken. I use dish washing detergent also when I put the impellers in. It makes them easier to get in, lubricates them till the pump picks up water and I can't help but laugh every time I see the bubbles coming out my exhaust. LOL
 
Last edited:
rondds
Thankyou for the additional detailed instructions regarding the pump removal and disassembly. Also for the moral support. I already have the bandages ready as tmal suggested. I don't think cussing will be an issue either but I will have to be polite as my wife will be the one to pull me out if I get stuck.
I have a newbie dumb question : does LH/RH indicate the rotation of the engine ? I have been reading through the Merc manuals that came with the boat and quite honestly I am a bit confused as to which way each of the engines does rotate. Also thought I read on the xm serial plate the ratio was 1.6/1 however that does not agree with the manual information either. It seems to be either 1.5 or some other ratio but not 1.6 depending on the type of transmission (Borg Warner or Hurst). I thought the boat had Hurst.

I realize I am starting to jump all over the place and getting more confused as I do and wasting others time as well. I will try and get these facts straight next time I get to the boat.

Thanks
Ken

Ken, if you were already confused I'm afraid I'm about to confuse you more.

Standard rotation on engines is LH but as you know you need one prop to turn clockwise and one to turn counter clockwise. Boats with Hurth transmissions accomplish this in the transmission. The transmission itself changes the LH rotation of the engine into RH at the prop. As far as I know, Hurths are the only trannys that do this.
Borg Warner/Velvet drive do not change the rotation so that needs to be done on the engine itself. Engines are modified so that they are essentially spinning backwards. That would be a right hand rotation motor.
If you've got Hurth transmissions both motors will be left hand. Borg Warner/Velvet drive boats will have one of each. It's good to know which you have because the day may come when you need parts (starter for example) for a RH engine and if you but LH parts they won't work.

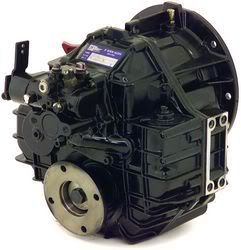
Take a look at these pictures. If your transmissions look similar to this they are more than like Hurth transmissions.

Hurth630A.jpg


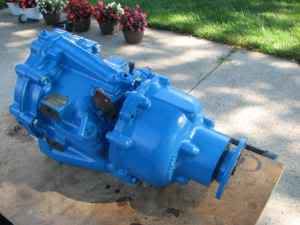
If they look like this they are probably borg warner/velvet drive units.


3n73kd3l55O65Y05X2b7732a1c55940141742.jpg


Confused enough yet? :smt101:smt101:smt101

FYI, try not to get too overwhelmed with all this information. I didn't know any of this till I owned by first twin screw inboard boat. You'll get the hang of things with time.
 
Last edited:
Ken, if you were already confused I'm afraid I'm about to confuse you more.

Standard rotation on engines is LH but as you know you need one prop to turn clockwise and one to turn counter clockwise. Boats with Hurth transmissions accomplish this in the transmission. The transmission itself changes the LH rotation of the engine into RH at the prop. As far as I know, Hurths are the only trannys that do this.
Borg Warner/Velvet drive do not change the rotation so that needs to be done on the engine itself. Engines are modified so that they are essentially spinning backwards. That would be a right hand rotation motor.
If you've got Hurth transmissions both motors will be left hand. Borg Warner/Velvet drive boats will have one of each. It's good to know which you have because the day may come when you need parts (starter for example) for a RH engine and if you but LH parts they won't work.

Take a look at these pictures. If your transmissions look similar to this they are more than like Hurth transmissions.

Hurth630A.jpg


If they look like this they are probably borg warner/velvet drive units.


3n73kd3l55O65Y05X2b7732a1c55940141742.jpg


Confused enough yet? :smt101:smt101:smt101

FYI, try not to get too overwhelmed with all this information. I didn't know any of this till I owned by first twin screw inboard boat. You'll get the hang of things with time.

Capt Tim
Xms definitely look like the Hurth pic you provided and thanks for the moral support. It confused me when reading the manuals as nothing seemed to agree with what I thought I had seen in the boat however I understand they need to cover all of the options available.

Thank you very much again
Ken
 
Tim:
Mine is slotted too BUT I can't get the pump out b/c the belt is too short. I have to take that top bolt OUT in order to get the pump in a position to slip the belt off, Just no room in there b/c of the way things are situated. If Ken can get it off by slipping the pump up and over, God bless! That will save quite a few curse words!

I think all these engines are LH, even those with outdrives.

If you want to identify your engines take a look at this article....LH/RH


That's too bad Ron. I thought mine was tough but it sounds like yours is even tougher. At least I'm able to remove the belt once everything is loose.

How you liking your genny? I've got the Quicksilver QS-7.5 G in mine. I've had my share of issues with it but I've had some real good luck with it lately.
 
Tim, it's a betch, but I've got a system down and cut the time from 5 hours to about 1.5 hrs!

I am very happy with my old QS. I've had to do only routine maintenance and replace/repair some things that just broke b/c of old age. All the westerbeke guys marvel at how quiet it is. 4 cylinders really help.
 
The posts here have been very informative and helpful. I only have one question: the dialogue has centered around straight drives where the sea water pump is slightly more accessable to get at. Can anyone shed light on what the "position" is to get at the pumps in a V-Drive, where they are tucked just inside the engine mount stringer. I can see them, but between the engine cooling strainers, exhaust piping and rudder stocks ... I would like to "assume the position" - but want to be able to eventually get back out as well.

Thanks,
Dave


Dave,

I have v-drives on my '93 and it's not too horrible of a process. I will admit that the first time I replaced one of the pumps, I had ran out of existing swear words and started making up my own by the end of the process. After that, it has gotten much easier. A lot of it is done by touch and feel. I generally end up draping myself over the engine to reach the pump, but it helps to have arms that are on the longer side (not NBA long, just a bit more than average). I don't have to wedge myself down into the bilge to remove either pump, I can do it all from above, but it's certainly not comfortable. Most of the mounting bolts are accessible, but the ones that are closest to the engine are a little tougher since there tends to be other hoses in the way. Generally speaking, I can only operate the ratchet with one hand as i'm either balancing myself or holding another hose out of the way with the other hand. It's not impossible, just takes a little time and patience.

I find that putting the pump back on is actually worse. Getting the pump in place and the mounting bolts started tends to take a few tries. All in all, it's not too bad, but I don't know how much of a difference in room there is between the bilge on my 330 and your 310.

Ken.
 
Ken,

Thanks for the advise.

With the boat being new to us, I have to figure out how to maneuver around in the ER in order to get at the sea water pumps, bilge pumps, ect. By comparison, the stuffing boxes are easy!

My '91 310 is a 330 in '92, so I think they might be very close (mine has a '91 hull number and is stamped as a 310 in the hull, but has all 330 decals).

Thanks,
Dave
 
Tim:
Mine is slotted too BUT I can't get the pump out b/c the belt is too short. I have to take that top bolt OUT in order to get the pump in a position to slip the belt off, Just no room in there b/c of the way things are situated. If Ken can get it off by slipping the pump up and over, God bless! That will save quite a few curse words!

I think all these engines are LH, even those with outdrives.

If you want to identify your engines take a look at this article....LH/RH

Ron
I checked out the LH/RH link.
Good info.

Thanks
Ken
 
I am in the process of sourcing both impellers and complete replacement kits as I am not sure as to when the last maintenance was performed.
Impeller pricing from a local source I have found is $24 each and the complete kit is $98 each.
I am curious as to whether these prices are in the ballpark or if I need to keep shopping.
Also I have been quoted $300 labour to have the work done bringing the total to $500 for both engines.

Please let me know what you think
Thanks
Ken
 
That's not a bad price for the job completed. Your best price for parts is B0ATFIX.com. Looks like they have it for $65.97 - you'd have to check shipping. Search the part # 46-807151a14
 
That's not a bad price for the job completed. Your best price for parts is B0ATFIX.com. Looks like they have it for $65.97 - you'd have to check shipping. Search the part # 46-807151a14

Thanks rondds.
I will check out the link you have provided. I will have to add shipping and exchange but still could be very reasonable.

Thanks
Ken
ps. Having second thoughts tackling this myself as not comfortable in real tight spaces standing on my head. Not concerned with the mechanical end as I have received oodles of excellent input, pictures and schematics and enjoy those type of projects. However, even cleaning the forward bilge pump between the two engines was enough. Call me chicken, but if I do not feel I cannot do the job right there is no point in kidding myself.
 
I have done mine for the first time and it was rough. I made a couple of mistakes and had to take the starboard engine one apart 3 times. No I have master degree in these pumps and can do it quickly. A couple of points for you to think about.

1. on my bracket, it is cast iron and getting the bracket over the top screw is impossible. Make sue you have a good set of long needle nose pliers to get the screw back in. I get the bottom screw of the bracket in first the I can get the top one mounted in the hole easily.

2. Before you take the pump off the bracket, take a good picture of it from the back where the hoses mount. I should have taken pictures on one pump. That way I would not of installed it upside down on the bracket. When I reconnected the hoses, since it was upside down, the intake was put on the output and vice versa. I knew it was wrong right when I started up and looked over the edge of the boat. The boat was farting under the water.

3. When I was putting the impeller in, I greased the entire house with dielectric grease. It is a silicone grease so for a short run, no damage to the impeller for lack of water.

4. On mine, the first impeller was tough to get in the housing. Someone told me about using the needle nose pliers and just twisting the impeller in. That took all of 30 seconds. without that tidbit, took about a 1/2 hour.

5. I also found out the the output hose was really short and the oil cooler was mounted to the block. This gave you no room to get the hose on. Taking the oil cooler screw out allowed me to pull the hose forward and get it on the hose nipple without a lot of work.

Hope this helps some.

James
Thankyou very much for your response and input. Excellent additional information. I particularly liked the point about the boat farting underwater. Funny, but good you noticed it quickly. I still have not decided if I am up to the very tight working spaces based on unpleasant memories. However, looking at all the options. I very much enjoy mechanical projects so we shall see.

Thanks
Ken
 
I still have the scratches from replacing the impeller on my 454/ Bravo a few weeks ago. There is quite a bit of satisfaction doing it yourself, but sometimes it's just worth the $$ to have someone else do it ;-) In less than a week I replaced the oil/power steering cooler, the raw water pump impeller (and pump body), exhaust risers, and shutters. I had bruises and scratches on both arms - looked like I lost a wrestling match with a feral cat!
 
Thanks rondds.
I will check out the link you have provided. I will have to add shipping and exchange but still could be very reasonable.

Thanks
Ken
ps. Having second thoughts tackling this myself as not comfortable in real tight spaces standing on my head. Not concerned with the mechanical end as I have received oodles of excellent input, pictures and schematics and enjoy those type of projects. However, even cleaning the forward bilge pump between the two engines was enough. Call me chicken, but if I do not feel I cannot do the job right there is no point in kidding myself.

rondds
I followed up on the link and shipping is $35 and change which gets me to $103 without considering exchange wherever that might be at the time of order. Thank you for your tip however it looks like it might make sense to stick with the source I have closer to home.

Ken
 

Forum statistics

Threads
113,238
Messages
1,429,059
Members
61,119
Latest member
KenBoat
Back
Top