Official 19SPX/21SPX/SPX190/SPX210 Thread

mine was 8M0187255,
I had seen this white ring floating around cockeyed in front of prop, dealer told me not to worry about, and by time I took it in for service, it was gone.
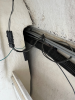
I think the old one was torn up because the prop's black coating, very think, was being pushed out due to corrosion of metal, i had to remove some it so new sleeve didn't bind against it. I used some E6000 glue to help hold in in place. Saw that on other web sites.
 
Mercury Marine's online parts catalog shows everything in detail. It might take 2 minutes to get thru all the links and drop downs, but all you need is the SN of the motor and you can't go wrong. I am confident I can get the right part number, but not so confident that the clerk on the phone can follow all the links.
 
Mercury Marine's online parts catalog shows everything in detail. It might take 2 minutes to get thru all the links and drop downs, but all you need is the SN of the motor and you can't go wrong. I am confident I can get the right part number, but not so confident that the clerk on the phone can follow all the links.

Thanks, According to the catalog, I do have the correct part. Hopefully it will hold up once installed.
 
Hey all, I bought my 2016 21 SPX inboard at the end of last season and loved it. I'm getting ready for this year and wanted to add a depth finder. What I'm looking for is a power source for the depth finder. I've read around but I'm not exactly sure how to power it? Do I hook it directly to the battery or some other constant 12v supply? Do I attach it to the radio constant 12v? Should I hook it directly to the battery and just use the on/off switch on the unit so it doesn't kill my battery?

It has a long cable that goes from the transducer to the control box, but I can't seem to find a way to run it through the boat. Is there a straight pass through that I can run the wire to the fuse box in the helm?

Any suggestions would be greatly appreciated.
 
My SPX is Covered in the garage and I'm not in the mood to climb in with a flashlight, so what I'm about to say is from memory.

The factory installed OEM depth finder includes a keel mounted transducer, which is the best setup I have ever had. Regardless, since you are aftermarket you'll have to make do.

Mount the transducer on the stbd side of the transom. Drill a hole above the waterline and run the cable into the stbd side of the engine compartment. Seal with 5200, clamshell vent, yada, yada.

You can run the cable up under the stbd side deck. You might need a stiff plumbers snake to "snake" all the way through.

The dash should have an unused accessory plug. Put in a toggle switch for the depth finder. If you have an unused spot on the dash panel, use that. If not, run the electric wire back to the battery and attach it there. It shouldn't make any difference where you "plug" it in, as long as you have a switch.

Regardless whether you use a switch or not, you simply need to remember to turn it off. If its let running out of the water, the transducer will not be happy.
 
GypsmJim,

Thanks for the info. The weather hasn't been cooperating enough for me to get outside and see if I can snake the cables up to the helm. Hopefully it won't be much longer until the weather breaks. I appreciate the help.

I was able to get out there and hook up my VessleView and check for faults. Since this boat is new to me I wanted to be able to monitor the engine. I'm glad I did because I have an O2 Sensor fault. It says to check the fuse, but I'm not sure where the O2 sensor fuse is located. Is it at the fuse block? Or inline? The manual or schematics in the manual really doesn't make it clear where that fuse is at. Maybe I should just replace the O2 sensor?
You have two O2 sensors and some diagnosis should be done to determine if they're functioning correctly and/or which one the ECM is complaining about. A Merc computer can give real time data to help with this, although an understanding of how they work is needed, as well - such as whether the ECM is demanding open or closed loop, for example.

Note that diagnostics computers never tell you what to replace - they simply tell you what system is complaining and then it's up to you to do diagnosis to figure out exactly what the problem is.
 
I went back to the manual and did a search for O2 sensors and found where the fuses are located. I'll have to go out and check the fuses.
upload_2023-3-13_12-42-1.png
 
Hey all, I bought my 2016 21 SPX inboard .... Is there a straight pass through that I can run the wire to the fuse box in the helm?

I posted earlier about trying to run a wire from the engine bay to the helm. Anyone looking for how to do this see the attached pictures.
upload_2023-3-21_18-22-58.png

upload_2023-3-21_18-22-54.png

Take the top panel off from the port side of the stern container.
upload_2023-3-21_18-25-7.png

Looking toward the front you can see some wire and cable runs.
upload_2023-3-21_18-26-23.png

Underneath the helm is an opening and when you look inside you can see where the wires come in.
upload_2023-3-21_18-27-45.png

This is the hole inside the helm where the wires come in. You can use a stiff cable snake to run the wire. I found it easier to go from inside the helm to the rear of the boat. I also left a spare wire in there in case I ever need to pull another wire.

Hope this helps someone.
 

Attachments

  • upload_2023-3-21_18-24-24.png
    upload_2023-3-21_18-24-24.png
    810.3 KB · Views: 66
Se sport 400 installed,
3 different drivers confirm faster on plane. Especially when bow is empty and several Adults in back, and i can say less cavitation when taking tights turns and on throttle.
When cruising I can also get the nose down more than before, like when when water is choppy. Does everything I wanted.
Didn't want to drill holes, used clamp on method. Also used Sika construction adhesive to help hold in place.
 

Attachments

  • se400.jpg
    se400.jpg
    63 KB · Views: 87
Se sport 400 installed,
3 different drivers confirm faster on plane. Especially when bow is empty and several Adults in back, and i can say less cavitation when taking tights turns and on throttle.
When cruising I can also get the nose down more than before, like when when water is choppy. Does everything I wanted.
Didn't want to drill holes, used clamp on method. Also used Sika construction adhesive to help hold in place.
Glad you're happy with it. Many naysayers around. Personally, I'm a DoelFin kinda guy.

Fin performance aside, I HAVE heard some negative comments about the clamp-on versions. Hopefully, your Sika will do the job. Personally, I don't mind drilling the holes because in 38 years of running fins I've never taken one off.
 
Hey guys, Wisconsin is being a shit state like usual so it's probably going to be almost memorial day before we get the boat out. Now last year I had mentioned I was looking for a prop. We have a 190 ob with a 150. Ended up with 17p enertia eco, which I was told was too big, yadda yadda. Well it's not the perfect pitch, 18 or 19 would probably be better. I hit rev limit with the wife and the baby, but for the 25mph cruise that we usually do, I'm at about 2500rpm. I'll verify it again when it's actually on water but I only dropped to about 47mph topped out. Rather take the 1000ish rpm drop for cruise than the 2ish mph top end. So don't be afraid of the big ass prop.
 
Hey guys, Wisconsin is being a shit state like usual so it's probably going to be almost memorial day before we get the boat out. Now last year I had mentioned I was looking for a prop. We have a 190 ob with a 150. Ended up with 17p enertia eco, which I was told was too big, yadda yadda. Well it's not the perfect pitch, 18 or 19 would probably be better. I hit rev limit with the wife and the baby, but for the 25mph cruise that we usually do, I'm at about 2500rpm. I'll verify it again when it's actually on water but I only dropped to about 47mph topped out. Rather take the 1000ish rpm drop for cruise than the 2ish mph top end. So don't be afraid of the big ass prop.
47 is what I got with the OEM Black Max aluminum prop. I put on a 19 Enertia (NOT the ECO) and the speed went up to 50. Also, the prop slip dropped from 15 to 8 and my mid range (~25 mph) fuel usage went down 10%.
 
Hey all, just wondering if anyone knew where the depth finder was in the boat. Assuming it's in the rear in the back compartment/engine bay. I've got a 190 ob. Going to put a lowrance thru hull in and hoping to save some shop time and cost by having the back accessable right away.
 
My 150 is in the 3rd hole up and from what I have learned that's where it should be. But mine is the 190, not a 210. Maybe contact SR to see what they recommend.

Trimming up on hole shot is counter-intuitive. Something else is going on here.

My first thought was that maybe your black rubber Flo-torq sleeve is damaged and the prop is slipping under load. But that should be easy to check.

I googled info about the white plastic bore sleeve and cavitation did indeed come up. Maybe that wasn't a bad suggestion after all. It won't hurt to put one on, and that would be my first move.

I’m way late to this conversation but, that little white plastic ring just ahead of the prop had me puzzled until I happened to see the 4:30 - 5:00 minute mark of this video (which I found after I watched his incredibly helpful video on 100-hour service of the Mercury 150 hp 4-stroke!)

Hopefully the photo I am attaching will appear showing that ring (err, bore sleeve?) on the prop which I just popped off in order to check and change our lower unit gear lube … gotta positively LOVE how DIY-friendly these Mercury 4-stroke 150’s are designed and engineered!!!!!!)
 

Attachments

  • IMG_6473.jpeg
    IMG_6473.jpeg
    171.6 KB · Views: 73
  • IMG_6478.jpeg
    IMG_6478.jpeg
    195.4 KB · Views: 70
  • IMG_6477.jpeg
    IMG_6477.jpeg
    134.6 KB · Views: 71
Seems like this is a secret that few service people know about.
What was the part number Mercury gave you? The one I purchased is 8M0054695.
I have not had a chance to install it and test it yet.

Thanks

mine was 8M0187255,

I had seen this white ring floating around cockeyed in front of prop, dealer told me not to worry about, and by time I took it in for service, it was gone.…


Okay, now I am confused.

The bore sleeve or white polymer ring just ahead of the prop on our SPX 190 is simply a perfect circle or ring of plastic; whereas; when I look up the two different parts numbers posted upthread ***AND*** when I reference the parts diagram by our engines serial number and using the Mercury Parts Catalog
( https://public-mercurymarine.sysonline.com/iOS/Default.aspx )
I see some small, square or box-like “extensions” off the outside edges of the ring at the 2 o’ clock, 4 o’ clock, 8- and 10 o’ clock positions … (see attached screen shots)

To make things EVEN MORE INTERESTING, now I am searching the web by both parts #’s and finding rings with ONLY THREE “extensions” - at the 2- 6- and 10 o’ clock positions!!!!!

Wondering why ours is simply a round ring and what part # I should be looking for to replace it if and when it ever needs replacing …


ALSO and just fyi, I also came across this note about the two bore sleeve part numbers posted about thus far:

23-8M0054695 SLEEVE, Propeller Bore has been superceded to a new part number.
The newest part number is 8M0187255
Please note the new superseded part is a functional replacement and may look different from the original part

https://www.mercruiserparts.com/8m0054695-sleeve-prop-bore
 

Attachments

  • IMG_4022.jpeg
    IMG_4022.jpeg
    172.1 KB · Views: 60
  • IMG_4022.jpeg
    IMG_4022.jpeg
    168.5 KB · Views: 60
I forgot to reply with my results. I noticed that I was not having to adjust the throttle on plane to correct cavitation. The best kept secret in the service departments is the bore sleeve to prevent cavitation. Now I will see how long it last.
It does work and have absolutely no idea why so many service facilities have no clue about this Bore Sleeve.

Okay, now I am confused.

The bore sleeve or white polymer ring just ahead of the prop on our SPX 190 is simply a perfect circle or ring of plastic; whereas; when I look up the two different parts numbers posted upthread ***AND*** when I reference the parts diagram by our engines serial number and using the Mercury Parts Catalog
( https://public-mercurymarine.sysonline.com/iOS/Default.aspx )
I see some small, square or box-like “extensions” off the outside edges of the ring at the 2 o’ clock, 4 o’ clock, 8- and 10 o’ clock positions … (see attached screen shots)

Wondering why ours is simply a round ring and what part # I should be looking for to replace it if and when it ever needs replacing …


ALSO and just fyi, I also came across this note about the two bore sleeve part numbers posted about thus far:

23-8M0054695 SLEEVE, Propeller Bore has been superceded to a new part number.
The newest part number is 8M0187255
Please note the new superseded part is a functional replacement and may look different from the original part

https://www.mercruiserparts.com/8m0054695-sleeve-prop-bore
 
ThorSen, when the little tabs that hold the ring in position break off, it becomes a ring. As it vibrates around and spins, it becomes an even more perfect ring due to being "sanded down" by the spinning.

Moondoggie... just a side note... it's "ventilation", not "cavitation" :)
 
Thank You, Brother!

You have saved me from scratching a lot of what little hair I have left on my head, yet again!!!!!

I’m going to include that sleeve next time I order parts, so it can join all the other parts I like to keep on the shelf in case we need them, to reduce any down time (I.e., alternator belt, thermostat, extra seals for the lower unit vent and drain plugs).

Thanks again and have a Wonderful Season!!!!
 
Can someone point me in the right direction on how to mount a rope to the ski eye in the back? I was looking at it this weekend, as we are going to get a tube or pull a skiier and it looks like I wouldn't be able to fit any kind or rope in there. Is there an attachment or something that connects to the eye and then to the rope??

Thanks!


Do you have a ski pole that came with the boat or are you attaching to the rear hooks on the stern? If the second one, then a self centering tow harness would be what you're looking for. Connect those to the rear eyes, then rope loop up through hole and spread to connect in the gaps on that.
 

Forum statistics

Threads
113,172
Messages
1,427,837
Members
61,084
Latest member
AntonioJamm
Back
Top