Mid-90's 270 Sundancer Thread

Thanks! What size and pitch is best? The B2 was recently rebuilt by the former owner.

Call the people in the link below, they will tell you exactly what you should have and what you do have, if you get all the numbers and names etc. off your current prop. MLauman and I both have a SS from them for our 7.4's. MM

http://www.ptprop.com/

Didn't see Mike had posted the link also. MM
 
Had the boat on the trailer this weekend and checked the prop - it's 18½d and 21p.
 
WOO HOO! I finally got my engine back together and started it up last night. VROOOOOM! I bought the boat on July 4th and on the second time out, the raw water pump failed and I seriously overheated it. I didn't know it at the time, but the alarms had been disabled. Bummer. I found out both heads had cracked and I got water in the oil. Bummer. Anyway. I brought it home, tore down the engine and pulled the heads. Took me awhile to find a replacement set, but I had the new ones cleaned up, inspected and reworked with a valve job. Along the way, I also purchased a Rochester "350 Magnum" carb and high rise intake to replace the worn out Weber. Replaced the fried starter too. Sure did feel good when it all finally firedb up!

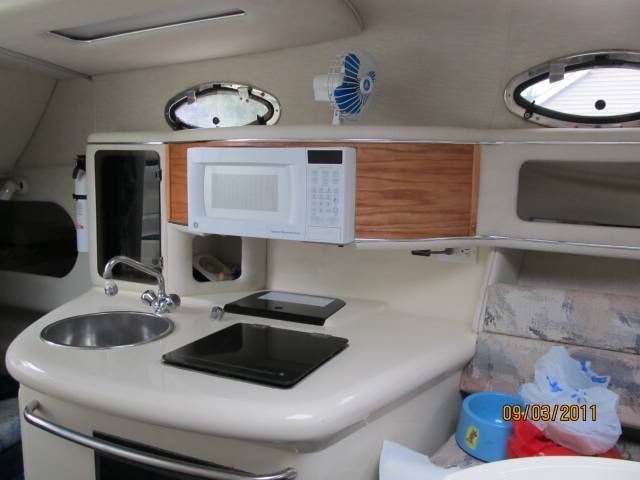
While this was all going on, I installed a new Sony Marine Stereo, re-caulked the windows, throughly cleaned everything and put in a microwave. Busy, busy. I know it's Labor day, but hey... I will get on the water this year!
 
Last edited:
WOO HOO! I finally got my engine back together and started it up last night. VROOOOOM! I bought the boat on July 4th and on the second time out, the raw water pump failed and I seriously overheated it. I didn't know it at the time, but the alarms had been disabled. Bummer. I found out both heads had cracked and I got water in the oil. Bummer. Anyway. I brought it home, tore down the engine and pulled the heads. Took me awhile to find a replacement set, but I had the new ones cleaned up, inspected and reworked with a valve job. Along the way, I also purchased a Rochester "350 Magnum" carb and high rise intake to replace the worn out Weber. Replaced the fried starter too. Sure did feel good when it all finally firedb up!

While this was all going on, I installed a new Sony Marine Stereo, re-caulked the windows, throughly cleaned everything and put in a microwave. Busy, busy. I know it's Labor day, but hey... I will get on the water this year!


Pictures! We need pictures. Glad you are out again. MM
 
Here's the microwave. I stained the rest of the wood in the cabin to match the oak veneer.

MicrowaveFinishedsmall.jpg
 
Last edited:
Hi folks,
First time I found this thread and just spent and "extended" lunch break reading. Very good stuff here. I was wondering with the microwave install (mine does not have one), did you make the wood on either side of the microwave hinged to still have storage on both sides? I would like to add a microwave as well, after I get done spending about 3 boat dollars on new cockpit upohlstery, getting some gel coat scratches fixed, and finish putting in a new water heater and bilge heater. I've had my boat since July and I'm just now moving forward from the many things the horrible survey missed. Its been an expensive year so far but I'm going all the way to get ready for a wet slip ASAP. So far, I've done.....
-new gimbal bearings and bellows
-new shifter cables (don't buy off brands when you do these....just sayin)
-impellars
-all fluids changed
-fuel sending unit and gauge
-2 new trailer tires and a spare
-new battery charger
-2 new carbs
-blower motor
-water heater removal (rusted evil was shot with my .45 upon removal.....yes it was that bad)
-renewed all fire extenguishers and signaling gear
-new anchor rode

So far the gel-coat work and the upohlstery are the only things I have hired-out to have done. I look forward to helping with my small bit of experience and I know I'm gonna have plenty more questions of my own.
 
I was wondering if any of you have replaced your cockpit upohlstery? I am about to get mine back from the upohlstery shop and was wondering how to get access to the screws holding the lounge seat in place. The removal was easy enough by just pulling it off since the plywood was soft. However the screws fastening it obviously are screwed upward from the aft berth's ceiling below somehow. Therefore the headliner needs to come out somehow. After some exploration, it seems the headliner is stapled to the ceiling and I don't see how to re-attach the headliner after screwing down the seat base besides putting new screws through the headliner to hold it up. Is there a better way? I don't want to pull out this stapled headliner if there is some other way. I may post this question in a repair forum also. Thanks for any help in advance.
 
I pulled the lounge seat on my '97 and I did not have to remove any headliner. It was a matter of finding the 'hidden' screws. Some are pretty obvious - they have decorative plastic covers snapped over them. Others may be hidden in a crease or pleat. Since the screws are still in place on yours it should be an easy matter to locate them from below.
 
I have found the screws with the caps you are speaking of on the side panel with the mirror of the aft cabin but it appears to be a separate panel from the headliner. I might go ahead and remove that side panel and see if it exposes how the headliner is attached better. The headliner must come down since the old screws that held that lounge seat base cushion are still there pointed up. I wish I was at the boat to take some pics. Also, I might fish around the edges of the headliner in the cracks some more for some other screws I might have missed there. So far I have done a little light prying on the headliner and thats where I discovered the staples holding it so far. Also once I finally get to these seat base screws, should I apply some type of sealant like caulk to the screws when re-attaching the new seat base? It seems like they are pretty well out of the way of the weather when the seat is on but I do have some moisture, dampness issue in that aft cabin at times.
 
Also I should clarify that the screws for the seat base are separate from the ones holding the headliner I assume since some are near the center of the seat base and all I have is smooth headliner material in the cabin below in those areas.
 
I had the same problem several years ago on my 1994 270. The seat came up easy because the wood was soft. I cut the screws off and filled the holes with silicone. Then I got ss staples and stapled some heavy duty velcro to the new plywood. I stuck the mating velcro to the velcro on the seat and then peeled the tape off the back of the velcro and stuck the seat into place. That way I can pull the seat up every winter and store it in the house. The only problem I had was I used too much velcro. I put three long strips on the seat and to the base. I throught I was going to break the plywood or my back tying to get it off the next winter. So the next spring I just used four small pieces and it works great. It doesn't take much to hold the seat in place. Good luck.
 
After having thought about it some more (it's been several years) I think I did have to drop the headliner. Not all the way - just drop it down a few inches. But as I recall, it came down as a panel that was screwed in - there were no staples involved. You shouldn't have to remove the vinyl from the panel.

That velcro procedure sounds like a great idea.
 
Thanks guys. The velcro idea does sound good. I may look for some other screws just out of curiosity of how the headliner is assembled but the option to remove it at whim with the velcro seems to be the best and definitly easiest option. I will probably go that route. Great idea. Also MLauman I was noticing the pic of your boat with the rear bimini frame. Did you install that rear bimini or did it come with the boat? My current canvas enclosure configuration angles down to the transom from the back of the front bimini frame. I would love to upgrade to something like what you have and I'm trying to figure out how high I want to put it on the wish list depending on cost. Also, is it just a rear bimini top you have or do you have a full side enclosure to go along with it?
 
My boat came with the factory Camper Package which includes the rear bimini and a fully enclosed canvas
 
I was noticing the pic of your boat with the rear bimini frame. Did you install that rear bimini or did it come with the boat? My current canvas enclosure configuration angles down to the transom from the back of the front bimini frame. I would love to upgrade to something like what you have and I'm trying to figure out how high I want to put it on the wish list depending on cost. Also, is it just a rear bimini top you have or do you have a full side enclosure to go along with it?

My boat came with the factory Camper Package which includes the rear bimini and a fully enclosed canvas

Mine also came from the manufacturer with the full camper canvas. I got a complete canvas set form Great Lakes Boat Tops at a great price with a 25% off out of season discount. (Far less than people getting custom quotes.) They may have made the frames as well. (Dennis, AKA Lazy Daze, often knows this type of information. You could PM him.) MM

http://www.greatlakesboattop.com/sea-ray
 
Thanks for the info on the canvas. I'm probably a few months out from squeezing something like that into the budget as I have a few more projects in process to complete first like getting a new water heater installed, installing a bilge heater, and cockpit carpet. I hope to have these things and the cockpit upohlstery complete in the next couple weeks. Then a few more weeks to rebuild the boat slush fund.:thumbsup: But I will get a quote soon from them soon so I can figure out how many convienience store robberies it will take....j/k :grin:
 

Forum statistics

Threads
113,198
Messages
1,428,378
Members
61,104
Latest member
maybeknot
Back
Top