Cockpit re-upholstery project

Progress still moving - I'm in that slow middle stage of applying the barrier epoxy coat and finalizing the panels etc. 2 main decisions made in the past week or so

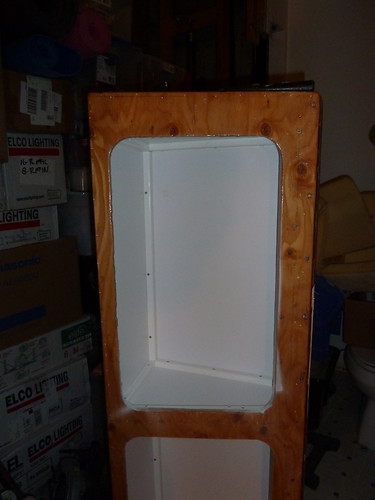
1) I've decided against trying to get a 'finish' coat in the cubbies in the helm seat. My initial idea was to sand and fill everything, apply 2-3 coats of epoxy, and then put a white enamel paint finish on top of that. I got as far as the first coat of enamel and decided to bag it. Far too much effort keeping everything dust free, sanding, wet sanding, etc to get that nice finished look. I punted and bought a big sheet of white laminate that I will apply to the interior surfaces and then will either trim the joints with routed pieces of starboard or simply caulk the corners with a good grade sealant.

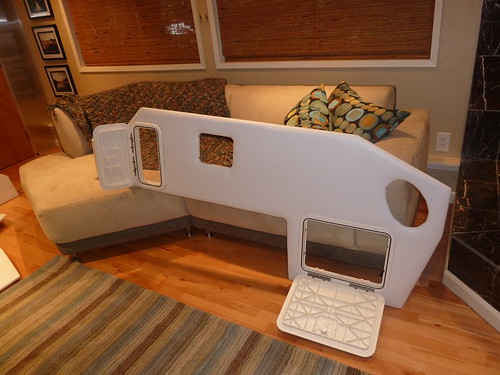
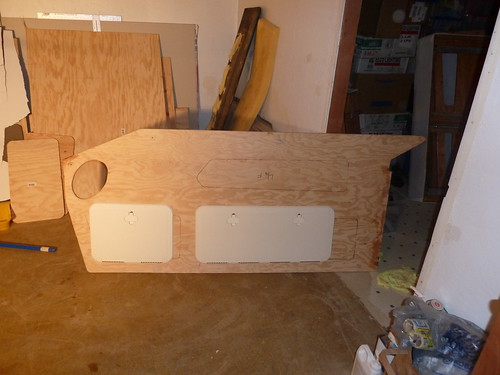
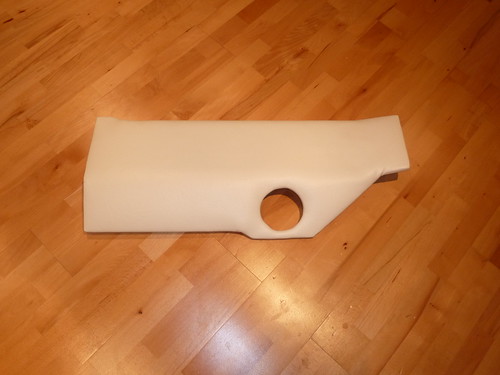
2) access 'doors' on the side panels - I toyed with building them out of starboard, making them out of plywood and covering them in vinyl with eurostyle hinges, sliding plastic tambour doors, etc. I decided instead to go with pre-made plastic access hatches from I.P.S. (great lakes skipper).

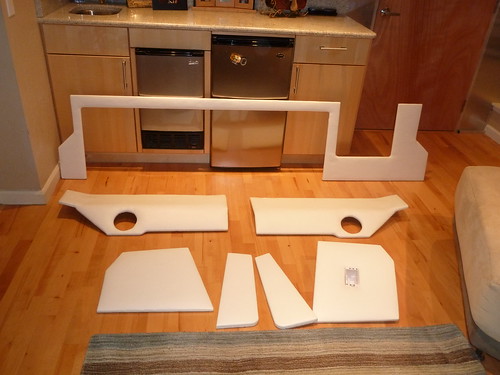
I still need to figure out what the final dimensions for the open cubby on the left side, but otherwise I think the panels are all set. I still need to template out the seating surfaces, including the bolster for the helm seat.

Pics of the new access hatches


P1010374 by Boykster, on Flickr


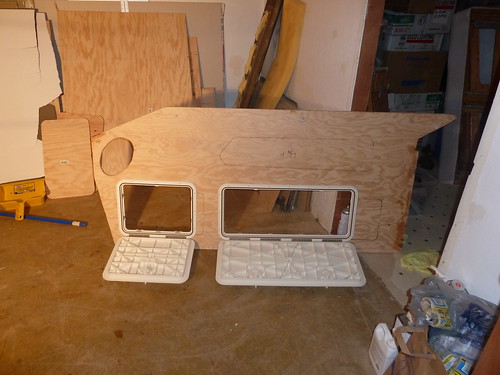
P1010375 by Boykster, on Flickr
 
Looking Good!
 
More progress -

Vinyl and some misc hardware arrived, so I decided to try my hand and upholstering one of the smaller panels. I covered it with 1/2" foam and then stretched and stapled the vinyl.

Front

P1010376 by Boykster, on Flickr

Back

P1010377 by Boykster, on Flickr

I need to clean up that one wrinkled area on the lower right - I just need to pull the staples from that section, restretch it and re-staple. Overall though, I'm very pleased with how it came out.

Also, in the never ending saga of the helm seat back / cubbies, I got the white formica laminate installed in the cubbies and got the internal trim mostly done. I used 5/8" starboard cut into strips, routed with a round over bit and screwed into place


P1010378 by Boykster, on Flickr


P1010379 by Boykster, on Flickr

Progress has been somewhat slow due to work and other things, but so far I'm quite pleased. I'm still waiting for the rest of my foam (1", 2", and 3" sheets) for the cushions/seating, but things are progressing nicely! I still have a bunch of panels that need to be epoxied before I foam/vinyl them, but pretty soon I'll be focusing on the seating surfaces and the more complex sewing upholstery. Fun!
 
Hey Boykster......one would almost think you knew what you were doing. LOL LOL

Just kidding.....looks like you're doing just fine. Want a job? We could use a hand now and then with our little boat refinishing business. :)

"I need to clean up that one wrinkled area on the lower right "

We find that inside corners can be a little bit of a pain in the butt once in a while....especially if they are nearer 90 degrees. Yours is a pretty wide angle and it should smooth out nicely.

Something to think about if you run into wrinkles in tougher corners.....we sometimes use a heat gun to warm and soften the vinyl making it easier to stretch smooth around curves and corners. Not often...but now and then we have to resort to that.

Keep up the good work.
 
Thanks for the compliment and the tip on the heat gun - I think this one will even out just fine, and I know what I did wrong - I didn't tackle the inside corners early, I waited on this one and I paid the price for it. I needed to tack the sides roughly and then do the fiddly corners, and then do the rest of the perimeter.

As fun and satisfying as doing this for a living might be, I'll stick to my day job :grin:
 
Very nice work! I did a similar project on my 300, agree those compound panels with brackets are a pain. On the staples, are you using Monel? They won't rust like stainless staples, expensive but well worth it when you've gone to this much work. I got an electric stapler from Lowes since epoxy coated wood is hard and makes hand stapling dificult.
 
Thanks! :smt001

My local Lowes didn't have monel staples, but they did have stainless, so I bought a couple of boxes of stainless. I'm pretty sure the original staples were stainless, and there wasn't any rust, so I'm not that worried about that part of it.

And yes - I bought an Arrow heavy duty electric stapler. No chance I was going to use a hand stapler. About 6 years ago I built a home theater in my basement and went with upholstered walls for acoustic reasons (sound dampening / diffusing panels behind cloth). Thousands of staples later

Front
P1020664 (Medium).JPG


Rear
P1020662 (Medium).JPG
 
Last edited:
Boykster very impressive work my friend... keep the pics comming and am excited to see your new seating installed...
 
Been spending an hour or so each evening finishing up the panels - epoxying, then foaming and vinyling. Done with all but the port side large panel

Back trim panel, and some of the smaller side panels


P1010381 by Boykster, on Flickr

Starboard side large panel


P1010382 by Boykster, on Flickr

Access doors open


P1010383 by Boykster, on Flickr

I'm happy with the hatch doors I chose - they're not as 'cool' as some solutions I've found, but they look good and are going to really make the storage areas in the cockpit much more functional.

My thicker foam finally arrived, so next week its back to seat surface planning, and I still have 2 more pieces to break down and template out - the rear seating bench. I'm going to make the seat back bigger - taller really - so there's more cushion to lean back against. Then its time to consider the sewing part of the project....:smt017
 
Wow... very impressive work. It looks so beautiful. You should be very proud of your work. I'm sure with all of the problem solving you have done so far that the sewing will be tackled with great sucess. Thanks for keeping updated on your progress...
 
Boyk, that looks like a million bucks! BTW, did you take these photos aboard a 76' Fairline or Sessa? ;-)
 
Last edited:
Double CRAP! I just realized that the hatch door lower right here


is too far forward (left) - it's not going to be openable where it is. I need to re-measure a few things,and might even have to get a smaller hatch door. The 'double' crap is actually OK now that I realized that I'm going to have to re-do the vinyl on this panel after figuring out if/how to reconfigure the door. I found a tear in the vinyl on the top edge - right by where the helm seat is. Probably from just moving the panel around - it's just a ding that if it was anywhere else I wouldn't sweat, but its in a spot I'll see EVERY time I'm on the boat.

C'est la vie - I can salvage the plywood panel - just need to do some 'patching' and re-cut / relocate the door once I get my dimensions re-checked. This is the downside of being a back of the napkin engineer :grin:

Luckily, I bought a bunch of extra vinyl - no worries there
 
Last edited:
I know it's an old thread, but any images of the finished project?
ANd how did you cut and staple the vinyl at the access door cutouts???
I did my panels and those areas came out like crap ;)
 
Wow = thread resurrect!

Unfortunately, real life caught up with me and I didn't finish the project :smt009 We ended up getting rid of the boat this past year after it and the project sat idle for 18months due to work, other travel, etc getting in the way. I did transfer all of the materials and progress so far to the new owner, so hopefully he'll continue the work.

Now I'm boatless....and have 10-foot itis....looking at 370-420 DAs in the late 90's - early 2000's era as the next boat!
 

Forum statistics

Threads
113,185
Messages
1,428,154
Members
61,095
Latest member
380Thumper
Back
Top