Bravo 3 Drives...........another place to look for corrosion.

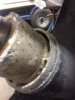
Hmmm... nice pitting. Let's hope it's all lightly loaded as they're all stress concentration points where cracking likes to begin....

Jim,

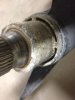
The bad news is that corrosion can be accelerated by stress particularly in marine conditions. Clearly some is a function of physical exposure, but none the less high load areas suffer more. when you speak of blending 10:1, what do you mean?

Henry
 
10:1 is the slope, ramp, of the blend. If you have a pit that's 0.020" deep, you'd want to blend to the free surface with a radius of 0.200" inches. Often, this probably isn't going to be practical with most boating equipment, you loose to much material to maintain the functionality of the part.

Theory says that a notch of zero radius makes in infinite stress concentration. As the transition becomes smoother, the concentration is lessened (consult your favorite mechanics of materials book for a chart). For many metals in a benign environment, roughly, a 20% increase in stress will halve the fatigue life. And yes, the greater the stress field, the faster the corrosion in most materials. It also leads to another mechanism of failure, stress corrosion cracking. Not too long ago, someone had a prop shaft here that from the picture, looked a bit like that was the initiator, which then moved to fatigue and then cleavage (not the good cleavage either).
 
Last edited:
How bad is this? Make it one more year? Any suggestions? Thanks.
 

Attachments

  • bearingcarrier2.jpg
    bearingcarrier2.jpg
    10 KB · Views: 339
  • bearingcarrier1.jpg
    bearingcarrier1.jpg
    9 KB · Views: 342
That's starting to get pretty bad and if it were mine I would be replacing the bearing carrier in the next year or two.

In the meantime I would sand, prime and paint them and see if the corrosion gets any worse over the course of the season..
 
I have a Bravo 3 with the same. That piece is replaceable. You can acctually do it without taking the drive off or apart. Mercury makes a tool that fits inside and unscrews this piece off. I borrowed the wrench, drained the oil and used a small propane torch to heat it up. I need a long pry bar and a friend s help to unscrew it. Repalaced the part, torque it to factory recomendations. I forget the lbs of torque, its pretty high. Its been two years and doing fine.
I purchased the Bearing carrier assembly from www/dougrussell.com
Mercury part number 710-805329A 1
Cost was $370.00
 
Thank you for the responses. Any advice on masking off the propeller shaft and also the small gap area between shaft and bearing carrier?
 
I had quite a bit of corrosion on my drives and with one side being off for some winter maintenance I decided to sand and repaint. With the research I concluded the best approach (long term) was to treat the bare aluminum with Alumiprep and then Alodine. A friend who has a paint booth sprayed it with a couple coats of a two part epoxy urethane primer. We just sprayed on a clear coat over the top. I added a prop shaft anode to help keep the corrosion at bay. I'm hopeful that it is just touch-ups that I'll have to do going forward. The corrosion around the bearing carrier is significant and not likely to survive its removal ... so a new lower unit might be needed longer term. The port drive will be off next fall, so if this holds up well over the summer, I'll do the same again. Total cost was about $200 - $150 for the spray and $50 for the chemicals (lots left over so more will not be required next time). Next time I might consider sandblasting ... has anyone done this to an assembled drive? things to watch out for?

having trouble adding the link to the video ... it is at www.youtube.com/watch?v=0xQEqCBmtTY
 
Last edited:

Forum statistics

Threads
113,202
Messages
1,428,452
Members
61,108
Latest member
asigman
Back
Top