'85 Cobalt Restoration

Yep the lemonade is that you found it now instead of after you found 3 quarts of fresh oil in the bilge and had to listen to that annoying low oil pressure alarm.
 
Yep the lemonade is that you found it now instead of after you found 3 quarts of fresh oil in the bilge and had to listen to that annoying low oil pressure alarm.

I guess you're right. The machine shop can't lift the motor until next Monday or Tuesday. This has sorta screwed up my progress as I don't want to put anything else back on the motor. Guess I'll clean the garage or something....
 
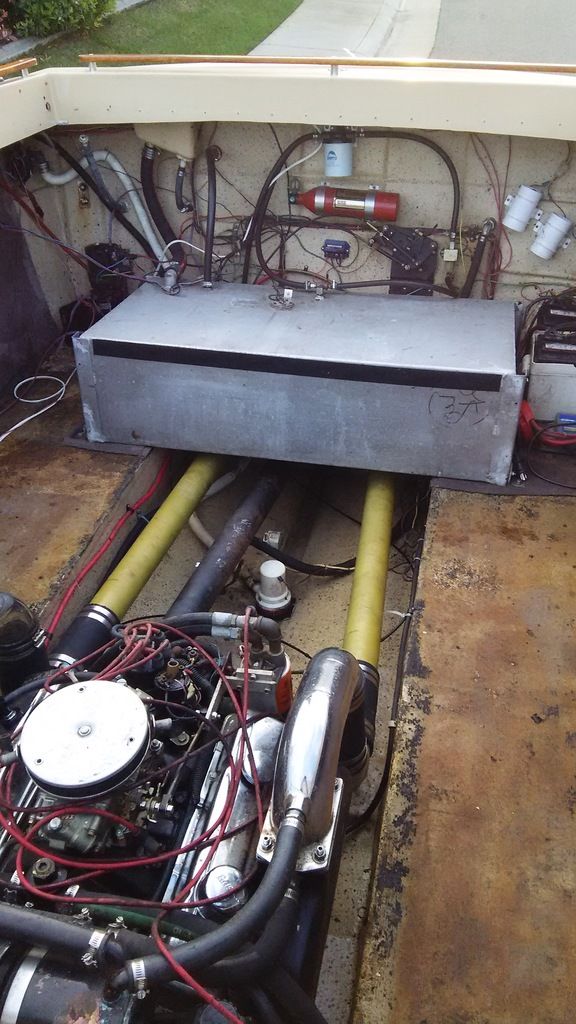
Well I discovered another setback this past weekend. I removed the fuel tank for a number of reasons, mainly to clean and it sits on top of the carpet so to re-carpet it needed to come out. Like everything in the bilge it was black with mold and grease so this weekend I cleaned it up. Good thing too as I found 3 corrosion points in the bottom with really deep pits as well as one seam weld that looks a bit funky....kind of powdery. The tank sits in the position in the pic below.


I am taking it to a shop tomorrow either for some patches or to have a new bottom made. Depending on what I hear I may have to have a new one made. It's aluminum, 52 gallons and the rear seat sliding brackets bolt to flanges welded to the tank.

This is a lesson to anyone that feels they can get an old boat for a "really good deal and fix it up". As a previous owner of this boat I know it pretty well and I did not have real high expectations of the condition but I'm finding it worse than I hoped for. And I haven't even pulled the outdrive yet.

Pressing onward....

Shawn
 
Halon system. That's unusual for a boat this size, right?
 
That was Cobalt. Halon there and in the engine compartment forward. It also has a wet bar, it had 4 cigarette lighters and ashtrays (mid '80s), idiot lights on the instrument panel for low oil pressure, low amps, low fuel and high water temp and a power stereo antenna. They even had a model that had a power center windshield section that dropped below the deck for access to the foredeck. Some would say innovative, others would say it was more stuff to break.
 
Well I got back at it again this weekend. I got most of the motor back together. When I opened the box of new plug wires they were the wrong ones and NAPA has to order the correct ones for me and I should have them on Tuesday. But everything else is good to go. I am having the motor lifted up next Thursday so I can drop the oil pan and correct a leaky dipstick tube. I have the fuel tank out for repair so I still need to rig a small tank to run the motor. I'm hoping to start it next Friday or Saturday. Meanwhile I am still cleaning up the wiring. It looks like many of the wires in the Merc wiring harness were by-passed with new and now only a few of the wires in the big Merc plug are actually connected to anything.

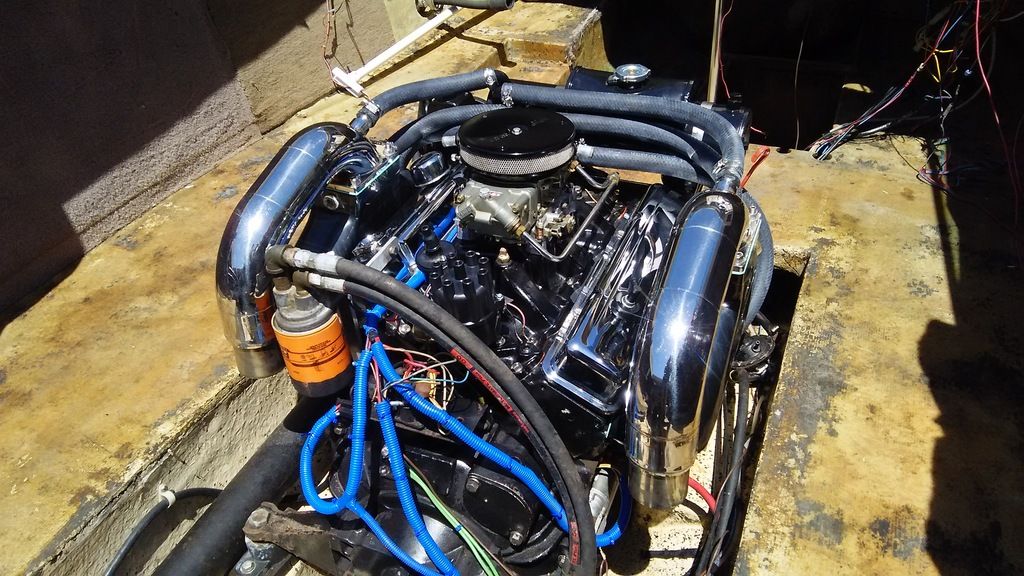
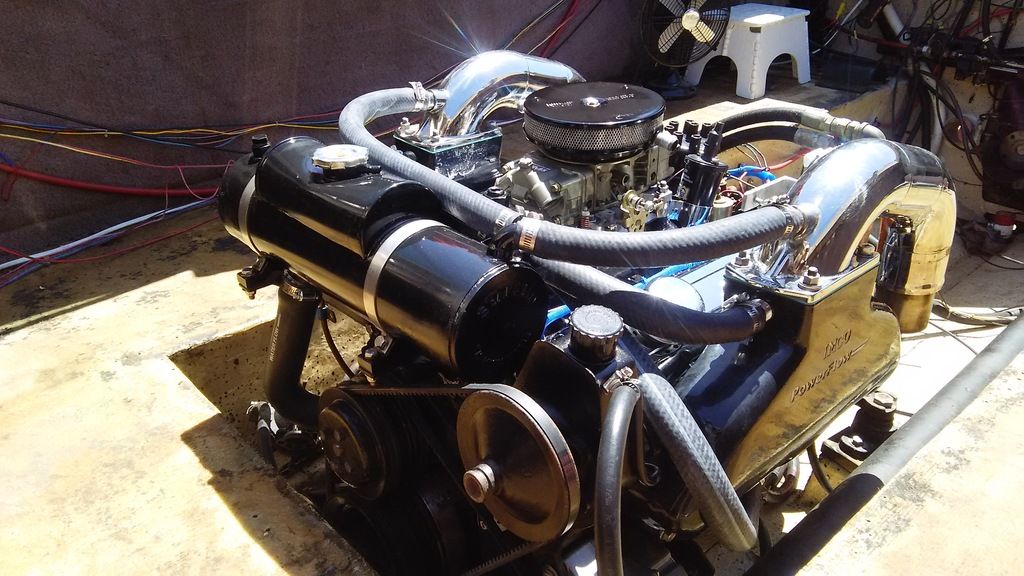
It's actually looking pretty nice. The IMCO Power-Flow manifolds and elbows look great as do the new chrome valve covers. Even though I labeled all of the old cooling hoses when I removed them, I'm really glad I took pictures with my phone for future reference. There is really a lot of hoses in this system.


After I get it running I can get the drive off and start on it. It's a SEI 106 and only about 2 years old but like everything else on this project it was mostly neglected. I'll be changing the bellows and the checking the gimbal bearing. The drive looks kind of rough and I will have to get busy with the sander and wire wheel and then paint it. I ordered some new SEI labels. All the zincs need changing and I am suspecting I may have to replace the trim cylinders. Maybe I'll have it done before summer's over.

Shawn
 
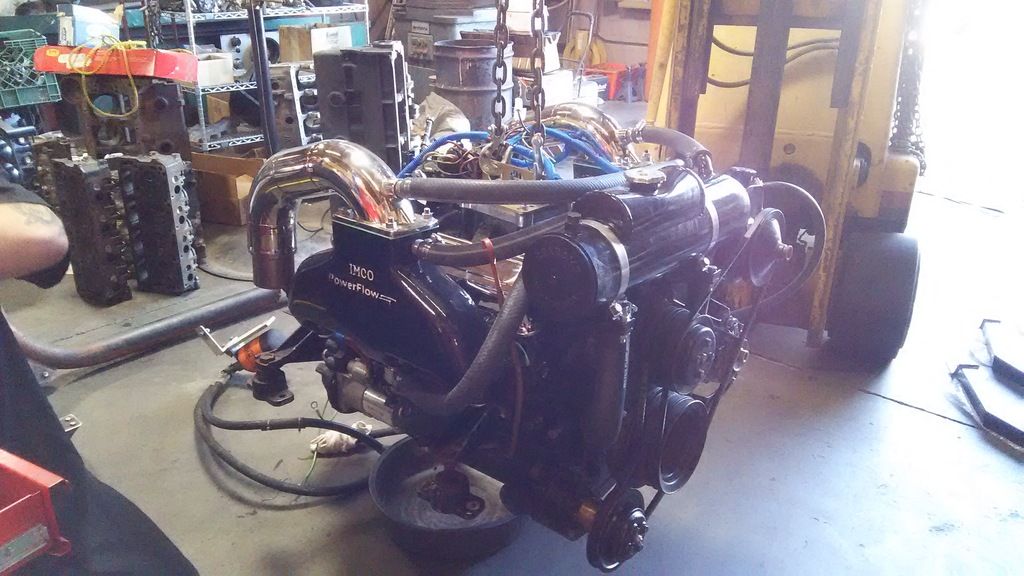
As I mentioned in this thread and also another thread on this project ("Not That Great A Deal") I got the motor mostly back together but the motor needed to be pulled from the boat to fix a funky oil pan/dip stick tube connection that was loose and would not tighten. So last Thursday the machine shop (Crackaway Engine Machine-Elk Grove, CA) I've been working with lifted the motor out to correct the problem. But as luck would have it, and in line with the way this project has been going, the pan needed to come off and a new connection machined into the pan. So to do that the shop wanted to put the motor on a stand. But to due that the bell housing needed to come off and along with that all of the jack shaft parts as well.


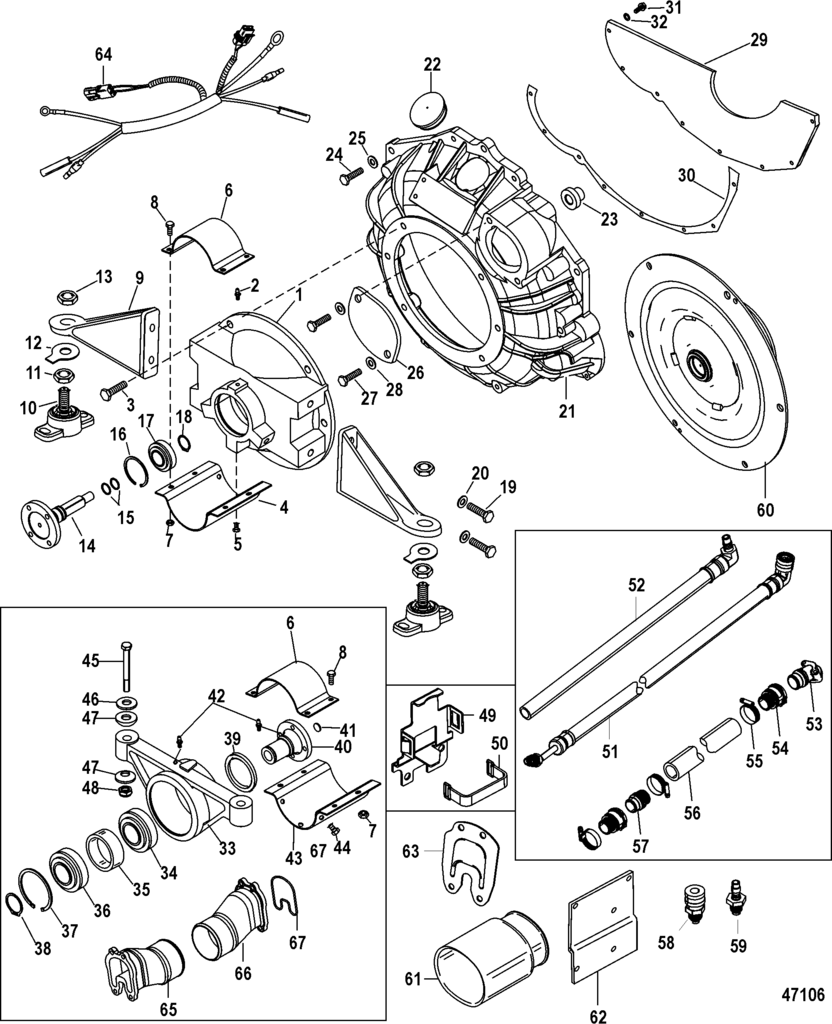
As I have explained, this model has a drive shaft (jack shaft) between the motor and the outdrive. At the back of the motor is a special bell housing with a gimbal bearing held in with a semi-pressed in fit along with a snap ring keeper. A short flanged drive shaft (#14) goes through a gimbal bearing (#17), through the coupler and lastly through a pilot bushing (#23) as referenced in the drawing below.


As we took things apart a lot of brass shavings dropped out of the bell housing apparently from the brass pilot bushing. The gimbal bearing was worn just enough to allow the short drive shaft to wobble and destroy the bushing. It took until today to find the parts but I have them in hand and the motor can go back together tomorrow. The brass bushing has been replaced by a roller bearing. Many thanks to J&H Marine in Stockton, CA for tracking down these parts that are more rare than a virgin on prom night.

But now that the engine was out and I was cleaning up the bilge I discovered some breakdown and delamination of the fiberglass where the floor rests on top of the stringer. There was actually a void there and in my mind I knew water had gotten in and the stringer was going to be rotted. I've had so many setbacks with this project I was sure this one was going to be too expensive to fix and I was already planning to cut my losses and part the boat out.

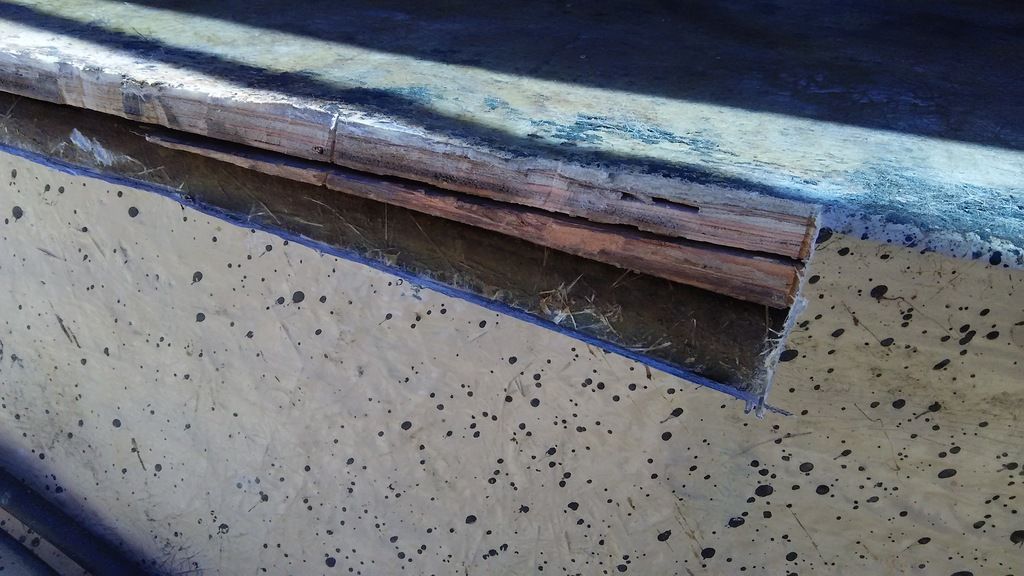
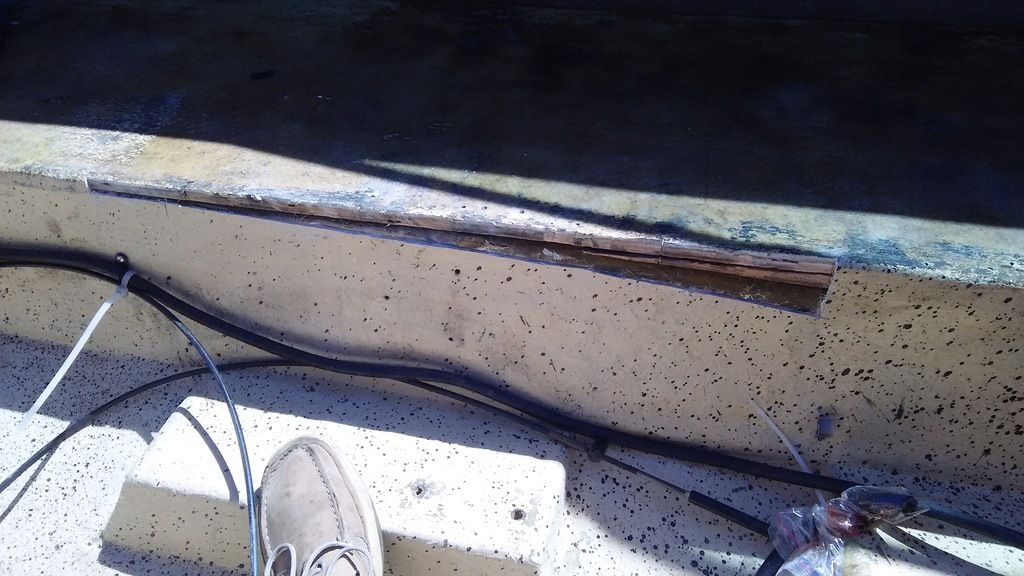
So today I cut out the glass where the damage is and I was stunned to find no rot, no stringer damage and a small issue that is repairable. Apparently during the design and construction of the boat the stringer and the floor actually separate from each other. A wedge was built in but somehow over 30 years separated. See the pic.


That is right where people like to stand in this boat and I think over the course of 30 years the glass just broke down. I am planning to insert some 3M 4200 between the wedge and the floor and the wedge and the stringer and clamp it all together until dry. Next I plan to fill the void with resin and glass mat and a final layer of glass cloth. Hopefully I will have this finished over the weekend and the motor can go back in early next week. I hope to start it later in the week after I clean up some wiring issues.

I hope people are enjoying reading about this progress. Its somewhat therapeutic for me to share. I am very emotionally attached to this project and I, more than anyone, knows how stupid and dangerous this can be. Hopefully its also a lesson to others how these restoration projects can go financially south in a hurry. Counting what I paid for the boat ($3500) I'm now in it about $6500 with at least another $1200 that I know of. Realistically I will be about $8-9000 into a boat that BUC says is only worth about $5000.
 
Great stuff Shawn. Keep it coming...I mean the narrative, hopefully not the "issues!"
 
I really enjoy threads like this - keep it up. That boat is a classic, a labor of love, no way to put a price on it.
 
I really enjoy threads like this - keep it up. That boat is a classic, a labor of love, no way to put a price on it.
 
Over the weekend I got the engine in the boat, all hoses and parts back on, all fluids topped off, primary ignition wiring sorted out and got ready to try and start it. I haven't put a motor together for bout 25 years and I really wasn't sure whether it would start or not. Because the fuel tank is out I was going to have to rig a temporary tank but I wasn't interested in doing that today if it wasn't going to start. So I hooked up some water and turned the motor over and gave it a squirt of starting fluid. To my surprise it tried to start.

I have a 3 gallon tank for my dingy outboard and I emptied that, put in some fresh fuel and connected it to the motor. I tried starting it and it did start and run for a few seconds several times but the batteries were pretty low and by now would no longer turn the motor over. I charged the batteries overnight but it looks like I will need get a couple of new ones.

Enthused that it looks like its going to run, I buttoned everything up and got started getting ready to start my new job tomorrow. I have been unemployed since last November and was thinking about retiring but this opportunity came up and it will give me a chance to pad the savings account and finish the Cobalt. Unfortunately, I won't have the time now to devote to it. Only going to have weekends. There may be light at the end of the tunnel yet.
 
Well it runs. Had some trouble getting it started without backfiring so I checked firing order, it had fuel but I discovered a vacuum leak. Plugged that, massaged the timing and got it to run and eventually idle. Good oil pressure, cooling water flowing but I need a temp sending unit. Had to use my laser thermometer to monitor temps.

I was going to take a video of it running but I don't know haw to post a video. Any help here?

Thanks
Shawn
 
That's great Shawn! BRAVO! You can post the video to youtube and than reference it on CSR like you would with a photo placed on Photobucket.
 
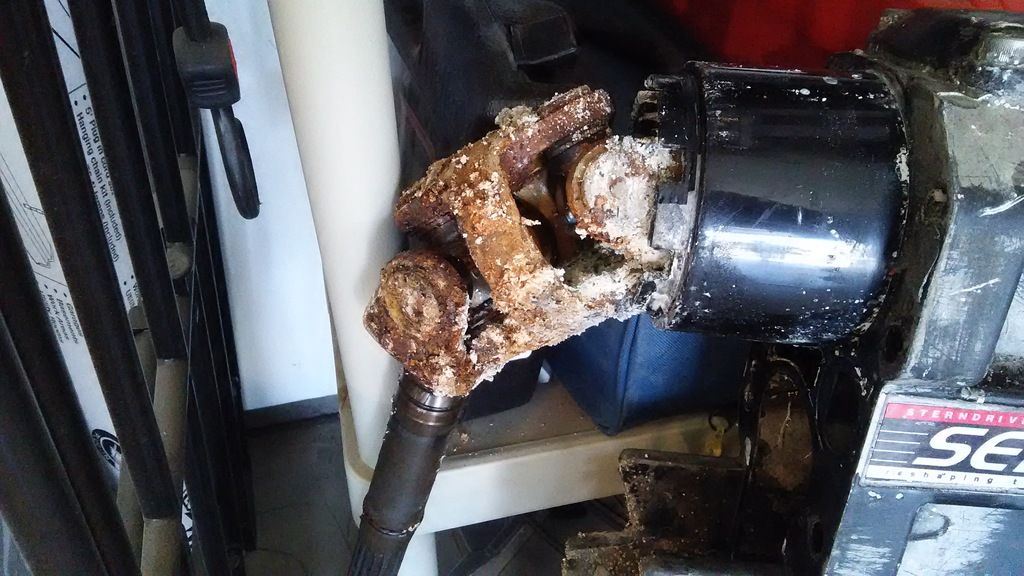
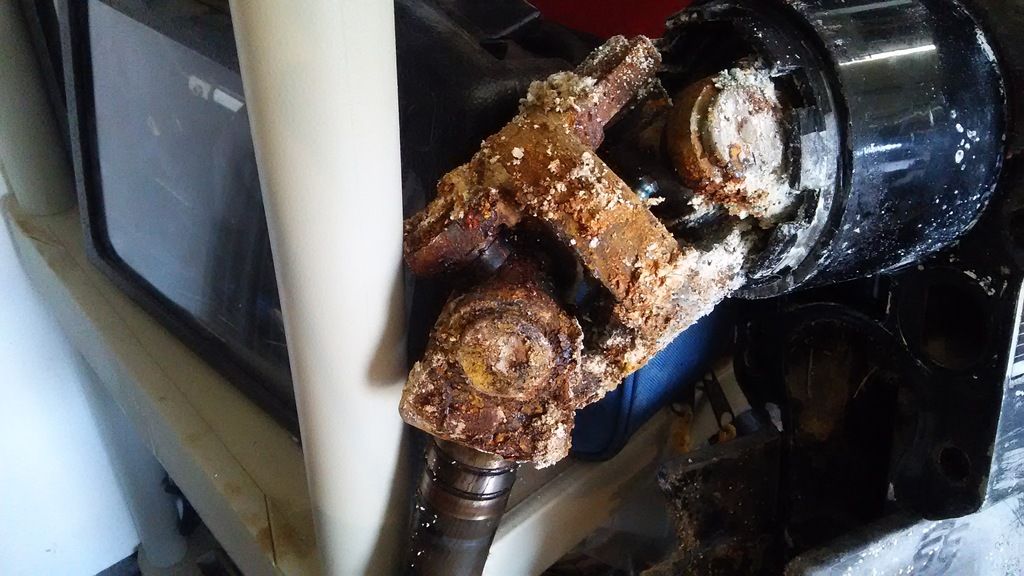
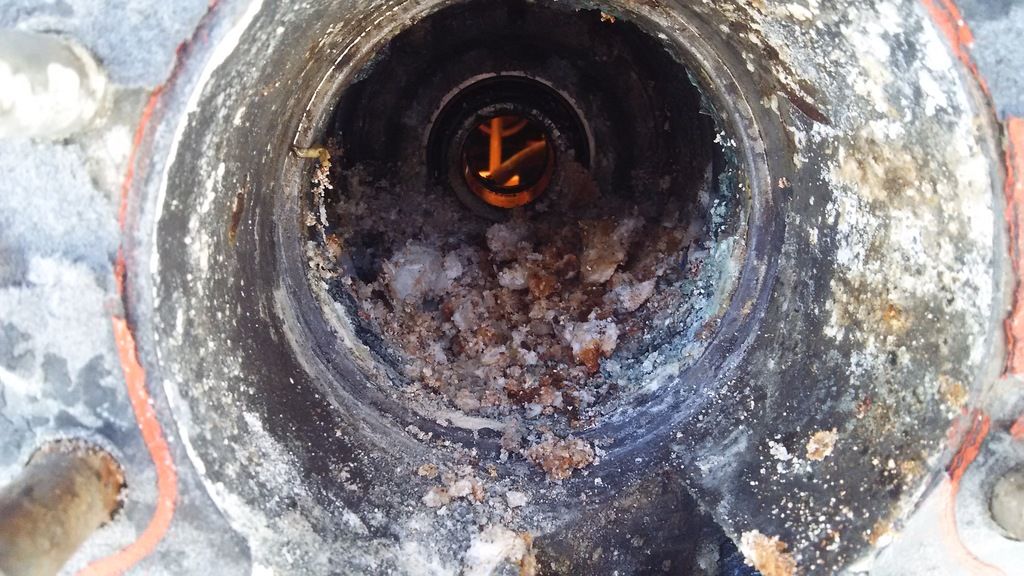
With the engine running well I decided to pull the outdrive and get the service out of the way. I truly wasn't expecting this:


This last one is not a pic of my arteries but inside the u-joint bellows.


I also posted these in another thread but I wanted to keep my restoration thread current as well. This week I'll start cleaning things up to see how bad it is.
 
I shot a couple of short videos of the motor running. Lets see if this works.

[video]<iframe width="560" height="315" src="https://www.youtube.com/embed/lNpjH0iiX-8" frameborder="0" allowfullscreen></iframe>[/video]

[video]https://youtu.be/hDyhEIfNub4[/video]
 
purrs like a kitten, big mean kitten... :) nice job Shawn.
 
There has to be some end to this....right? I tried to remove the bell housing from the outdrive today and it is all so corroded that the hinge pins seem welded in. I ended up stripping the inside of the pins.

The is a mid '90s transom assembly advertised locally on craigslist for $200. The pics look pretty good and I think I will go look at it Monday after work.

Anybody know how to R&R an Alpha transom assembly?
 
Hi Shawn,

I always wondered where this boat went! My sailboat was on the same gangway for 25 years and every time Denny's boat was there, I'd take a stroll around it. I never knew the brand because there was no name on it except the CM23. It really looks good in the water, especially when I'm working my ass off scrubbing my boat and Denny cruises by with a bunch of girls laying all over it. I told him I wanted it when he was ready to sell. Suddenly it was gone. Said he sold it to a friend for $5,500. I'm glad it ended up with someone who appreciates it as much as I did!

Anyway, it inspired me to look for one on and off over the years. Finally, a week ago, I found one in Phoenix of all places. Drove out there, did a compression test (160 in all 8), operated everything, and drove it home on its original trailer. Interior is a 6 out of 10 so needs to be replaced and I think I'll paint the hull from the rub-rail to the waterline like yours. In any case, hopefully I'll be in the water by summer.

Your pics and posts really inspired me to get off my butt and go get this thing, so I appreciate the informative posts on your effort to get your old girl going again. How is your progress coming? Is there anything specific to the CM23 that you think I should investigate?

Thanks a bunch!
Mark
 

Forum statistics

Threads
113,177
Messages
1,427,990
Members
61,086
Latest member
MrWebster
Back
Top