- Feb 5, 2009
- 827
- Boat Info
- 560DB
2 x Raymarine e125's
Walker Bay Generations 360 Centre Console w. Yahama 60HP
2 Seadoos
- Engines
- CAT 3406e (C15's) @ 800HP
I purchased my 560 in the spring of '09 and after a year of running and getting used to the boat, have determined that there are a few things to maintain/upgrade to add to the experience. In case anyone has thoughts, comments or interest, thought I'd post my winter work list that I just sent off to my marina manager (Mike). Some of the items on the list are there in the current form due to the great input I received from my fellow boaters here at Club Sea Ray.
Jackie J V
Winter Work List
In Process
1. Repair fish finder – Rene (Note to CSR readers - Rene is our Marinas Electronics Wizard) was to remove Digital Sender Module and send to Raymarine service centre for assessment and possible repair. Also had considered inspection and possible replacement of transducers while out of water. Given that the fishfinder is my only depthsounder, it is key that I get this fixed.
(Note to CSR readers - this has been a perpetual pain in the ... all year. The only depth sounder on my 560 is the fish finder and in my boating area, there is an awful lot of randomly placed granite that can turn a nice outing into a nice repair bill real fast! Depth sounder has been working sporadically and try as I might to identify a trend or consistency of when working and when not, I can not isolate its working as anything but variable).
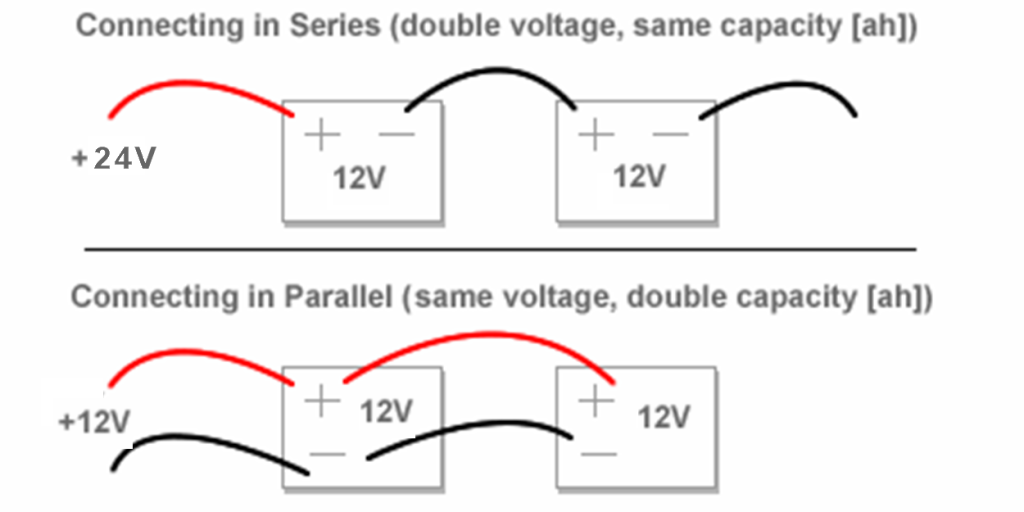
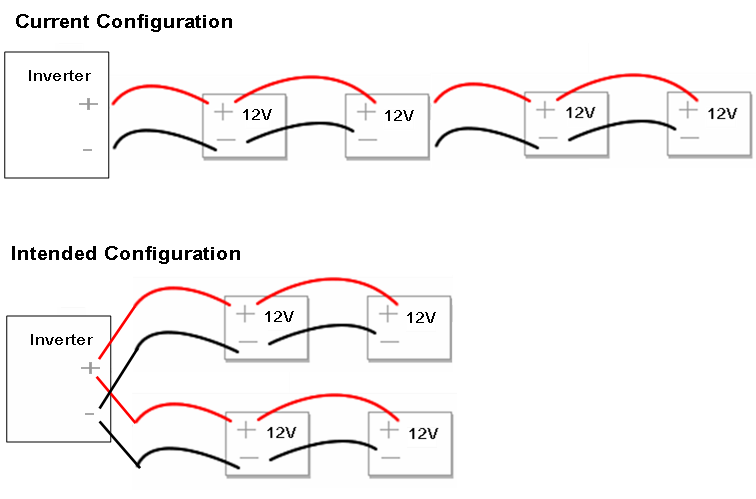
2. Inverter Set-up – Rene had made a number of modifications to the fix the inverter set-up. The final adjustment that he had suggested be done over the winter was to rewire the battery configuration. I may screw up this description so humour me ( J ). I think he said that the four batteries were hooked in a serial chain (not in series) so that the draw would be strong off battery one, but then diminish to the point where there would be little benefit of the draw coming off of battery four in the series. He was suggesting a rewire to configure the set-up as two separate banks of two to improve the efficiency of the set-up and therefore the total available amp hours.
3. Sunpad Cover –At the end of the season I had requested a replacement cover for the bow sunpad, in Sunbrella matching the canvas. Stewart had supplied a quote and I’m assuming this is underway.
In discussion/New items
1. Install Stern Thruster – As per quote supplied.
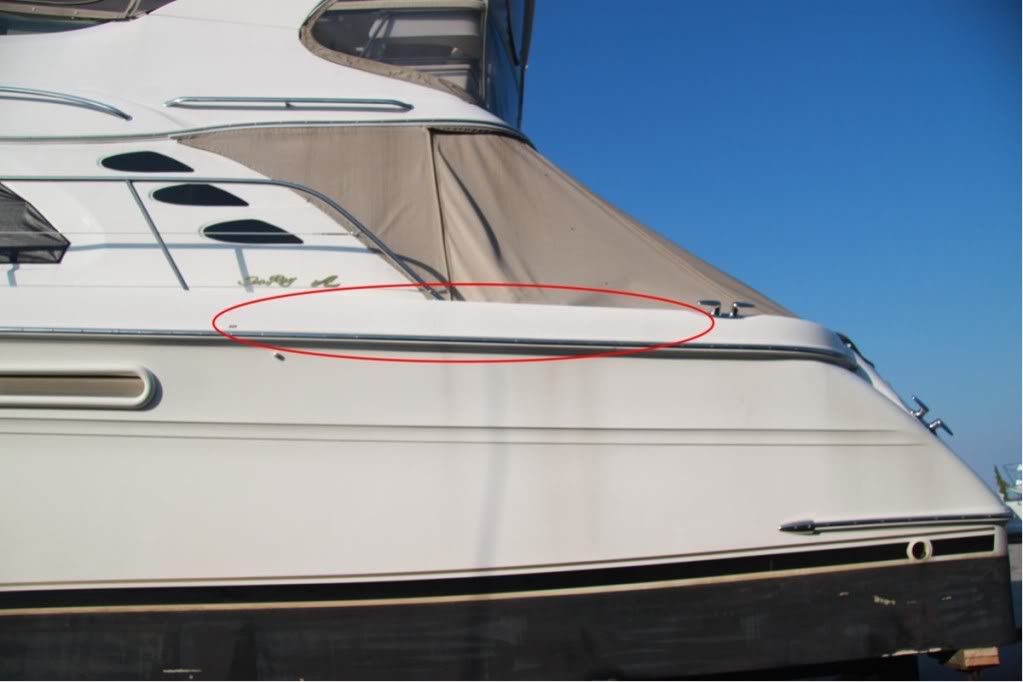
2. Assess hull core in question area – Had discussed taking a core sample in questionable area identified in survey and during inspection after haul out (See area bracketed by chaulk in attached photo from Survey “Jewer Bottom Area”). Need to identify source of issue and repair as applicable.
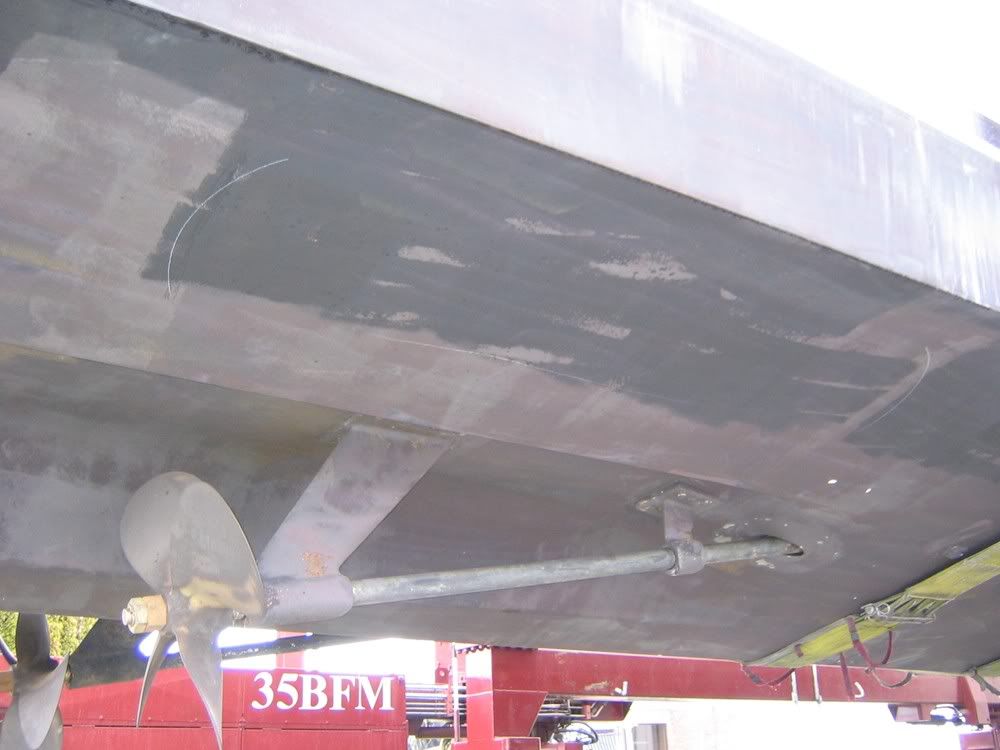
(Note to CSR readers - my original survey turned up an area of moisture in the bottom of the cored hull that nearly scared me off the purchase. After investigation and discussions with the local Sea Ray dealer and the marine surveyor, I concluded that the item was isolated and potentially even linked back to the original manufacture. Reinspection after haulout in the fall seems to support the original conclusion.)
3. Remove and sandblast Dynaplate – Had been painted over when hull last painted. Marine survey indicated that Dynaplate should be removed and replaced. I think it can just be sandblasted – however I’d appreciate your guidance on this Mike.
4. Electrolysis to running gear – The marine survey I commissioned on purchase included the following recommendation – “There is some mild electrolysis activity on the rudder and struts. It is recommended that these areas are cleaned and the underwater hardware is repainted and anodes are installed on the shafts and rudders.” Mike, I’d appreciate your direction as to what you think is necessary here.
5. Props – Replace props with spares in hold (please inspect spares first for dings, bangs or dents – I think they’re OK though) and have props cleaned and adjusted (if necessary). Replace cleaned props into hold for spares.
6. Adjustments to Swim platform – There are a couple of items under investigation. Maintenance and adjustments include:
a. Service – according to the manual there is an annual service as follows – “Two grease fittings on top of lift cylinders (pg 20 of manual) should be greased annually with a good moly based grease.” Please service.
b. Adjustment – the swim platform “droops” a little when under load. Refer to attached photo “Swim Platform Load Factor” for reference. I’ve got an enquiry in with the manufacturer GHS (Florida Bow Thruster - FBT). In a Sea Ray owners site, another owner indicated that at the instruction of the manufacturer, he had adjusted the platform to be an inch higher on the outside edge than the transom side to compensate for similar effect. I believe that this adjustment would be effected by adjusting the threaded rod under the swim platform. I am open to suggestions and will pass on any guidance received from FBT.

c. Modifications – The swim platform on the 560 sits extremely close to the water (I think a foolish design) and under load, drags under certain conditions (about 10 knots). Adjusting the droop will help a little. In addition, I’d like the two following modifications:
i. Remove cosmetic skirt – There is a trim edge which I can’t believe to be anything but cosmetic, on the underside of the swim platform. Most of the screws have vibrated out, so it is an easy task to remove. Please remove and retain (I’ll take home in case I want to reinstall later).
ii. Install spacer bars – Another Sea Ray 560 owner added 4” x 2” rectangular aluminium tubing (at least ¼” thick) between the lift forks and the fibreglass swim platform to raise the swim platform 4”. I think 4” x 4” would work better – but again am open to suggestions and discussion. I’d also appreciate your input on potential concerns. The other owner has indicated that it’s made a substantial difference and has held up well over the past two years since the modification was made.
7. Fibreglas repairs – There are a number of areas that need some fibreglass work/repairs.
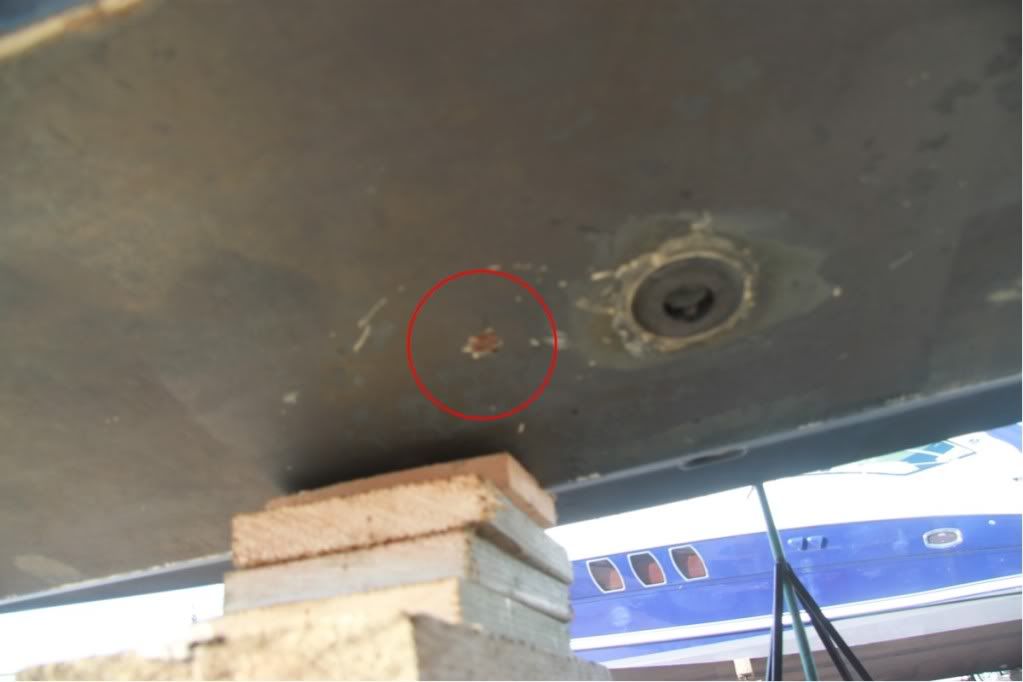
a. Refer to attached picture “FR - Underwater Chip”. There is about a ¼” chip taken out of the hull right on the bottom near the speed transducer. Please inspect for collateral damage and repair.
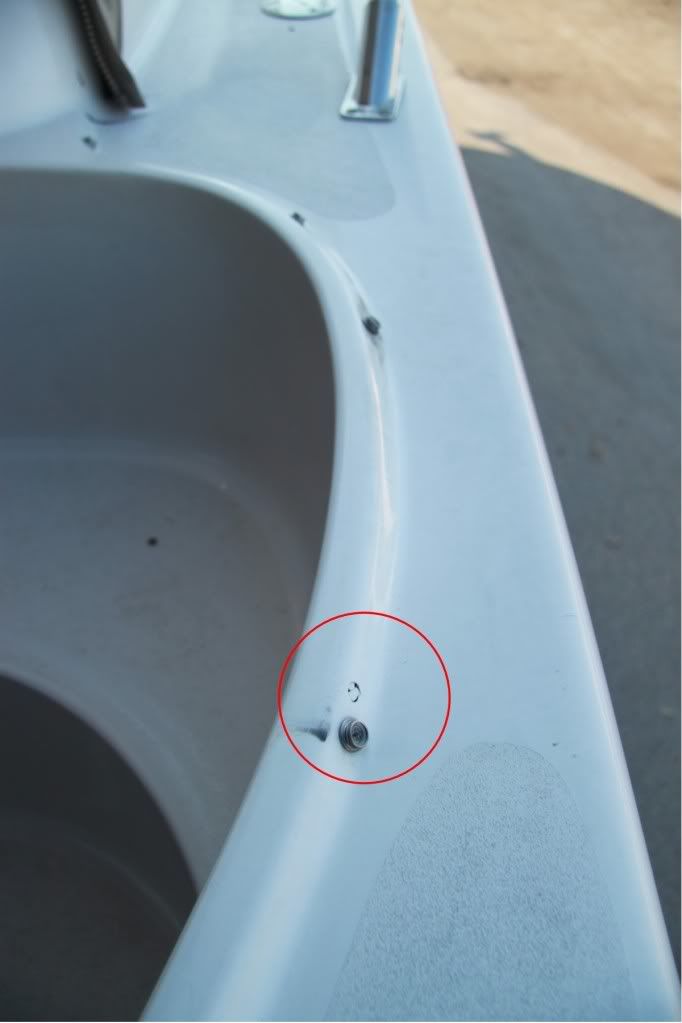
b. Refer to attached picture “FR – Starboard Entry”. There is a chip/hole/void on the starboard where you enter the boat off the dock. Looks like a fairly easy fix.
c. Refer to attached picture “FR – Transom Locker”. There was a crappy repair job done to the transom locker. Repair left a white patch and there are spider cracks emanating from the impact point. Please repair.
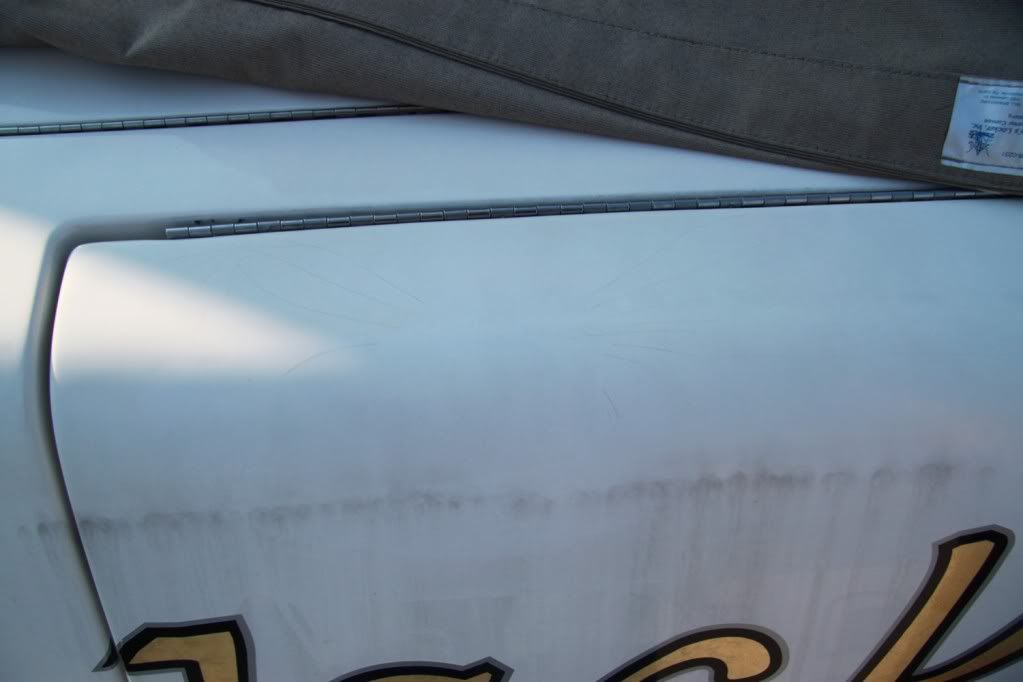
d. Refer to attached picture “FR – Port Side”. There are spider cracks along a six foot section on the side of the walk way. Please repair.
e. Swim platform – There is one chip where the previous owner had the dingy outboard sitting on the platform – please repair. Also it is obvious that there had been previous repairs to the swim platform due to the discoloration and spider cracks. How much would it cost to restore
8. Canvas Repairs – There are a couple of repairs/amendments I’d like to have made to the canvas as listed below:
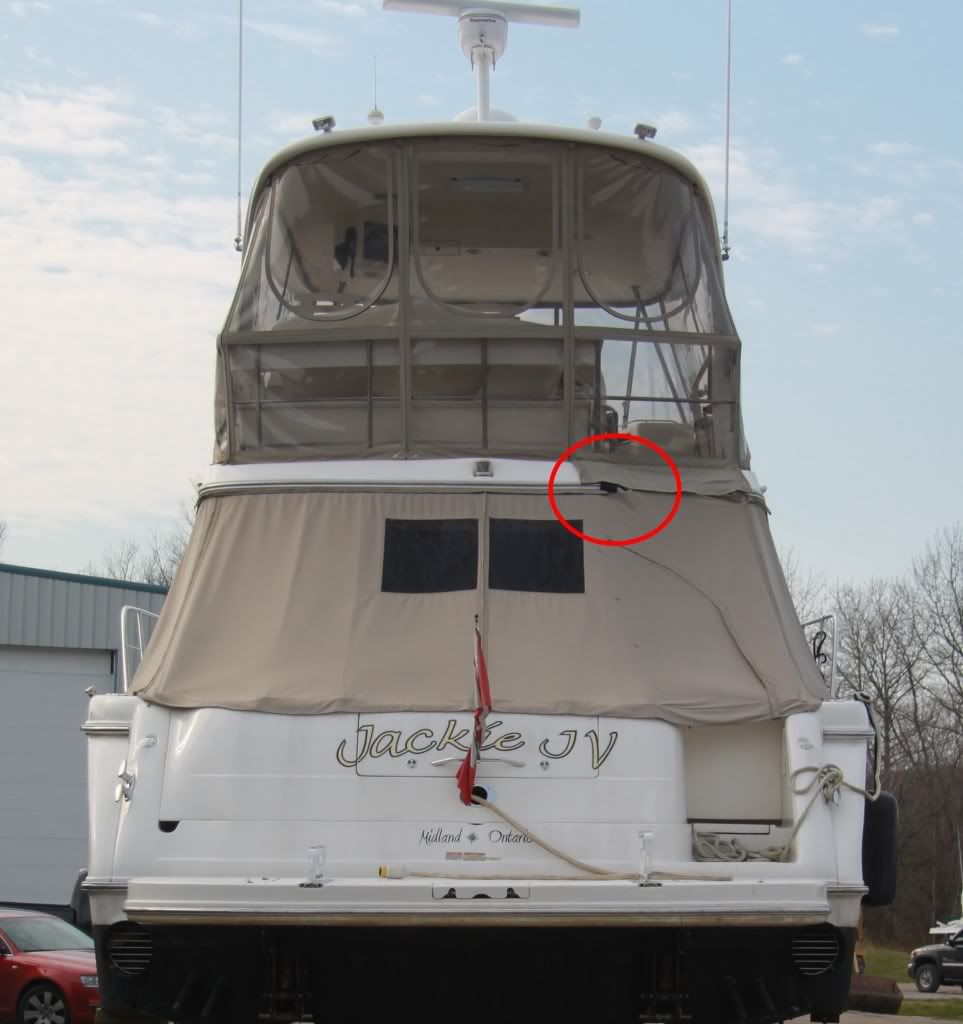
a. Refer to attached photo “CR – Aft Canvas”. There is a gap in the canvas which allows water to penetrate the cockpit. I had a temporary solution using a piece of Velcro, however I’d like to adjust the canvas by adding a matching flap to cover the gap. Also, right at that location, the Velcro attaching the bridge canvas to the cockpit canvas has passed its useful life – please have the Velcro replaced.
b. Bridge side canvas smilies. The plastic in the large smilies on each side of the bridge are very scratched up due to being rolled up over time. I would like the plastic in just the smilie can be replaced (balance of plastic and canvas is fine). I’d also like flaps and snaps to be added so that the smilie snaps to the roof (like the centre forward bridge smilie). What are the options for replacing this plastic (e.g., EZ2CY)?
c. The zippers and seams on the centre forward bridge smilie leaks slighty, but enough that water accumulates under the seats and leads to dampness and mold. What is the best way to fix?
d. For some reason, the snaps on the sunpad do not match up to the snaps on the deck and I’m not keen on drilling new holes in the deck. Either I need vinyl extensions sewn onto the sunpad, or I’d be open to a strip of sunbrella which would act as an adapter of sorts (snapping to the sunpad and the deck). I’d appreciate a recommendation and solution.
9. Polish – After other work has been completed and just prior to launch, I’ll need a complete hull polish. Please identify options and provide recommendation and quote.
Potential Additions
Jackie J V
Winter Work List
In Process
1. Repair fish finder – Rene (Note to CSR readers - Rene is our Marinas Electronics Wizard) was to remove Digital Sender Module and send to Raymarine service centre for assessment and possible repair. Also had considered inspection and possible replacement of transducers while out of water. Given that the fishfinder is my only depthsounder, it is key that I get this fixed.
(Note to CSR readers - this has been a perpetual pain in the ... all year. The only depth sounder on my 560 is the fish finder and in my boating area, there is an awful lot of randomly placed granite that can turn a nice outing into a nice repair bill real fast! Depth sounder has been working sporadically and try as I might to identify a trend or consistency of when working and when not, I can not isolate its working as anything but variable).
2. Inverter Set-up – Rene had made a number of modifications to the fix the inverter set-up. The final adjustment that he had suggested be done over the winter was to rewire the battery configuration. I may screw up this description so humour me ( J ). I think he said that the four batteries were hooked in a serial chain (not in series) so that the draw would be strong off battery one, but then diminish to the point where there would be little benefit of the draw coming off of battery four in the series. He was suggesting a rewire to configure the set-up as two separate banks of two to improve the efficiency of the set-up and therefore the total available amp hours.
3. Sunpad Cover –At the end of the season I had requested a replacement cover for the bow sunpad, in Sunbrella matching the canvas. Stewart had supplied a quote and I’m assuming this is underway.
In discussion/New items
1. Install Stern Thruster – As per quote supplied.
2. Assess hull core in question area – Had discussed taking a core sample in questionable area identified in survey and during inspection after haul out (See area bracketed by chaulk in attached photo from Survey “Jewer Bottom Area”). Need to identify source of issue and repair as applicable.
(Note to CSR readers - my original survey turned up an area of moisture in the bottom of the cored hull that nearly scared me off the purchase. After investigation and discussions with the local Sea Ray dealer and the marine surveyor, I concluded that the item was isolated and potentially even linked back to the original manufacture. Reinspection after haulout in the fall seems to support the original conclusion.)
3. Remove and sandblast Dynaplate – Had been painted over when hull last painted. Marine survey indicated that Dynaplate should be removed and replaced. I think it can just be sandblasted – however I’d appreciate your guidance on this Mike.
4. Electrolysis to running gear – The marine survey I commissioned on purchase included the following recommendation – “There is some mild electrolysis activity on the rudder and struts. It is recommended that these areas are cleaned and the underwater hardware is repainted and anodes are installed on the shafts and rudders.” Mike, I’d appreciate your direction as to what you think is necessary here.
5. Props – Replace props with spares in hold (please inspect spares first for dings, bangs or dents – I think they’re OK though) and have props cleaned and adjusted (if necessary). Replace cleaned props into hold for spares.
6. Adjustments to Swim platform – There are a couple of items under investigation. Maintenance and adjustments include:
a. Service – according to the manual there is an annual service as follows – “Two grease fittings on top of lift cylinders (pg 20 of manual) should be greased annually with a good moly based grease.” Please service.
b. Adjustment – the swim platform “droops” a little when under load. Refer to attached photo “Swim Platform Load Factor” for reference. I’ve got an enquiry in with the manufacturer GHS (Florida Bow Thruster - FBT). In a Sea Ray owners site, another owner indicated that at the instruction of the manufacturer, he had adjusted the platform to be an inch higher on the outside edge than the transom side to compensate for similar effect. I believe that this adjustment would be effected by adjusting the threaded rod under the swim platform. I am open to suggestions and will pass on any guidance received from FBT.
c. Modifications – The swim platform on the 560 sits extremely close to the water (I think a foolish design) and under load, drags under certain conditions (about 10 knots). Adjusting the droop will help a little. In addition, I’d like the two following modifications:
i. Remove cosmetic skirt – There is a trim edge which I can’t believe to be anything but cosmetic, on the underside of the swim platform. Most of the screws have vibrated out, so it is an easy task to remove. Please remove and retain (I’ll take home in case I want to reinstall later).
ii. Install spacer bars – Another Sea Ray 560 owner added 4” x 2” rectangular aluminium tubing (at least ¼” thick) between the lift forks and the fibreglass swim platform to raise the swim platform 4”. I think 4” x 4” would work better – but again am open to suggestions and discussion. I’d also appreciate your input on potential concerns. The other owner has indicated that it’s made a substantial difference and has held up well over the past two years since the modification was made.
7. Fibreglas repairs – There are a number of areas that need some fibreglass work/repairs.
a. Refer to attached picture “FR - Underwater Chip”. There is about a ¼” chip taken out of the hull right on the bottom near the speed transducer. Please inspect for collateral damage and repair.
b. Refer to attached picture “FR – Starboard Entry”. There is a chip/hole/void on the starboard where you enter the boat off the dock. Looks like a fairly easy fix.
c. Refer to attached picture “FR – Transom Locker”. There was a crappy repair job done to the transom locker. Repair left a white patch and there are spider cracks emanating from the impact point. Please repair.
d. Refer to attached picture “FR – Port Side”. There are spider cracks along a six foot section on the side of the walk way. Please repair.
e. Swim platform – There is one chip where the previous owner had the dingy outboard sitting on the platform – please repair. Also it is obvious that there had been previous repairs to the swim platform due to the discoloration and spider cracks. How much would it cost to restore
8. Canvas Repairs – There are a couple of repairs/amendments I’d like to have made to the canvas as listed below:
a. Refer to attached photo “CR – Aft Canvas”. There is a gap in the canvas which allows water to penetrate the cockpit. I had a temporary solution using a piece of Velcro, however I’d like to adjust the canvas by adding a matching flap to cover the gap. Also, right at that location, the Velcro attaching the bridge canvas to the cockpit canvas has passed its useful life – please have the Velcro replaced.
b. Bridge side canvas smilies. The plastic in the large smilies on each side of the bridge are very scratched up due to being rolled up over time. I would like the plastic in just the smilie can be replaced (balance of plastic and canvas is fine). I’d also like flaps and snaps to be added so that the smilie snaps to the roof (like the centre forward bridge smilie). What are the options for replacing this plastic (e.g., EZ2CY)?
c. The zippers and seams on the centre forward bridge smilie leaks slighty, but enough that water accumulates under the seats and leads to dampness and mold. What is the best way to fix?
d. For some reason, the snaps on the sunpad do not match up to the snaps on the deck and I’m not keen on drilling new holes in the deck. Either I need vinyl extensions sewn onto the sunpad, or I’d be open to a strip of sunbrella which would act as an adapter of sorts (snapping to the sunpad and the deck). I’d appreciate a recommendation and solution.
9. Polish – After other work has been completed and just prior to launch, I’ll need a complete hull polish. Please identify options and provide recommendation and quote.
Potential Additions
- Consider installing Flexiteek/Nuteak in cockpit and on swim platform. Mike – we talked about an installation you did on the older vessel at the end of the North Dock. I’d like input on the owner’s experience last year and get a rough understanding as to cost. Which product did you use. I had some e-mail correspondence with Nuteak and they lobbed a local rep. at me.
Last edited: