water in the bilge

Westie

Active Member
Oct 16, 2008
1,109
Calgary
Boat Info
2001 260 Sundancer towed with the power of an IFORCE V8
Engines
7.4 L Bravo III
For the past while I would always have some water in the bilge and didn't know where it was coming from. It was never a lot but last time I was out it seemed to be more than usual. So on Wednesday I climbed into the bilge while my wife backed the truck down the ramp. As soon as the transom was in the water I noticed some water in the bilge.


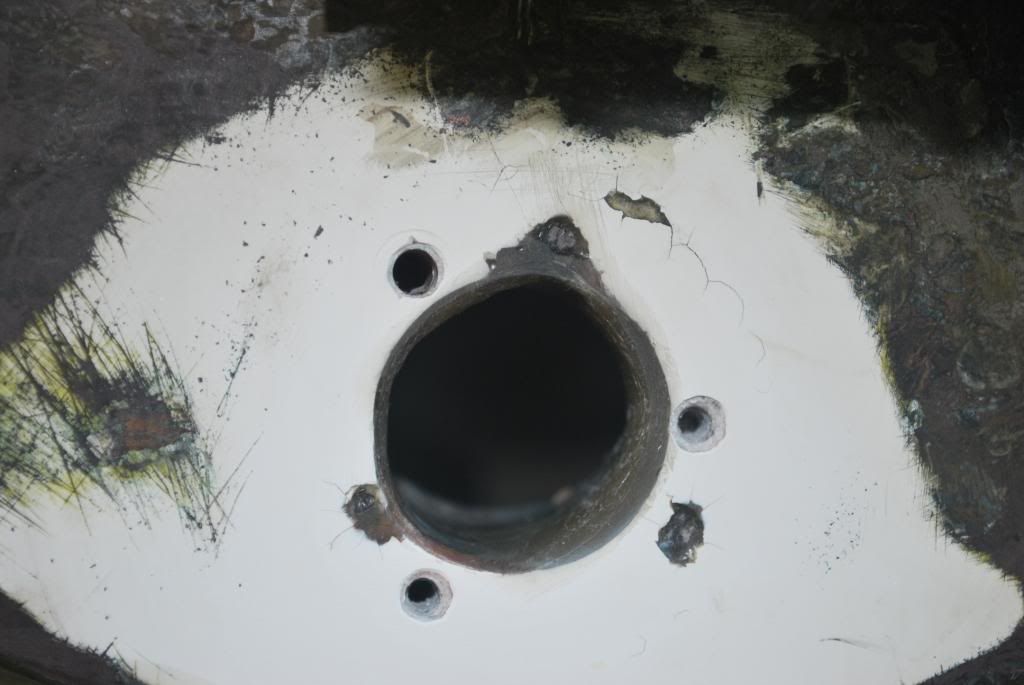
It had to be the transom drain plug so when I got home I took it off. I have to say I was not impressed with the workmanship. The hole was drilled too big. It was 1.189" in diameter, for a 1" OD fitting. As a result two of the screws were right on the edge of the hole and where pretty much torn out. The sealer around the fitting was just cheap crap, wasn't even stuck to the flange. Number 6 screws were all that were used.


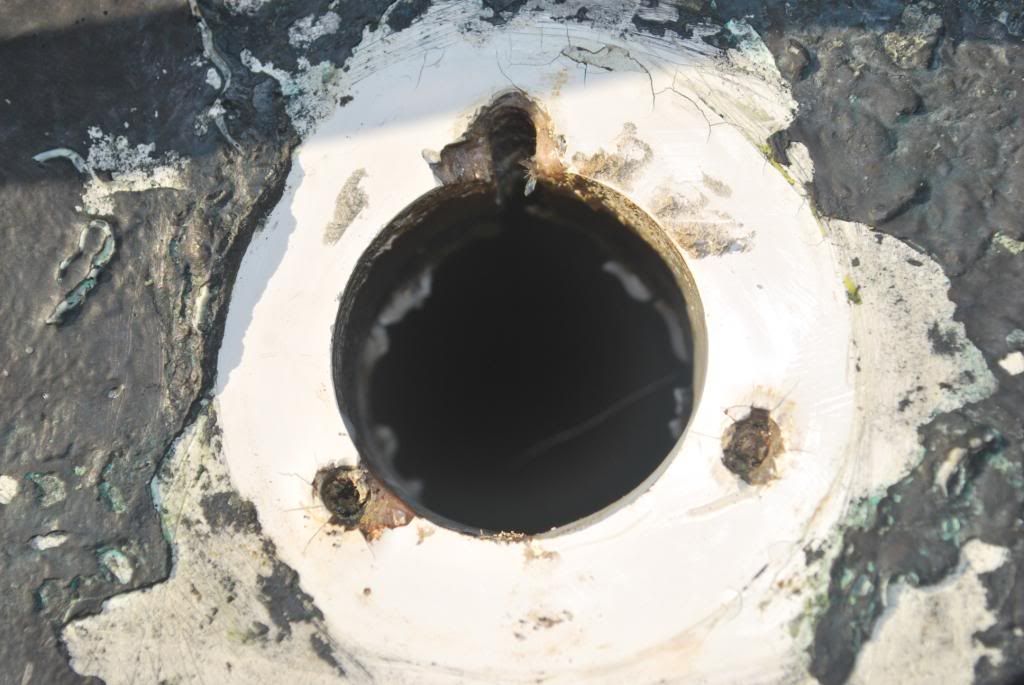
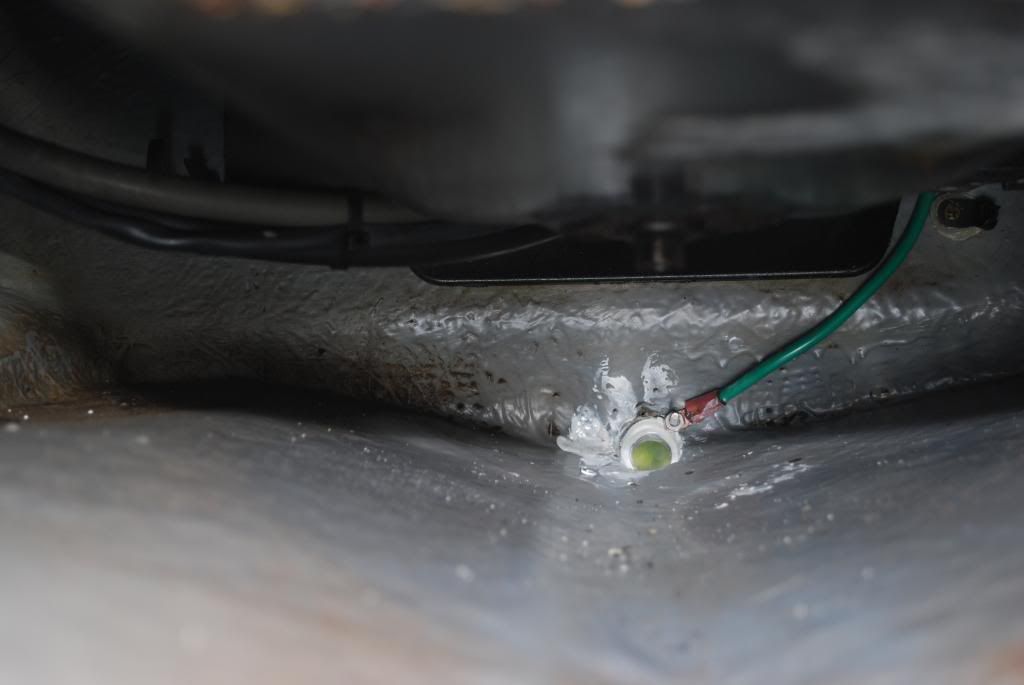
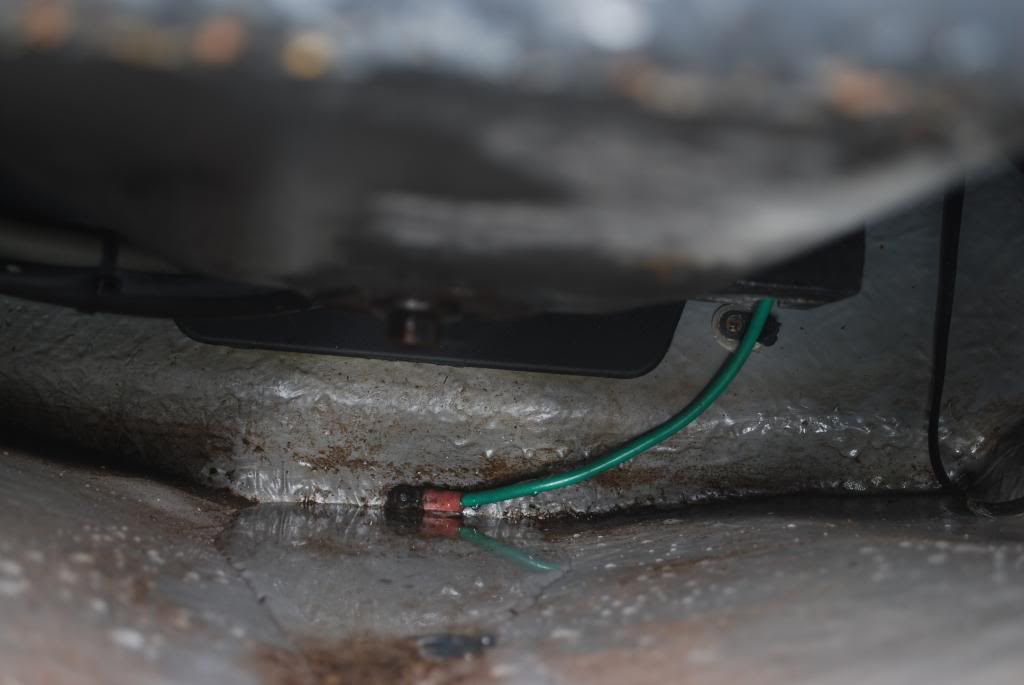
So today I am laying in a couple of layers of glass mat to build up the hole so that I can reinstall the flange. Of course to get to the back of it to attach the bonding wire I have to remove the batteries and the blower so I can get access to the very bottom of the transom from the inside..
 
Just from what I see it looks as if you may need to drill a bit larger hole overall, epoxy it in and then after the epoxy has hardened drill the proper size hole. It looks like some type of pressed wood, which will allow water to seep into it internally eventually rotting out all of pour transom.

Maybe someone else will pipe in and tell me what I am seeing or suggesting is wrong? But that is my take from your image.

Good luck
 
The transom was completely dry as there was some sealer stuck to the hole in the transom, it just wasn't stuck to the flange. I ended up puttin 3 to 4 layers of cloth and epoxy around the sides of the hole. This is what it looked like when I was done.

DSC_5368_rs_zpsaadce3aa.jpg
[/URL]

You can see by the dark ring how much I added.

I coated both the hole and flange with 3M5200 so it should be well sealed and never give me a problem again.

I ended up taking out 1 battery and the blower so that I could reach to put the lock washers, bonding wire and nut on the screw inside the bilge. While I was in there and had access I greased the coupler as well.

Here is what it looks like now from the inside.

DSC_5371_rs_zps27c588fa.jpg
[/URL]
 
Well since you tow it there should not be any problems with testing your transom in the future for moisture with a moisture meter. I would speculate that unless you leave your boat inn the water for any extended periods, you should have fixed the issue. I am just posting my thoughts so perhaps some other members might chime in.
 
Not sure what you are trying to suggest.
The way I fixed it is the best possible way. Filling the complete hole with epoxy and then re-drilling it would have been nearly impossible and would have only added marginal strength to the edges of the hole. By laying in cloth in the sides of the whole I not only sealed it but added the strength required to keep the screws from tearing out. The flange is now mounted in the transom as well as it can be and is orders of magnitude better than it was when it left the factory. I would not hesitate to leave it in the water for long periods of time.
 
I am not trying to say anything, you have probably fixed it quite well. Water has a way of weeping in very small holes and soaking the inside wood coring on boats, eventually rotting the wood inside. What has been often mentioned here in CSR is that let's say you have to do a through the hull install of something which is 3/4 inch outside diameter, that the best way to do so is to drill a hole 1 1/4 inches, fill the hole with epoxy, let the epoxy fully dry, then drill in your 3/4 inch hole. This method is preferred to prevent water intrusion into the wooden inner core.

I believe there is a thread here somewhere about doing this procedure when one has to replace a sea cock, naturally any other outside fiberglass finishing may have to be done as well.

You tow your boat so unless you leave it in water I would say your fix is probably sufficient.
 
Last edited:
I am not trying to say anything, you have probably fixed it quite well. Water has a way of weeping in very small holes and soaking the inside wood coring on boats, eventually rotting the wood inside. What has been often mentioned here in CSR is that let's say you have to do a through the hull install of something which is 3/4 inch outside diameter, that the best way to do so is to drill a hole 1 1/4 inches, fill the hole with epoxy, let the epoxy fully dry, then drill in your 3/4 inch hole. This method is preferred to prevent water intrusion into the wooden inner core.

I believe there is a thread here somewhere about doing this procedure when one has to replace a sea cock, naturally any other outside fiberglass finishing may have to be done as well.

You tow your boat so unless you leave it in water I would say your fix is probably sufficient.


Sorry you don’t understand but my method is far superior to the method you are suggesting.
 
Now Men.. winter is several months away. It is a little early for all of argumentative banter. I am sure both ways of fixing the problem will work and it just comes down to personal preference. :thumbsup:
 
Sorry you don’t understand but my method is far superior to the method you are suggesting.

Well Look I did not comment one way or the other about how you repaired it. It was only a suggestion, so I would say you do not understand. I could care less what you did, I was only trying to be helpful not get someone to get their dander up and pissed off. Dump a damn bag of quickcrete in for all I care. I only made a suggestion which apparently you could not comprehend.

You just cannot say anything to some people F....___________________________________________ it
 
I think that Pseudo is saying that maybe, just maybe, there is water intrusion into the wood that serves as coring for your transom. If the transom is not solid fiberglass, the water can wick its way up pretty far into the surrounding coring. Now, if your boat doesn't sit in the water very long, it may have not had a chance to happen. BUT it might behoove you to have someone who knows how to use a moisture meter come down and test the surrounding area for water intrusion...that is, IF your transom has wood coring. From your first picture it seems that it does.
 
Well Look I did not comment one way or the other about how you repaired it. It was only a suggestion, so I would say you do not understand. I could care less what you did, I was only trying to be helpful not get someone to get their dander up and pissed off. Dump a damn bag of quickcrete in for all I care. I only made a suggestion which apparently you could not comprehend.

You just cannot say anything to some people F....___________________________________________ it

First of all you said my way was probably sufficient since I tow my boat. This implies that you don't think it is the right way if I store my boat in the water.

So I'll try to educate you about glass work so you don't give bad advice to others that may not know any better.

First of all you said "let the epoxy fully dry". Epoxy doesn't dry, it hardens due to a chemical reaction and will harden even under water. In fact some resins will not harden in the presence of air so you need to cover them with cellophane or spray them with wax (some have wax mixed in already for this purpose) while they harden. If you do you one that has been mixed with "air dry" make sure you clean or sand it very well before applying anything over it.

When epoxy hardens it shrinks, some type more than others.
When epoxy is hard it does not machine that well with cutting tools, it does machine well with abrasives. This is because it is a fairly brittle material. The advice that people give to start a hole by using your drill in reverse with a slightly bigger bit is to overcome the brittleness that would cause chip out and cracking otherwise.

When you have a thick layer over a large area epoxy is best mixed with a filler of some sort to give it more strength. This is similar to adding re-bar to concrete. Both materials have excellent compression strength but will crack under tension. In the 1980 asbestoses was used as a filler that made the epoxy very strong but I would not recommend anyone use that now. West Systems make a number of fillers that are good.

So lets get back to your suggested method of repairing the hole.

You say to drill it 1/2" over size and fill it with epoxy, then drill it down to size. Ok lets say I did drill it out. Now exactly how do I fill a hole in a vertical surface with a liquid. Remember one side which will be very rough and have a very odd shaped surface is almost unreachable. Yes it can be done by creating a dam behind it with some molding putty then creating a dam on the other surface with an opening above the hole to fill from but it certainly isn't a straight forward thing to do.

Ok so now you have the liquid in the vertical hole. You better hope it doesn't leak out during the long period where it takes to harden. Oh but to get it to harden faster you can do the work when it is hot out and add more hardener. Yes heat and more hardener will make the epoxy cure faster but it will also be more brittle than if you let it harden slower. So lets assume you did a good job and none of the epoxy is leaking out. As it is hardening it is shrinking. Which means that it is creating stress internally and pulling away from the very edges of the hole that you want it to penetrate into. Not a good thing.

Not you have waited a long enough time for the epoxy to fully cure. Its time to drill it out now. Remember that is it quite brittle. how are you going to drill a hole slightly bigger than 1 inch in it with out causing any fractures? Once you do you will have a 1/4" ring of cracked brittle epoxy all around your hole. 1/4" of epoxy without any filler in it is way too much .
Then once the hole is in it you fit the flange into it and see that the screw hole are right into the brittle epoxy. Guess what when you drill holes for these and put a screw into them you create more stress which will cause cracks.

With the way I did it there is strength added to the epoxy with the cloth, it still seals the hole and epoxy was forced into the edges of the hole as pressure was applied to force the cloth and resin into the sides. Now I have a strong filling that does not have to be machined except for some minor sanding. The screw hole, as can be seen in my photo are not into unfilled epoxy.

So even it you are just sealing a hole on a horizontal surface I wouldn't follow your method because it won't guaranty a sealed hole. The better method is to drill a hole slightly oversized, maybe 1/8" to 1/4" depending on how tight of a fit you want in the end. Then paint the edges with epoxy applying pressure to the edges as you do. (when I hade to put cloth in my hole because it was too big I used a dowel wrapped with tape to keep everything in place and keep pressure on it). Once it has cured then sand it or if you are very careful and didn't get too much on the edges use a good drill bit. Then before applying the sealer of your choice (I personally like 5200) bevel the edges of the hole to give room for the sealer and to avoid a sharp transition that creates stress in the sealer joint.
 
...So I'll try to educate you about glass work so you don't give bad advice to others that may not know any better.

I also stated someone else may chime in as well. As "Bad advice" I was not giving advice but mentioning what I have heard previously. You did what you planned all along, there was no one that I am aware of who told you to do anything. You started a thread, and I just made a comment.
 
Last edited:
From BoatUS Magazine

"Fill the hollow area with epoxy putty and allow it to fully harden before proceeding. The epoxy provides a solid base for the through-hull and prevents water from reaching the core material."

And on using "Google" I found numerous boating related items which used epoxy some even stated the use of either fiberglass or epoxy, with one recommending epoxy versus fiberglass, something about the fiber hair cracking while being used and positioned. So apparently either is acceptable, with epoxy being easier for most non users of fiber-glassing techniques.
 
Last edited:
I recommend using a forstner bit for clean cut holes. Hole saws will product a chattered, rough hole.
Not that it's the garboard plug but here is my video on drill a transom switch.
[video=youtube;pQAiuvimMKQ]http://www.youtube.com/watch?v=pQAiuvimMKQ[/video]
 

Forum statistics

Threads
113,253
Messages
1,429,309
Members
61,128
Latest member
greenworld
Back
Top