Valve Cover Removal on 454/7.4L

rondds

Well-Known Member
Oct 3, 2006
8,859
Jersey Shore
Boat Info
2001 380DA
Engines
Merc 8.1s (2008)...Hurth ZF 63 V-drives...WB 7.0 BCGD (2013), Garmin 8208 & 740 MFDs, GMR 24xHD dome
Had the heads redone on the stbd engine (Gen 4 with hydraulic lifters). Did the "cold" valve adjustment as prescribed in the Merc Manual once the heads were back on and put then finished the reassembly. Got the engine running, got the timing adjusted, but I now have a valve tick. Engine ran to temp for about 40 minutes and it didn't go away. I'm guessing it's most likely something out of adjustment.

Is there any hope of getting the valve covers (stamped steel) off in order to adjust the valves while it's warm and running, without dropping the entire exhaust system. Access to a couple of the studs is real tough b/c of the manifold and elbow (I do not have riser blocks).

More specifically, has anyone done this on this engine and, if so, how? Did you fabricate a tool or weasel in some sort of 1/4" drive and swivel?
 
Unfortunately, I don't think you can without at least removing the risers.
 
I took a cheap socket and ground it down to make it very short. left just enough to go over about half the bolt head. The I used a flexible drive.
Magnet needed to retrieve the bolts and spreader plates.

When I reinstalled I replaced the two inboard bolts with allen head bolts. Used a ball end hex driver to reinstall.
 
I have not removed valve covers on your exact set-up, so I can't really envision what you're up against. Obviously the actual removal of the cover is the easy part. It sounds like you are having trouble accessing, though. Do you have a few pictures? I'd be happy to help you "brainstorm" ways to get in there.

Got one response via PM and posted it above. I was asked for pix, but won't have them probably til next weekend.

Happy Hour, I was thinking I might need to create an SST (Special Service Tool) for this job. Did your covers have the studs sticking out of the head and nuts that threaded onto the studs? The studs on mine have a male TORX fitting on the end. Might be able to take the whole stud out easier than trying to retrieve the nut. You have a picture of that modified socket? If the socket is short, how did you slip it over the stud to engage the nut? Is this what you used?
FLEXIBLE DRIVE

I'm going to launch the boat and tick my way over to the slip before I tackle this job. Too tough to tinker while the motor is running on bucketed water on land.
 
Yes I had the torx studs. fortunately they only stuck out above the nut a little bit. Don't have the socket anymore since once I got the valve cover off I was able
to remove the studs and replace with the allens. I initially tried to remove the studs but they were in too tight. My flexible tool is 1/4" drive and looks like it
might be a little more flexible than the ones on amazon. mine is craftsman. All you really have to do is crack the torque on the nut. You can then screw it off with just a little screwdriver work.
 
Can you get enough room if you just loosen the bolts from the exhaust to the head and slide the manifold out maybe 1/2"? Or take out the bolts one at a time and replace a few with threaded rod to hold the manifold in place and then slide the manifold out a little more than the first option? If you just put this all together your exhaust gasket should still be fine if you are careful separating.
 
Happy:
I see that flexible thing twisting around on itself a hundred times before it breaks the torque. Only advantage is that they were just put on so it's possible they'll pop free easily. Then there's just the customization of the socket to worry about.

Larry, that's a very interesting idea. Wouldn't involve any coolant mess. Only question is if the gasket will survive.

Anyone try a 1/4" drive swivel and extension?
 
Ron, I was able to get mine off with a 1/4" drive swivel socket. A regular socket with a swivel attachment didn't work but the swivel socket did. My valve covers don't have studs and a nut they just have a bolt so I don't know if that would make a difference. Mark
 
Going to give the 1/4" drive and swivel a try. If that doesn't work, I'm trying Larry's suggestion - leave everything as-is and back out the manifold bolts to gain the 1/4" I'd need. Another brilliant suggestion came in via PM - Re-use the gasket during the adjustment process, but once everything is adjusted properly, take out the 6 middle bolts, leave the 2 end ones backed out a bit and slip in a new gasket by slotting the two end bolt holes of the gasket and slide it in.
 
take out the 6 middle bolts, leave the 2 end ones backed out a bit and slip in a new gasket by slotting the two end bolt holes of the gasket and slide it in.

I totally agree, but if you just asembled this and the gasket has not gotten too hot you should be able to pull it apart without damaging the gasket.
 
Ron, getting that gasket out will be like pulling teeth......should be easy for you then:thumbsup:
 
Mark
By the time I need to replace the gasket, it will have about 1hr of running time on it. Hopefully it will be like pulling a baby tooth!
 
FOLLOW-UP...
Spent the day fotzing with this motor. Used a swivel and a wobble extension and was able to get the nuts off the valve cover and get the valve cover off without removing the exhaust. No problemo! THANK YOU MARK!!! YIPPEE!!!

#2 exhaust rocker was flopping in the breeze. Must have completely forgotten to tighten that one. DUMBA$$!!!! Ran the motor with minimal oil drippage (stuffed oil-sorb cloth along the manifold), did a warm adjust on all 8 on the right side head and the engine was once again purring like a kitten. YIPPEE!!!

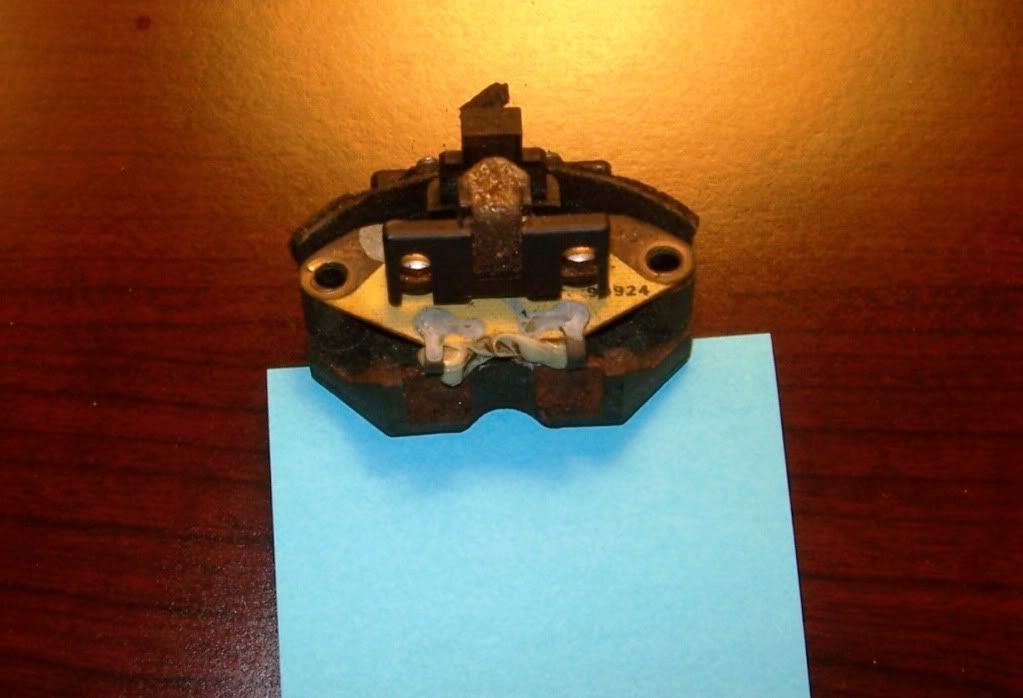
After about 2 minutes of run time...it stalled. These engines have NEVER stalled...never. Can't get it started. WTF??? There's gas but no spark. After about 3 hours of me and my buddy staring at each other, replacing all the plugs, cleaning the contacts inside the distributor and on the rotor and swapping out the coils and the ignition amplifiers (that thing bolted to the exhaust elbow), all to no avail, we cracked open the manual and read the trouble shooting section. By following a simple flow-chart, all signs now pointed to the Ignition Sensor (item #8 below).

Yet another thing to swap out. Took the one off the port (working) motor and threw it in the starboard (not working ) motor, and the beeotch started up like CHAMP!

This is the dead one - pretty bad, eh?

100_3076.jpg


Just ordered two (one for each motor) from B0ATFIX - with shipping, came to about $128.

In all my years hanging around this and the previous SR message board, I have NEVER seen this part mentioned as a culprit of anything - never heard it mentioned...at all...ever. We were thinking we maybe broke a wire in the harness from moving stuff around to pull the valve cover. It was looking pretty bleak. But the Merc Shop Manual was our savior - when all else fails, RTFM, right?! Right!

Main idea is that the motor would spin beautifully when you flipped the ignition switch, but it just wouldn't start. We had no spark when pulling a wire off a plug and touching it to ground, BUT there was 12v at the coil. So the problem HAD to be after the coil, which doesn't leave much - bad plugs (new), bad wire (new), sensor. What a relief to have this problem solved.

So, note to all you Gen IV big-blockers with Thunderbolt Ignition, take a look at your Ignition Sensor (under the rotor). If it looks scuzzy, REPLACE it. This will leave you dead in the water, without warning.


41255.png
 
Rick, I had every intention of boating up there, UNLESS there was some catastrophic problem. EVERYTHING hinged on yesterday's service. We also checked that pushrod (#2 exhaust) for a bend and it was A-OK. Only downer yesterday was we couldn't do a seatrial on our repair since we disabled the port motor to get the stbd one going. So the boat has been dock-bound since launch (May 6).


I was pretty sure things were OK when I checked compression last week and the numbers were improved over the pre-head job numbers. Just waiting on these parts and if all buttons up OK, I'm good to go! Now I'm itchin' to go ablate some paint!
 
You should back out in the bay by next weekend blazing along at what....16-17 knots!!!!
 
Rick, I had every intention of boating up there, UNLESS there was some catastrophic problem. EVERYTHING hinged on yesterday's service. We also checked that pushrod (#2 exhaust) for a bend and it was A-OK. Only downer yesterday was we couldn't do a seatrial on our repair since we disabled the port motor to get the stbd one going. So the boat has been dock-bound since launch (May 6).


I was pretty sure things were OK when I checked compression last week and the numbers were improved over the pre-head job numbers. Just waiting on these parts and if all buttons up OK, I'm good to go! Now I'm itchin' to go ablate some paint!

How is the missus going to get there????
 
What's a "knot?"
How's ur bay-blazing going Nunzie?
Do I have more hours of idling at the dock than you this year?
 
I have cruised well over 200 nautical miles so far this season while burning over 300 gallons of off-road diesel fuel. Most of which is ocean time, and there are a few Barnegat Bay miles in there too. BTW...a nautical mile is related to a knot....google it!!!
 

Forum statistics

Threads
113,291
Messages
1,430,094
Members
61,157
Latest member
Markt2359
Back
Top