ASClayton
New Member
- Sep 7, 2021
- 12
- Boat Info
- 2008 330 Sundancer
- Engines
- Twin 496 Mag w/ Bravo III Drives
Boat is a 2008 330DA.
I purchased the boat 3yrs ago and in the survey it called out the dry rotted sanitation hose. Well this year it finally gave way and would not hold vacuum, so the vacuflush pump would run 24/7 and the toilet would not flush most of the time. I had already replaced the duck bulls, and the bellow so next up was the hose! After doing some research I saw that sea ray had left the sanitary hose outside in the Florida sun to rot before it was installed and is leading to premature failure. Why this was not a warranty issue is mind blowing.
I purchased 27ft of 1.5” sanitary hose (which is a lot cheaper online and Amazon then what I paid at the marine store, but I couldn’t find how much I needed and my boat is 2hrs away so I wanted to get to the boat to roughly measure and not order 10ft to much when it’s 9-12$ foot. 27ft also gave me enough to replace the pump out hose from the tank to the pump out. I also ordered a stainless steel coupler to connect the new hose to the old hose in hopes of pulling the old hose out with the new hose installed.
Here is the link for the coupler
https://www.supplyhouse.com/sh/control/product/~product_id=CSS-150
Started in the bathroom by removing the toilet which was fairly simple even for a big guy like me (6ft7 250lbs). Remove the cover around the base of the toilet, then remove the large hose clamp and the two plastic clamps the hose clamp sits on. Then remove the water supply line after you turn off the water pump and the toilet lifts right off. You can now undo the base which contains the large ball valve with 4 - 7/16 nuts holding that to the floor of the boat. Then remove the 2 hose clamps that connect the hose to the toilet base - you’re now done in the bathroom for now.
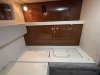
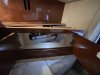
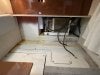
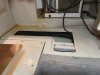
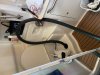
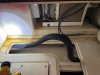
Next up move to the aft couch/bed. Start by remove the port cushion. You then have to remove the lower cabinets on the port side. Start by removing the upholstered trim piece on top of the cabinet which was 3 screws that were covered by a screw cap. That will allow you to access the top screws I believe there were 6-7 screws holding the top of the cabinet, and 3 on the lower portion. You can now remove the cabinet just be careful not to rip or snag the upholstery on the walls. Once the cabinet is out you can remove the 2x2 piece of wood that the lower cabinet screws go into. Once that has been removed you can take off the bilge access door which was screwed down (and in sea rays infinite wisdom used 3” screws through a half in of plywood ….. so there were screws in the the damn toilet hose, shown in pics which is below the access hatch since the boat was new ….. nice work sea ray!). You can now see the hose in the bilge compartment behind the bathroom, screw holes and all. There were two hose clamps screwed to the hull that hold the toilet hose from sagging, remove those. Where the hose goes through the firewall it enters into a pvc pipe that runs through the firewall all the way to the port side transom where it exits the tunnel and runs up to the holding tank.
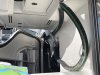
Next move to the engine room. There the hose is zip tied to the other hoses above the holding tank. Remove all of those. There’s also a plastic cover on the hose. Remove that and reuse once installed. I also removed the bilge blower hose from the blower motor on the port side to give me more room in that area and to not damage the blower hose. Remove the 2 hose clamps where the toilet hose enters the holding tank, I stuffed it with paper towels, then put a ziplock bag and duct taped it all up so nothing would leak during the replacement.
Now take an adult beverage break ….. and prepare yourself for the colorful words, cuts and scrapes, and sweat and tears that will follow!
Keep in mind I’m not an actual mechanic and I did this by myself…. Would have saved me hours and plenty of cussing if I had help. However…. It was pretty damn exhilarating finally accomplishing this alone!
I connected the new and old hose with the coupler in the bathroom.
You are now ready to feed the hose through the boat and this is where having help would be ideal!
Start by pushing a small amount into the hole in the bathroom floor, I was able to get maybe 10-12” at a time, then move to the access hatch in the aft and pull that through. Then you can shove that slack into the pvc pipe through the firewall. Then go to the engine room and pull that slack through. Take care to not bend the sanitation hose, as it has a steel wire wrapped in it and will ruin the hose if you bend it too much. Now repeat this step 100x till you’re ready to drown yourself in alcohol or tears. Here’s the trick ….. when you finally shove enough hose through the hole in the bathroom to get the coupler through and have pulled it into the aft compartment …… lube up the hose on both sides of the coupler with vegetable oil, KY jelly, or even a small amount of grease. We had KY in the boat (sorry it’s just what I could think to use that was in the boat) and it worked great. When the coupler gets to the pvc tunnel in the firewall it is tight! I had to pull mine all back out because I couldn’t get it through without the lube the first attempt. Once it was lubed up it pushed through Soooooo much easier. Once you have done this enough that you’ve now got all the old hose out, you can remove the old hose and the coupler then cut the new hose to fit and reinstall the new hose to the tank. It sounds simple …… I do not drink …… I drank this weekend!
Now time to reinstall everything! Since you have to remove the toilet this is a great time to replace both the upper and lower toilet seals. I also removed prob 2lbs of caulk around the toilet base and redid that as well.
I had to readjust the pressure switch which is located on the top of the holding tank because it had to be adjusted to compensate all the leaking and once I replaced the hose it had too much pressure. Ideally you want to be able to flush the toilet and hear the vacuflush pump run for 15-20sec and shut off.
Once I finally finished re installing everything I double checked all my hose clamps, the toilet, and water line. Then test it!
Pretty sure I could flush a small child now! Amazing what a new toilet hose with no screw holes and weather rot will do! Thanks sea ray!
Feel free to reach out with any questions!