tphinney
New Member
I spent some time trying to figure out how hard it would be to do the Impeller replacement and could not find anything on the exact step by step instructions. So as a Newbie to do it yourself maintanence I though I would put this out for others that would rather spend a weekend bonding with their boat than shell out $200 bucks just to have the impeller replaced.
this is a compilation of the instructions out of the Solec manual and some short cuts I found by just doing it. these instructions apply to the Mercruise 5.0L MPI with engine serial numbers 6000XX and higher
Changing the raw water impeller for 5L MPI SRN # 6000XX
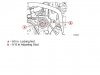
1. Loosen the serpentine belt.
Using a 5/8 box wrench and a 5/16 socket loosen the 5/8 locking nut so that the belt tension is removed and you can remove the belt from the raw water pump, alternator and tension pulley on the starboard side of the engine.

See Fig 1
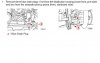
2. Next step is to drain the water out of the engine. If you'r on a trailer or up on blocks now would be a good time to pull the drain plug out of the boat otherwise there is going to be quite a bit of water in the bilge. The first drian plug in on the bottom front of the engine on the port side (if you can’t get it to turn use a small wrench to start it). The next two are on the intake and out let of the Raw Water pump. If you want at this point you may want to take the water/fuel separator filter out to give you easier access make sure that you get the water drained from the raw water pump otherwise when you go to try to get the hoses off you’ll be fighting the vacuum created by the water in the pump [it toke be all day to figure this one out].

See fig 2 for the drain plug locations.
3. Once the water is drained you will notice the hose in the Figure 2 diagram which cradles under the water pump and connects to a 3 way splitter just above the water pump and next to the alternator. Go ahead and disconnect it now. This will make getting the whole assembly out easy.
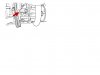
4. Now its time to correct all the mercrusier diagrams on the web. See figure 3. note the double headed screw #15 and nut #16 in the diagram. they are shown in the incorrect location they should be shown in the location where screw #17 is and washer #20. Screw #17 is actually in the lower hole not the top one. These screws and nuts not only hold the raw water pump assembly in place but also hold one end of the bracket for the starboard side tension puller. To get these out you will probably need a Swivel/U join socket adaptor to get the clearance you need to break them free. Once these are free the whole bracket should drop down; but you won’t be able to get it out yet.

fig 3
5.Next you will need to loosen the nut below the alternator which supports the starboard side tension pulley mounting bracket. Note Fig 4. once this is done you can swing the tension pulley and it’s mounting bracket out of the way.

fig 4
6.Now comes the hardest part. Loosen the clamps on the intake and exhaust hoses for the raw water pump and remove the hole assembly.

see fig 5
7.Now that you are out of the bilge it’s time to remover the raw water pump from the mounting bracket. All you should need is a 10mm socket/wrench to pull the 2 bolts from the rear of the pump and the 1 from the top of the pump. Then remove 4 remaining bolts on the rear of the pump and pull of the back of the pump.

see fig 6
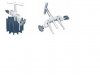
8.Now comes the time you’ll need a special tool if you want to make this easy. If you have an impeller puller use it to pull the impeller (see figure 7) out of the case; if not go to the nearest boaters world and get one. Remember the rotation angle of the impeller that you pull out as the new one will need to go back in the same way.

fig 7
9.A little bit of soapy water will help get the impeller in the case. Then replace the O-ring on the case with the new one in the impeller kit and put the raw water case back together again. The bolts on the raw water pump and the raw water pump to mounting bracket should be tightened to 8.8ft-in.
10.re install the intake and exhaust water hose’s to the raw water pump and tighten the hose clamps and drain plugs
11.mount the raw water pump and starboard tension pulley mounting frame to the engine block and torque the bolts to 30ft-lb.
12.re attach engine hose which runs under the raw water pump.
13.tighten the tension pulley mounting from under the alternator.
14. re-attach the serpentine belt and retension so that it flexes no more the 1/4 of an inch at it widest span between pulleys and tighten.
15. drop the boat in the water or put on the muffs and watch you water PSI and/or temp. the water PSI will read really low at first because the engine has been drained, but it should be fine in a coule of seconds.
At first attempt it toke me 2 full days to get this done which also included getting the right tools. and figuring out how to get at certain part. next time I figure I could ge this done in about 30 minutes.
they way I Figure even with having to buy the impeller Kit, the Impeller puller and a torque wrench it still cost me less than having the dealer do it. next time my only expense will be the $34.00 for the kit which sure beats $200+
hope you enjoy the post
this is a compilation of the instructions out of the Solec manual and some short cuts I found by just doing it. these instructions apply to the Mercruise 5.0L MPI with engine serial numbers 6000XX and higher
Changing the raw water impeller for 5L MPI SRN # 6000XX
1. Loosen the serpentine belt.
Using a 5/8 box wrench and a 5/16 socket loosen the 5/8 locking nut so that the belt tension is removed and you can remove the belt from the raw water pump, alternator and tension pulley on the starboard side of the engine.
See Fig 1
2. Next step is to drain the water out of the engine. If you'r on a trailer or up on blocks now would be a good time to pull the drain plug out of the boat otherwise there is going to be quite a bit of water in the bilge. The first drian plug in on the bottom front of the engine on the port side (if you can’t get it to turn use a small wrench to start it). The next two are on the intake and out let of the Raw Water pump. If you want at this point you may want to take the water/fuel separator filter out to give you easier access make sure that you get the water drained from the raw water pump otherwise when you go to try to get the hoses off you’ll be fighting the vacuum created by the water in the pump [it toke be all day to figure this one out].
See fig 2 for the drain plug locations.
3. Once the water is drained you will notice the hose in the Figure 2 diagram which cradles under the water pump and connects to a 3 way splitter just above the water pump and next to the alternator. Go ahead and disconnect it now. This will make getting the whole assembly out easy.
4. Now its time to correct all the mercrusier diagrams on the web. See figure 3. note the double headed screw #15 and nut #16 in the diagram. they are shown in the incorrect location they should be shown in the location where screw #17 is and washer #20. Screw #17 is actually in the lower hole not the top one. These screws and nuts not only hold the raw water pump assembly in place but also hold one end of the bracket for the starboard side tension puller. To get these out you will probably need a Swivel/U join socket adaptor to get the clearance you need to break them free. Once these are free the whole bracket should drop down; but you won’t be able to get it out yet.
fig 3
5.Next you will need to loosen the nut below the alternator which supports the starboard side tension pulley mounting bracket. Note Fig 4. once this is done you can swing the tension pulley and it’s mounting bracket out of the way.
fig 4
6.Now comes the hardest part. Loosen the clamps on the intake and exhaust hoses for the raw water pump and remove the hole assembly.
see fig 5
7.Now that you are out of the bilge it’s time to remover the raw water pump from the mounting bracket. All you should need is a 10mm socket/wrench to pull the 2 bolts from the rear of the pump and the 1 from the top of the pump. Then remove 4 remaining bolts on the rear of the pump and pull of the back of the pump.
see fig 6
8.Now comes the time you’ll need a special tool if you want to make this easy. If you have an impeller puller use it to pull the impeller (see figure 7) out of the case; if not go to the nearest boaters world and get one. Remember the rotation angle of the impeller that you pull out as the new one will need to go back in the same way.
fig 7
9.A little bit of soapy water will help get the impeller in the case. Then replace the O-ring on the case with the new one in the impeller kit and put the raw water case back together again. The bolts on the raw water pump and the raw water pump to mounting bracket should be tightened to 8.8ft-in.
10.re install the intake and exhaust water hose’s to the raw water pump and tighten the hose clamps and drain plugs
11.mount the raw water pump and starboard tension pulley mounting frame to the engine block and torque the bolts to 30ft-lb.
12.re attach engine hose which runs under the raw water pump.
13.tighten the tension pulley mounting from under the alternator.
14. re-attach the serpentine belt and retension so that it flexes no more the 1/4 of an inch at it widest span between pulleys and tighten.
15. drop the boat in the water or put on the muffs and watch you water PSI and/or temp. the water PSI will read really low at first because the engine has been drained, but it should be fine in a coule of seconds.
At first attempt it toke me 2 full days to get this done which also included getting the right tools. and figuring out how to get at certain part. next time I figure I could ge this done in about 30 minutes.
they way I Figure even with having to buy the impeller Kit, the Impeller puller and a torque wrench it still cost me less than having the dealer do it. next time my only expense will be the $34.00 for the kit which sure beats $200+
hope you enjoy the post