
- Oct 18, 2008
- 949
- Boat Info
- 1989 340 EC
- Engines
- 7.4LX2 Hurth 630A Drives
6.5Kw QS Genny
I can't take credit for the rudder restuffing, but I did my stuffing boxes today on my 1989 340EC and took some pictures. Note that this was done on land. I have seen others say you can do it in the water, but I can't see how you would get it clean without packing something around the area under the boat. The rudder stuffing instructions were done by RonDDS and he did such a great job I asked him to post it. He told me to just add it to this post, so thanks to him!
My boat is old and everything in the bilge is dirty, so bear with me. Some of this may not help with the Vee drive setup, but since I have never done one, I'm not sure what will apply. I'm sure my packing tool would need to be much shorter.
Here is the stuffing box in bad need of packing.

These are the tools I used. I highly recommend the Rust penetrant from AC Delco (I think the can looks different now.) Mopar also has the same thing only listed by a different name. You can't see the end of the extractor, but it's basicly a small corkscrew that you can screw into the packing(more on that later). My special tool is the white thing in the background. I took a 1 1/4" PVC pipe and cut it in half lengthwise, then cut it off so that the two halves can be rejoined around the shaft to "pack" the packing. It worked really well, I'm not sure how much area you would have on the Vee Drives, or if it would even work with the shaft being so short. You need a sharp razor blade to cut the packing to length. Not shown, but an absolute must is a pick set. It will contain 4 pieces, a right angle, straight, hook, and 45 deg one with a twist. These are needed to clean the old crusty packing.

Spray the lube on the large nut to ease it's removal. I slid it all the way up against the coupler and used a small bungee to keep it there and out of my way. I sprayed the thread down and cleaned them with a small wire brush to get everything out of the threads.
Use the extractor to screw into the first packing and pull it out. NOTE: This works well for packing in good shape that will stay together, but if yours was neglected by the PO like mine was it just pulls it apart, this is where the picks come into play. You will notice the extractor works well for newer packing (I added 2 layers last year as mine was leaking pretty bad as it was so old).
It's hard to see, but here is the extractor pulling out the top layer of packing.

Here is a better picture which also shows the right angle pick which works better for the smaller broken pieces (you will see how bad it was in a moment.

The focus is out here, but this is the inside of the stuffing box. Make sure you get all the old stuff out so that the new will seat properly and give you a good seal.

This is the mess that came out of mine, you can see how broken up it was. You can also see how some of it is white where all the wax is gone and the actual rope was getting all the work. Looked like it was burning up inside there.

I used the 45 deg pick to run around the inside threads to get all the wax and small pieces of material that had wedged itself all over the place. I also took a rag and poked it in with a small flathead screwdriver to run around and make sure I picked up all the small pieces that were still in there.
Now that you have the inside nice and clean it's time to cut your new packing. The stuff I used was PTFE injected Gore fiber mixed with graphite fibers. Take the packing and run it around your shaft as shown. Take the razor blade and cut a nice straight line so that the end will butt up together perfectly (or as close as possible) Sorry, I only had two hands so I couldn't hold the camera and razor blade at the same time:lol:

Install the packing into the very edge of the stuffing box. I oriented the first one with the butt end pointing down. I was able to get 4 layers into the box and I arranged them with the butt end facing 1)Down 2)Up 3)Port 4) Starboard. There are different recommendations on how to orient the butt ends, I just wanted to make sure none of them lined up.
Now it's time for the special tool, you can't tell in the picture but the line where it is cut lengthwise is right at the top. The flash blurred it out. Take the two halves and join them around the shaft so that you can pack the material in evenly. This will help to keep it flush with the bottom and also aid in making sure it doesn't roll over and cause a spiral effect. The PVC worked great and allowed me to physically stuff it in there nice in tight, hopefully it won't need to seat itself and be adjusted more than a couple times after the first few runs. ( I have GOT to get in there and clean that bilge up!) Now maybe it will stay dry enough to keep it clean for a while!

Once you get as many layers as you can fit and still have enough thread to make sure the adjusting nut will stay put. I had 5 full threads with 4 layers of packing and still had to give it a little push to get it to start. Once started I had 3-3 1/2 turns on the nut. I didn't put any anti-sieze on the threads, but only because I didn't have any. I may add some before it goes in the water.
Align the holes for the retaining pin and insert it and you are ready to go.

Now, on to the Rudder Packing. If you have any comments please direct them to RonDDS, as he put this together. I'm sure he will join in to answer any questions you have.
Ok boys. Here's my tutorial on rudder stuffing boxes. This is my port rudder. It took all sorts of might and as large a pipe wrench as I cold swing to loosen this baby up. To be honest, if I wasn't contorted like a yogi guru in a clear plastic box, it would have been easy. You do NOT touch the lower nut. Just the top one. Please excuse the embarrassing 20 year old bilge...
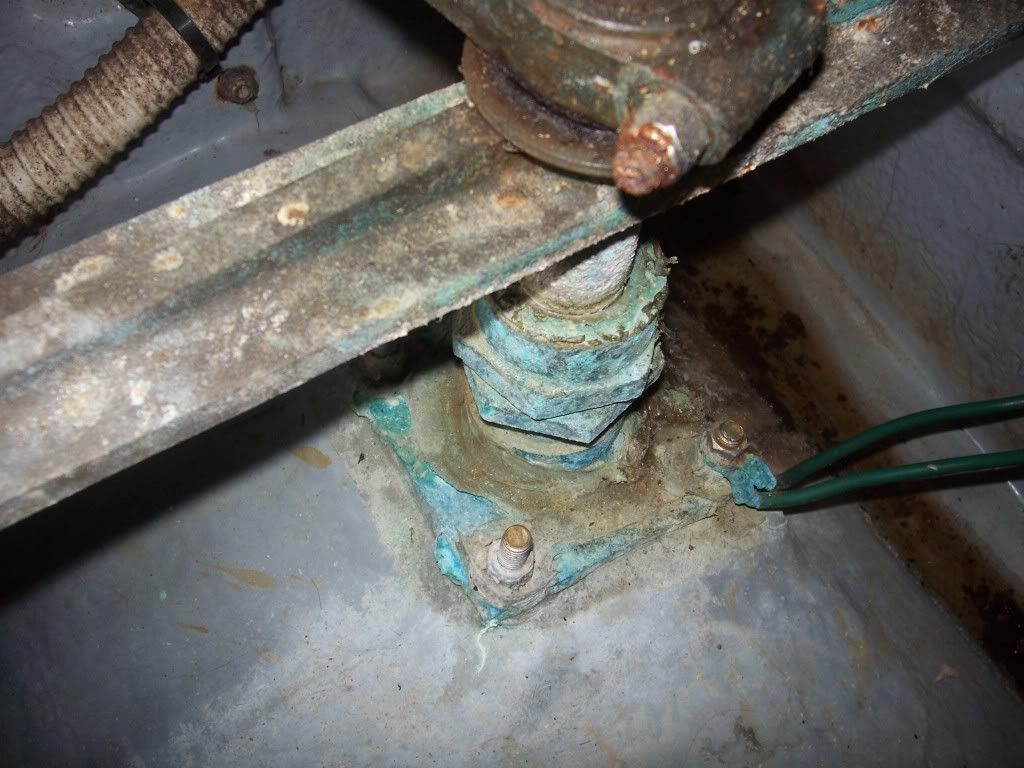
The rudder post was pretty crudded up so I used copious WD-40 to allow for sliding the nut high up on the post for access.
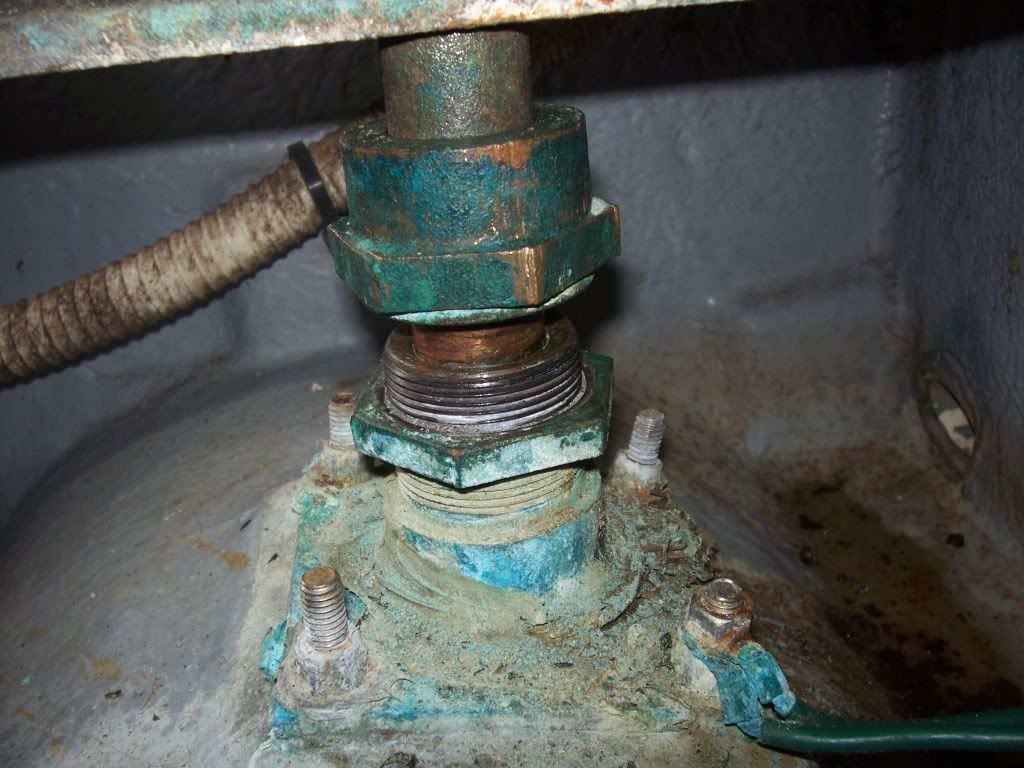
This pic shows what's stuck up inside the cylindrical part of the nut. That's where your packing goes. You can sort of see the old stuff up in there.
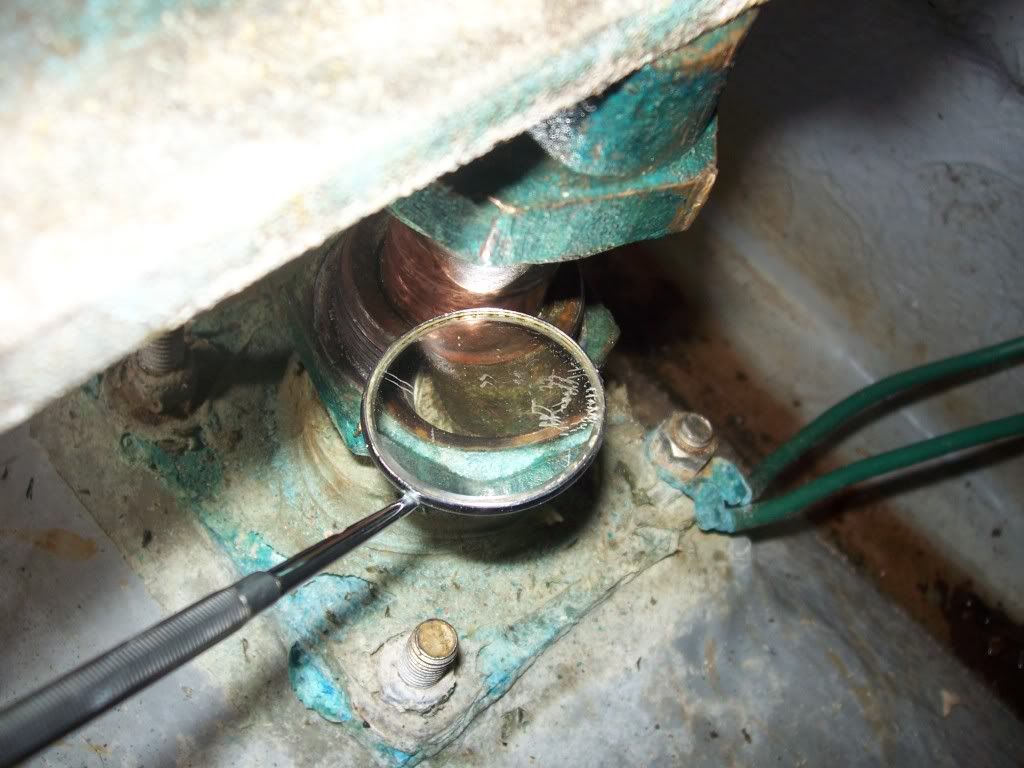
To be completely honest, I didn't even try to get the old wax rope packing out. You'd need a tool with a 150 degree bend to reach up in there and pluck out all the old crap. So I elected to place one appropriately sized ring of Gore 1/4" packing in place. I don't recommend this for packing a drive shaft b/c that generates an awful lot of heat and friction as it spins. This thing makes no heat. I really just wanted to make a better gasket in order to stop the constant leakage. When the ends of the piece of packing were drawn together they meet perfectly at the ends. I used the top of the rudder post as a diameter guide to cut. It just wouldn't stay butt-jointed long enough for me to snap the pic.
The ring you saw in the picture above is jammed up into the nut - it was the only ring I placed. A light coat of Never Seeze is placed on the male threads and the nut is lowered back down for tightening. You may need to put a fair amount of downward pressure as you start tightening to compress the new packing and get the threads to catch. I then snugged it up with a smaller pipe wrench. Here it is completed.

I did do the starboard one as well. That was even worse b/c of the position of the generator muffler and the holding tank. The hardest part is loosening the nut. After that the rest is cake. Have fun. I have to run and take 600mg of Ibuprofen now. :smt009
__________________
My boat is old and everything in the bilge is dirty, so bear with me. Some of this may not help with the Vee drive setup, but since I have never done one, I'm not sure what will apply. I'm sure my packing tool would need to be much shorter.
Here is the stuffing box in bad need of packing.
These are the tools I used. I highly recommend the Rust penetrant from AC Delco (I think the can looks different now.) Mopar also has the same thing only listed by a different name. You can't see the end of the extractor, but it's basicly a small corkscrew that you can screw into the packing(more on that later). My special tool is the white thing in the background. I took a 1 1/4" PVC pipe and cut it in half lengthwise, then cut it off so that the two halves can be rejoined around the shaft to "pack" the packing. It worked really well, I'm not sure how much area you would have on the Vee Drives, or if it would even work with the shaft being so short. You need a sharp razor blade to cut the packing to length. Not shown, but an absolute must is a pick set. It will contain 4 pieces, a right angle, straight, hook, and 45 deg one with a twist. These are needed to clean the old crusty packing.
Spray the lube on the large nut to ease it's removal. I slid it all the way up against the coupler and used a small bungee to keep it there and out of my way. I sprayed the thread down and cleaned them with a small wire brush to get everything out of the threads.
Use the extractor to screw into the first packing and pull it out. NOTE: This works well for packing in good shape that will stay together, but if yours was neglected by the PO like mine was it just pulls it apart, this is where the picks come into play. You will notice the extractor works well for newer packing (I added 2 layers last year as mine was leaking pretty bad as it was so old).
It's hard to see, but here is the extractor pulling out the top layer of packing.
Here is a better picture which also shows the right angle pick which works better for the smaller broken pieces (you will see how bad it was in a moment.
The focus is out here, but this is the inside of the stuffing box. Make sure you get all the old stuff out so that the new will seat properly and give you a good seal.
This is the mess that came out of mine, you can see how broken up it was. You can also see how some of it is white where all the wax is gone and the actual rope was getting all the work. Looked like it was burning up inside there.
I used the 45 deg pick to run around the inside threads to get all the wax and small pieces of material that had wedged itself all over the place. I also took a rag and poked it in with a small flathead screwdriver to run around and make sure I picked up all the small pieces that were still in there.
Now that you have the inside nice and clean it's time to cut your new packing. The stuff I used was PTFE injected Gore fiber mixed with graphite fibers. Take the packing and run it around your shaft as shown. Take the razor blade and cut a nice straight line so that the end will butt up together perfectly (or as close as possible) Sorry, I only had two hands so I couldn't hold the camera and razor blade at the same time:lol:
Install the packing into the very edge of the stuffing box. I oriented the first one with the butt end pointing down. I was able to get 4 layers into the box and I arranged them with the butt end facing 1)Down 2)Up 3)Port 4) Starboard. There are different recommendations on how to orient the butt ends, I just wanted to make sure none of them lined up.
Now it's time for the special tool, you can't tell in the picture but the line where it is cut lengthwise is right at the top. The flash blurred it out. Take the two halves and join them around the shaft so that you can pack the material in evenly. This will help to keep it flush with the bottom and also aid in making sure it doesn't roll over and cause a spiral effect. The PVC worked great and allowed me to physically stuff it in there nice in tight, hopefully it won't need to seat itself and be adjusted more than a couple times after the first few runs. ( I have GOT to get in there and clean that bilge up!) Now maybe it will stay dry enough to keep it clean for a while!
Once you get as many layers as you can fit and still have enough thread to make sure the adjusting nut will stay put. I had 5 full threads with 4 layers of packing and still had to give it a little push to get it to start. Once started I had 3-3 1/2 turns on the nut. I didn't put any anti-sieze on the threads, but only because I didn't have any. I may add some before it goes in the water.
Align the holes for the retaining pin and insert it and you are ready to go.
Now, on to the Rudder Packing. If you have any comments please direct them to RonDDS, as he put this together. I'm sure he will join in to answer any questions you have.
Ok boys. Here's my tutorial on rudder stuffing boxes. This is my port rudder. It took all sorts of might and as large a pipe wrench as I cold swing to loosen this baby up. To be honest, if I wasn't contorted like a yogi guru in a clear plastic box, it would have been easy. You do NOT touch the lower nut. Just the top one. Please excuse the embarrassing 20 year old bilge...
The rudder post was pretty crudded up so I used copious WD-40 to allow for sliding the nut high up on the post for access.
This pic shows what's stuck up inside the cylindrical part of the nut. That's where your packing goes. You can sort of see the old stuff up in there.
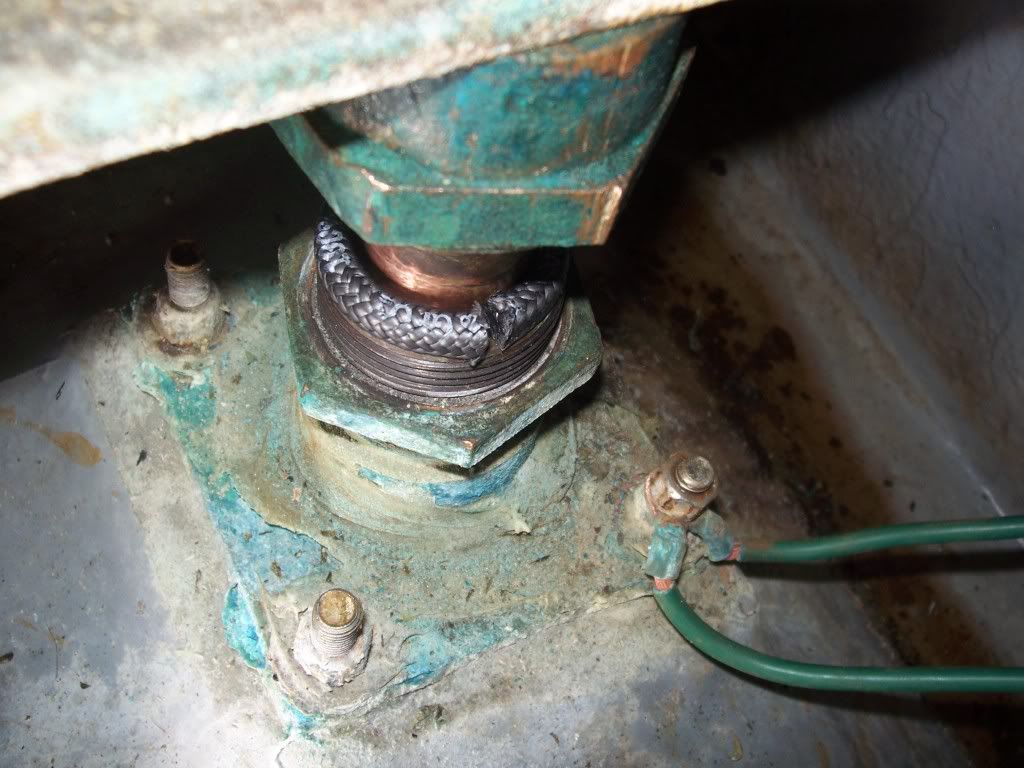
To be completely honest, I didn't even try to get the old wax rope packing out. You'd need a tool with a 150 degree bend to reach up in there and pluck out all the old crap. So I elected to place one appropriately sized ring of Gore 1/4" packing in place. I don't recommend this for packing a drive shaft b/c that generates an awful lot of heat and friction as it spins. This thing makes no heat. I really just wanted to make a better gasket in order to stop the constant leakage. When the ends of the piece of packing were drawn together they meet perfectly at the ends. I used the top of the rudder post as a diameter guide to cut. It just wouldn't stay butt-jointed long enough for me to snap the pic.
The ring you saw in the picture above is jammed up into the nut - it was the only ring I placed. A light coat of Never Seeze is placed on the male threads and the nut is lowered back down for tightening. You may need to put a fair amount of downward pressure as you start tightening to compress the new packing and get the threads to catch. I then snugged it up with a smaller pipe wrench. Here it is completed.
I did do the starboard one as well. That was even worse b/c of the position of the generator muffler and the holding tank. The hardest part is loosening the nut. After that the rest is cake. Have fun. I have to run and take 600mg of Ibuprofen now. :smt009
__________________
Lil' Krissy III 1989 340DB
-Twin Mercruiser 7.4L Carbureted Straight Drives (340hp x 2)
-Quicksilver QS-6.5G (988cc of raw 4cylinder Nissan Power)
Ron (Barnegat Bay, Jersey Shore)
-Twin Mercruiser 7.4L Carbureted Straight Drives (340hp x 2)
-Quicksilver QS-6.5G (988cc of raw 4cylinder Nissan Power)
Ron (Barnegat Bay, Jersey Shore)
Last edited:
