DiveCuda
New Member
- Jan 1, 2011
- 15
- Boat Info
- 2006 Sea Ray 340 Sundancer
Northstar Autopilot
Garmin 5208 Chartplotter/Radar/Sounder
- Engines
- Yanmar (T-306 PHP) Diesel
Love this forum--thank you to all the boat techies that take the time to write down their solutions...
Now that we've had our new to us Sea Ray 340 for a couple of months, it was time to start the monthly maintenance drill. Our 2006 Sea Ray has a wonderful set of Yanmar diesels to push her along and a solid Onan Diesel generator (5Kw) to support all of our electronic goodies. Weekend before last, we were doing our Saturday AM boat checks before launching, fired up the generator, and zap...instant generator shut down. Having serviced a few water propelled craft, my husband and I looked at each other and both said "impeller" instantly. We cruised on out into Tampa Bay sans air conditioning for the weekend thinking it would be a quick fix on Sunday afternoon....not so fast....:smt021
After a quick scan of our library of boat maintenance manuals, and more than a couple of hours drilling deep into the internet on Onan generators, we discovered two things: our generator is an older model (2001) and more importantly, there were no service manuals available on-line for viewing or purchase. The Onan site points you to finding a local dealer; we did, and you must order through your dealer. Well, that was two weeks ago. We ordered the manual; still have not see the manual, and being brave, impetuous and bold, decided to go for it regardless. Two weeks later, working a little each evening, our genie is up and operational again, and we have A/C as summer approaches on the bay...okay, the "how to" fix it story.
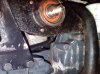
First, the generator and how to get into the generator . NOTE: the generator is behind the lift arm for the engine hatch. In order to repair the generator, you must be able to get into the generator box. Feeling like I had just stumbled across a Chinese puzzle, I was a little frustrated Sea Ray hadn't provided a few "hints" in their multiple manuals. See the black handle behind the lift to the left of the air flow opening? That handle must lift OUT and then pull up in order to take the front panel off. Notice how the handle is wedged up against the lift....
 :smt089
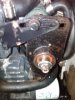
While Onan had provided convenient access points on top and on the side, thanks to Sea Rays interesting choice of location for the genie, in order to open the panels, you must take the box apart by removing three screws-- the three screws hold the upper bar frame in-place. Remove the two screws at the top, just left of the front access hatch AND remove the screw at the right hand (aft) end of the frame as well.
Now the top bar lifts out as well as the top access plate. Next, lower the hatch approximately 12 inches very slowly! (Yes, this is a two person job.) That moves the lift rod just far enough forward you can now pop the latch on the front access panel. (The clearance is less than a 1/4 inch, but it will open if the hatch is closed down sufficiently to move the bar over.) Now you can lift the front access plate out while your partner lifts the hatch again. In order for the hatch to come free, the hatch must be all the way up as you lift it up and out.
Gee, wasn't that easy.... Now you have access to the generator parts and pieces, but no manual and more than a few surprises. Our raw water internal hose inbound to the pump had split and the previous owner had managed to bind the hose together with two hose clamps. Only semi-successful, the interior of the box was eaten up with rust from salt water spray. Meanwhile, the search for "why" did the impeller implode revealed a raw water strainer that had possibly never been cleaned out. Plugged only begins to describe its condition.
I didn't start taking pictures soon enough to share the rust shots and plugged sea water strainer, suffice it to say that without Boeshield T-9 and a Graco wrench we would have never gotten the strainer apart. At one point, we seriously considered replacing the whole strainer. :smt101
Tmrw night I'll walk through the process of actually replacing the impeller and where to look for all those little parts that quickly head up-stream after implosion.
For those of you that are curious, this boat was inspected by a highly respected local surveyor and for the most part, she is truly in exceptionally good shape. The diesel engines are rock solid and the electronics on the boat are all in great shape. Cosmetically, the boat hasn't lost her good looks. With that said, our generator reminded us that a great boat is only as good as her "routine" maintenance allows her to be....more tmrw night, and have you checked your sea strainer filters lately?
DiveCuda Sends from the good ship, Kama Hele
:smt024
Now that we've had our new to us Sea Ray 340 for a couple of months, it was time to start the monthly maintenance drill. Our 2006 Sea Ray has a wonderful set of Yanmar diesels to push her along and a solid Onan Diesel generator (5Kw) to support all of our electronic goodies. Weekend before last, we were doing our Saturday AM boat checks before launching, fired up the generator, and zap...instant generator shut down. Having serviced a few water propelled craft, my husband and I looked at each other and both said "impeller" instantly. We cruised on out into Tampa Bay sans air conditioning for the weekend thinking it would be a quick fix on Sunday afternoon....not so fast....:smt021
After a quick scan of our library of boat maintenance manuals, and more than a couple of hours drilling deep into the internet on Onan generators, we discovered two things: our generator is an older model (2001) and more importantly, there were no service manuals available on-line for viewing or purchase. The Onan site points you to finding a local dealer; we did, and you must order through your dealer. Well, that was two weeks ago. We ordered the manual; still have not see the manual, and being brave, impetuous and bold, decided to go for it regardless. Two weeks later, working a little each evening, our genie is up and operational again, and we have A/C as summer approaches on the bay...okay, the "how to" fix it story.
First, the generator and how to get into the generator
. NOTE: the generator is behind the lift arm for the engine hatch. In order to repair the generator, you must be able to get into the generator box. Feeling like I had just stumbled across a Chinese puzzle, I was a little frustrated Sea Ray hadn't provided a few "hints" in their multiple manuals. See the black handle behind the lift to the left of the air flow opening? That handle must lift OUT and then pull up in order to take the front panel off. Notice how the handle is wedged up against the lift....:smt089While Onan had provided convenient access points on top and on the side, thanks to Sea Rays interesting choice of location for the genie, in order to open the panels, you must take the box apart by removing three screws-- the three screws hold the upper bar frame in-place.
Remove the two screws at the top, just left of the front access hatch AND remove the screw at the right hand (aft) end of the frame as well. Now the top bar lifts out as well as the top access plate. Next, lower the hatch approximately 12 inches very slowly! (Yes, this is a two person job.) That moves the lift rod just far enough forward you can now pop the latch on the front access panel. (The clearance is less than a 1/4 inch, but it will open if the hatch is closed down sufficiently to move the bar over.) Now you can lift the front access plate out while your partner lifts the hatch again. In order for the hatch to come free, the hatch must be all the way up as you lift it up and out.
Gee, wasn't that easy....
Now you have access to the generator parts and pieces, but no manual and more than a few surprises. Our raw water internal hose inbound to the pump had split and the previous owner had managed to bind the hose together with two hose clamps. Only semi-successful, the interior of the box was eaten up with rust from salt water spray. Meanwhile, the search for "why" did the impeller implode revealed a raw water strainer that had possibly never been cleaned out. Plugged only begins to describe its condition. I didn't start taking pictures soon enough to share the rust shots and plugged sea water strainer, suffice it to say that without Boeshield T-9 and a Graco wrench we would have never gotten the strainer apart. At one point, we seriously considered replacing the whole strainer. :smt101
Tmrw night I'll walk through the process of actually replacing the impeller and where to look for all those little parts that quickly head up-stream after implosion.
For those of you that are curious, this boat was inspected by a highly respected local surveyor and for the most part, she is truly in exceptionally good shape. The diesel engines are rock solid and the electronics on the boat are all in great shape. Cosmetically, the boat hasn't lost her good looks. With that said, our generator reminded us that a great boat is only as good as her "routine" maintenance allows her to be....more tmrw night, and have you checked your sea strainer filters lately?
DiveCuda Sends from the good ship, Kama Hele
:smt024