Njlarry
Well-Known Member
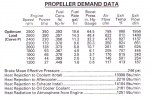
Did I miss the prop specs?
Follow along with the video below to see how to install our site as a web app on your home screen.

Note: This feature currently requires accessing the site using the built-in Safari browser.

CAT publishes the Brake-Specific Fuel Consumption (BSFC) or the amount of Hp produced for a given amount of fuel. The 3100 series are most efficient and have a flat BSFC from 2200-2400 RPM, so you should see your sweet spot somewhere in this range, and likely anywhere from 2100-2400 without much variation. The other factor is I usually see a small dip in the EGT's as I get towards 2400. I usually run 2350-2400 for this reason.
CAT publishes the Brake-Specific Fuel Consumption (BSFC) or the amount of Hp produced for a given amount of fuel. The 3100 series are most efficient and have a flat BSFC from 2200-2400 RPM, so you should see your sweet spot somewhere in this range, and likely anywhere from 2100-2400 without much variation. The other factor is I usually see a small dip in the EGT's as I get towards 2400. I usually run 2350-2400 for this reason.
I used mineral spirits to clean the Airsep filter elements ……..for 26 years on my 450DA and never had an issue. I suppose Brakekleen or a more volatile solvent like lacquer thinner might work, but we have no idea what cement the filters were assembled with, so I chose mineral spirits followed washing with dishwashing detergent followed by shaking the excess water out and letting then dry overnight due to the cost of replacing the elements from Walker Engineering. the other advantage is the more volatile solvents could pose a fire risk if for some reason some reason some of the solvent remained in the filter element afterthe cleaning process.
I bought a K&N kit complete with detergent and oil. I could likely skip the detergent, use Dawn and just buy a big spray bottle of the K&N filter oil.I used mineral spirits to clean the Airsep filter elements ……..for 26 years on my 450DA and never had an issue. I suppose Brakekleen or a more volatile solvent like lacquer thinner might work, but we have no idea what cement the filters were assembled with, so I chose mineral spirits followed washing with dishwashing detergent followed by shaking the excess water out and letting then dry overnight due to the cost of replacing the elements from Walker Engineering. the other advantage is the more volatile solvents could pose a fire risk if for some reason some reason some of the solvent remained in the filter element afterthe cleaning process.
The part number for the 3126's is CD190 which is a 7-1/2x10" cone. The 3116's I beleive use the CD195 which is 7-1/2"x8" cone. PO had the shorter ones installed on the 3126's, I replaced with the correct ones.Thats my plan moving forward with the replacement elements.
Problem was previous owners, or alleged mechanics treated those elements like footballs.
They were bent, dented and beat up pretty bad.
In getting these engines closer to baseline, it was time to replace and now properly service the new ones moving forward.
I'll do my best to avoid any soccer games in the engine room.
BEST !
RWS
I also had the shorter versions on mine, I ordered new replacements, found them cheapest at Fisheries Supply , not tax and free shipping! 216 for a setThe part number for the 3126's is CD190 which is a 7-1/2x10" cone. The 3116's I beleive use the CD195 which is 7-1/2"x8" cone. PO had the shorter ones installed on the 3126's, I replaced with the correct ones.
I have the old set sitting on my spares shelf if anybody needs another set.
Data above shows for 3116.
Thank you Frank!I made a tool out of about 1/4" aluminum flat bar wiah a small crook bent into the end of it. It fit behind the alternator boay and if you losen t he belt adjustment nut on the alternatos mount, you could move t he alternator out a just enough to tighten the belt, hold it in place with the aluminum bar and tighten the adjustment nut.
All the tools I made were either stainless steel or aluminum to avoid rust in my tool box, wich I made to replace the plastic battery boxes and held things like aluminum rudder backing gland nut wrenches, oil and diesel filter wrenches, etc. I switched to Red top AGM batteries and built this tool boax to be a combination battery box and tool tray
ALso you will find that it takes several adjustments on the alternator and water pump belts to reach the point where they no longer "grow" just by running the engines. Make the adjustment in several steps and don't try to get the adjustment all at once.
Frank
Perhaps a few of us could get together and get some made (stainless) exactly as Frank W did for his starboard side.
Would make life simpler.
BEST !
RWS