blescallett@verizon.net
New Member
Thank you I will try that
Follow along with the video below to see how to install our site as a web app on your home screen.

Note: This feature currently requires accessing the site using the built-in Safari browser.
Thanks Guys,
Alex,
When I emailed boatzincs he said I should look into putting zincs on the shafts.. Does yours have them? Also where are the ones on the rudders? I don't remember seeing them there either.. Do you replace them yourself? I would like to but I was also thinking of bringing in a diver service to clean the bottom, check the props and rudders and change them for me too...
Have another problem now...
last weekend I decided to get things ready for the summer by doing the basics, which for me start at cleaning out the strainers at the various seacocks. The A/C, generator and waste are small and a pain to get to, but not a big problem. The ones that seem to be the most difficult are for the engines. Reaching down to the port seacock handle it would not budge. When I tried to get into a different position to try to close it the handle came off and the lock nut when down in the bilge where I could see it but not reach it by hand. I figured as long as it didn't crack the seacock itself (where the boat could sink), I'd figure a way to retrieve the lock nut and screw the handle back on, get a PVC pipe to extend the handle and hopefully be able to close it and clean out the strainer.
Today was the first day I could get back to it, so I put some duct tape in reverse on the end of a golf club and was able to retrieve the lock nut. When I pulled it back up I felt victorious until I looked inside it and saw in that inside was threaded part of the threaded bolt (or whatever you call the part that the lock nut screws onto) broken off. My heart sank as I am realizing this could mean I have to pull the boat out of the water and have the seacock replaced. It's been a very difficult year financially and I feel lucky to still have a job (though I made about 1/2 of what I normally make) and was able to keep my house and boat, but there's not much left for any major repairs.
Any brilliant ideas or thoughts as to what to do now??
Hey Alex,
You're probably right about the salty oxidation and I'm not sure if there are enough threads left on the valve stem to reattach the handle, so I'm guessing I'm going to have to pull the boat and replace the seacock. I'm not sure I would want to risk sinking the boat, as the strainers for the engines are much larger than the others so the water flow could be substantial and with no way to cut the supply off until I get the strainers out and try to plug it , some serious water could be flowing into the bilge...
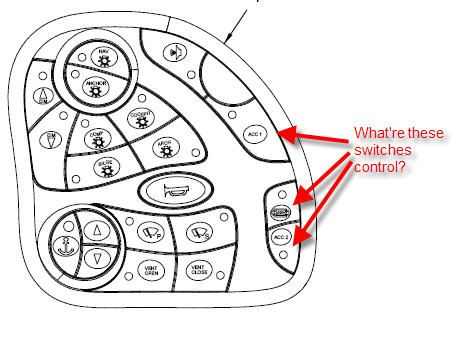
I had posted the question in Electrical Section, but I'll try here as well. Do you guys have these swithces control anything?
