Official 1980's Weekender/Sundancer 300 thread

This is SeaFoam and how it works, I use it in my small engines each year to just clean um out.

Sea Foam® Motor Treatment for Gas and Diesel Engines is a 100% pure petroleum product that works instantly to clean deposits from internal engine parts and remove moisture from oil crankcases and fuel tanks. As a fuel system additive, Sea Foam® motor treatment will clean carburetors, fuel injectors, clean carbon, gum and varnish deposits, add lubricity to fuel, stabilize fuel and control moisture. As an oil system additive, Sea Foam® motor treatment controls moisture, gum, varnish and residue deposits.

Im also going to sit down here and read up on that carb. Which spring is missing?
 
Last edited:
This is SeaFoam and how it works, I use it in my small engines each year to just clean um out.

Sea Foam® Motor Treatment for Gas and Diesel Engines is a 100% pure petroleum product that works instantly to clean deposits from internal engine parts and remove moisture from oil crankcases and fuel tanks. As a fuel system additive, Sea Foam® motor treatment will clean carburetors, fuel injectors, clean carbon, gum and varnish deposits, add lubricity to fuel, stabilize fuel and control moisture. As an oil system additive, Sea Foam® motor treatment controls moisture, gum, varnish and residue deposits.

Im also going to sit down here and read up on that carb. Which spring is missing?
Is it a bad idea use SeaFoam in the gas when we've already added StarTron?
We haven't treated the oil so that route shouldn't be a problem.

He didn't specify which spring but had corrected it when he noticed it. He's pretty OCD--grumbles every time he finds an old washer or bit of wire insulation someplace it shouldn't be; said their instructors were drill sergeants about keeping a clean work area and not leaving crap that could bounce around and make trouble. I'm not complaining, that's for sure, because I want to correct any PO shortcuts or sloppiness every time there's a repair or a maintenance item, but it's kind of funny when he gets so worked up!!

I'll give him a call again in a few days to find some time to chat in depth about where he wants to go next. If he feels there's a good chance the carb is contributing, I'd be willing to have him pick it apart. I'm hoping some time away from it will temper the frustration and bring him fresh perspective--maybe he'll think of something he's missed.
 
I'm going to run the issue by my carb guy tomorrow. But for now I'm still reading over the carb.
 
I'm going to run the issue by my carb guy tomorrow. But for now I'm still reading over the carb.
I really appreciate the time you're putting into this. I feel bad for him because he really has been trying, and especially after he discounted his labor saying, "I haven't FIXED anything!" He didn't have to do that and I'm not sure that most would!

Two or three or twelve minds may be better than one, though, so hope springs eternal!
 
I'd enjoy this particular challenge more if I'd taken small engines class instead of ag in high school!
 
My guy to you and yours,

1st rebuild the carb making sure the float is adjusted correctly and it's spring is correct
2nd make sure the choke is adjusted and working correctly ( it's also in that book I sent you)
3rd make sure the govenor arm is adjusted correctly (also in the book)

Last, start one at a time, by pass the sensors just to rule them out.

without the Genset here he is only going off your post telling us about the problem
Mine didn't quite come out and say it, but I think he does want to go to the carb next even though in theory it was rebuilt in the fall.
I'm going to be extra ticked at the prior guy if it turns out it wasn't really done or wasn't done properly. :smt021
 
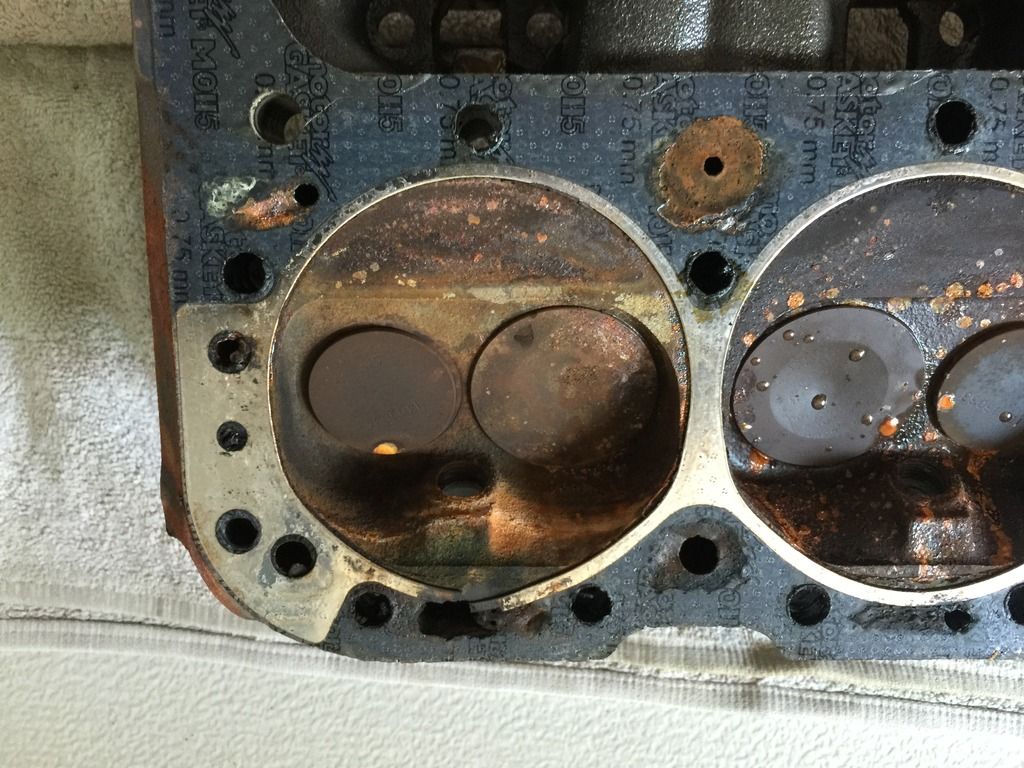
What a crazy week! My port engine developed a vibration so I decided to give her a tune up. Everything looked great on the left bank, and when I pulled the spark plug on #2 cylinder water came out of the plug hole. So yesterday I pulled the riser, and manifold to have them pressure tested, and they where fine, so today I pulled the cylinder head, and found this...


Yes, a blown head gasket. So, I took the head to a machine shop to have it pressure tested, and she was fine, (no cracks) I had the head resurfaced and guess what I'm doing tomorrow.

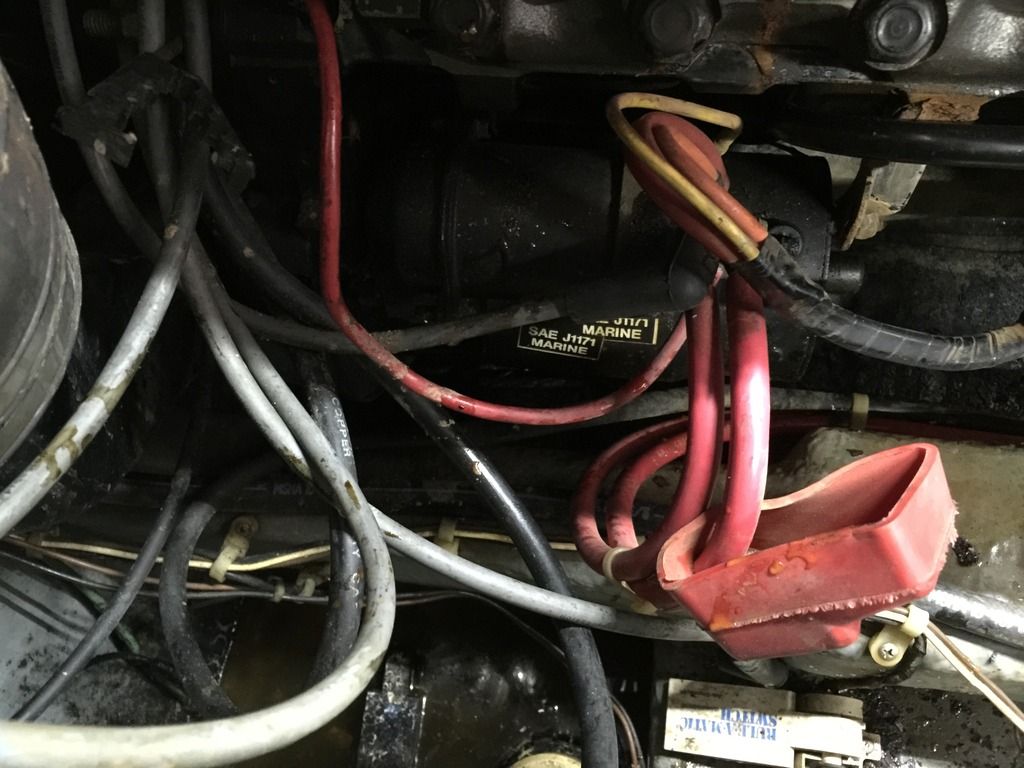
The starter has been acting up lately so decided to replace it while the head, and manifold are off. Does anyone have any tips on getting the starter out of there??

 
I just replied to another thread about doing the starter, you may want to look at it to see if anyone else offered up mre tips.
But, it's definetely doable. Having a set of ratcheting combination wrenches made it doable for me. Don't forget the bracket that holds the starter to the block.
There isn't enough rook to get on both starter bolts with a regular ratchet and socket, and not enough swing room to use a regular box wrench.
If I remember correclty, I used a regular box wrench to break the bolts free, and then the ratcheting box wrench to run them out. It was slow going with very little swing room, but you can do it.
I did mine with the manifold and riser in place. Having them off will be an advantage for you.
Think about using a peanut starter as a replacement. I put them on both my motors when I repowered.
The peanut starter won't make the connections any easier, but it will be easier to handle when your wedged in there.
 
I MISSED INBOARDS BY JUST ONE YEAR????!!!?!?!??

A dockmate is looking at DAs right now and wants the aft cabin with inboards; budget-wise he's been shopping late 80s models and I let him know I found only WEs w/inboards in this vintage. Made me curious so I knocked around the SeaRay site and there it was, laughing at me--1990 310DA had V-drive option. :( Guess I should have spent just a little more time shopping, eh?

But over all I'm glad I researched, because now I know I won't have to jump all that far on the next purchase to lift some of the haul-out burden for major maintenance!
 
Looking for some help with the water system on my 1988 Sundancer 300. The cold water flows nicely at the galley sink but not the hot water. Neither cold nor hot flows more than a trickle in the head. Any thoughts?

So I finally had time to get to work on this and is the usually the case with me, the easiest solution was the answer. For the head, it turned out to be the screen in the faucet nozzle that was the issue. All kinds of debris in it.

As as for the galley, this was just a little bit of a challenge. I had to take the knobs off the handle and pull out the internals for both hot and cold. They both had small small pieces caught inside in the springs that control water flow. Plastic looked like the bag from a bag of ice. I wonder how that ended up inside the water lines.

Bottom line...both head and galley hot and cold water are good to go.
 
You will be replacing the water heater soon. 2 times this has happened to me and within a few weeks the water heater lets go.


Sent from my iPhone using Tapatalk
 
I need to replace my port hole windows, Anyone know where to by them, and any replacement tips?

Thanks, Ken
 
Searayman on ebay has them, I just did a couple of mine this spring. I found that the outer ring that snaps on just doesn't stay on by itself. I used some Lifeseal to help adhere mine to the hull. 400 UV would also work well in that application.
 
I don't know all the history of Sea Ray designs, but I have what I am told is a 1983 SS310 Sea Ray -- and it looks all the world to me like a Sundancer with the after cabin under the helm. Twin engine inboard with v-drives, genny, AC, Hot Water, campus canvas....
 
Searayman on ebay has them, I just did a couple of mine this spring. I found that the outer ring that snaps on just doesn't stay on by itself. I used some Lifeseal to help adhere mine to the hull. 400 UV would also work well in that application.
I didn't see a lot of references to year/model....do I just email him to specify to make sure I'm getting the right ones? Is it best to measure? And what other supplies would I need to make sure we're installed/sealed properly? Total novice and definitely don't want to pull out old ones if I don't have all the right stuff on hand!
 
I've worked with this guy in the past. If you just email him he is more than willing to help
 

Forum statistics

Threads
113,224
Messages
1,428,901
Members
61,116
Latest member
Gardnersf
Back
Top