Navigation
Install the app
How to install the app on iOS
Follow along with the video below to see how to install our site as a web app on your home screen.

Note: This feature currently requires accessing the site using the built-in Safari browser.
More options
You are using an out of date browser. It may not display this or other websites correctly.
You should upgrade or use an alternative browser.
You should upgrade or use an alternative browser.
need gps/fishfinder installer
- Thread starter JJO
- Start date

Nehalennia
Well-Known Member
- Aug 22, 2007
- 10,006
- Boat Info
- 2001 310DA twin 350 MAGs, Westerbeke 4.5KW
- Engines
- Twin 350 MAG V-drives
It's really not that hard to install. I just did my 545s I bought here on BOE marine.
sb in gp
Active Member
It's really not that hard to install. I just did my 545s I bought here on BOE marine.
Hi Todd. You and I have almost the same boat, and I just bought the 535S GPS, similar to you. If you'd got a minute I have a couple of questions for you.
I'm going to be doing the install next weekend and I was wondering how you ran the wire from the engine area to the cockpit?
Also, did you go with the thru-hull tranducer? If so, did you replace the existing transducer that was in the boat? I assume then that the built-in depth finder is then useless, i.e. there is no way for it to share the transducer with the GPS and the the depth finder (I realize that the GPS has depth reading on it)?
Where did you end up mounting the GPS? Do you have any pics you can share?
Thanks,
Scott
tphinney
New Member
I agree with todd;
installing electrical equipment is real easy once you get past the fact that you need to drill some holes in your nice and shiny gelcoat.
the wiring is actually the easyest part thanks to Searay palnning ahead for all kinds of options. your wiring diagrams for your boat should show open fuse locations where you can get a hot wire from to power your electronics and the - side should simply be connected to the ground bus bar in the same area.
unscrew your dash panels at the helm and you shuold find what I'm talking about.
As for locations to mount you're GPS. I choose to mount mine on the dash over the gauges ans slightly under the wind screen. I tend to take large waves over the bow from time to time and wanted a little extra protection for the electronics so that it wouldn't take a couple hunderd gallon on top of the unit.
hardest part of the whole install for me was drilling a whole big enough to fit the cables and the cable compression mount which makes the whole thing look clean and keeps water from going down the hole.
Last edited:
Nehalennia
Well-Known Member
- Aug 22, 2007
- 10,006
- Boat Info
- 2001 310DA twin 350 MAGs, Westerbeke 4.5KW
- Engines
- Twin 350 MAG V-drives
Hi Todd. You and I have almost the same boat, and I just bought the 535S GPS, similar to you. If you'd got a minute I have a couple of questions for you.
I'm going to be doing the install next weekend and I was wondering how you ran the wire from the engine area to the cockpit?
Also, did you go with the thru-hull tranducer? If so, did you replace the existing transducer that was in the boat? I assume then that the built-in depth finder is then useless, i.e. there is no way for it to share the transducer with the GPS and the the depth finder (I realize that the GPS has depth reading on it)?
Where did you end up mounting the GPS? Do you have any pics you can share?
Thanks,
Scott
Take a look at two of my threads that covered it.
Feel free to ask any other questions these don't cover.
Garmin 545s GPS Install....done
Some positive Projects started.....(around page 3)
- Oct 12, 2006
- 1,974
- Boat Info
- "On Vacation"
2006 40 Sundancer
Raymarine E125 & HD Radar + Garmin 5208
- Engines
- QSB5.9 380 Cummins
I installed a VHF radio and 8' antenna on my slip-mate's boat over the weekend. Drilled 10 holes for the job. (Yeah, it is easier to do on someone else's boat!) Running the antenna wire behind the fiberglass was, as I anticipated, the only PIA. Also, the new solderless connectors sold by shakespeare actually work... I was a bit sceptical about the quality of the connetion but the reception was as clear as mine.
I think he has the same chartplotter as you are looking to install. Very easy install. It is mounted on the center of his console, with the gps about 2 ft away under the glass on top of the console. Tied it in directly to the positive connection and negative connection of the boat as the chapparals dont use the EIM system on latter-year searays.
I used the blue junctions connectors for the VHF radio and tied into existing wiring to make the job easier.
sb in gp
Active Member
Take a look at two of my threads that covered it.
Feel free to ask any other questions these don't cover.
Garmin 545s GPS Install....done
Some positive Projects started.....(around page 3)
Thanks Todd. Looks like you have done a lot on your 260. My main question was how did you fish the wire from the engine area to the helm to connect the transducer? Is there a gap to send a fish tape through or do you need to drill through the plywood firewall and wall under the cockpit sink?
I removed the cover under the throttle and tried to look back from the helm but could not really tell how to get all the way to the engine compartment. Looking forward from the engine room was also difficult. Suppose I'll just take a fish tape down to the boat and see how far I can get it to go.
Thanks.
Nehalennia
Well-Known Member
- Aug 22, 2007
- 10,006
- Boat Info
- 2001 310DA twin 350 MAGs, Westerbeke 4.5KW
- Engines
- Twin 350 MAG V-drives
Thanks Todd. Looks like you have done a lot on your 260. My main question was how did you fish the wire from the engine area to the helm to connect the transducer? Is there a gap to send a fish tape through or do you need to drill through the plywood firewall and wall under the cockpit sink?
I removed the cover under the throttle and tried to look back from the helm but could not really tell how to get all the way to the engine compartment. Looking forward from the engine room was also difficult. Suppose I'll just take a fish tape down to the boat and see how far I can get it to go.
Thanks.
If you remove the helm seat, (just pull it up) then remove the cupholder/binstorage~o~rama you can then look down aft and you'll see a bunch of cables and wires with a big glob of silicone. Run the transducer wires through there and tie wrap them all tight, nice and out of the way. Once you have it in that area it's easy to simply throw it through side of the helm access hole and voila. DONE! Wire it up and go boating!
Fishnut
Member
- Jan 30, 2008
- 509
- Boat Info
- 2006 240 Sundancer
- Engines
- 5.0 Mercruiser with Bravo III Drive
I agree with todd;
installing electrical equipment is real easy once you get past the fact that you need to drill some holes in your nice and shiny gelcoat.
the wiring is actually the easyest part thanks to Searay palnning ahead for all kinds of options. your wiring diagrams for your boat should show open fuse locations where you can get a hot wire from to power your electronics and the - side should simply be connected to the ground bus bar in the same area.
unscrew your dash panels at the helm and you shuold find what I'm talking about.
As for locations to mount you're GPS. I choose to mount mine on the dash over the gauges ans slightly under the wind screen. I tend to take large waves over the bow from time to time and wanted a little extra protection for the electronics so that it wouldn't take a couple hunderd gallon on top of the unit.
hardest part of the whole install for me was drilling a whole big enough to fit the cables and the cable compression mount which makes the whole thing look clean and keeps water from going down the hole.
You should post some pictures of your work. I was curious about the removal of your dash panels? Which panels did you remove. Second question, how did you get through the engine bulkhead? Did you drill a hole and where?
Nehalennia
Well-Known Member
- Aug 22, 2007
- 10,006
- Boat Info
- 2001 310DA twin 350 MAGs, Westerbeke 4.5KW
- Engines
- Twin 350 MAG V-drives
You should post some pictures of your work. I was curious about the removal of your dash panels? Which panels did you remove. Second question, how did you get through the engine bulkhead? Did you drill a hole and where?
Did you read my posts and links above?
There are pictures and descriptions.
tphinney
New Member
Other Item that might help.
I'm not sure about the 260DA's, but on my 240DA I have a vent return on the mid berth that you can pull out to get access to the area just under the "cupholder/binstorage~o~rama" (as todd put's it) to get a better view of the wiring path along the Starboard side.
I've had to go fishing for Nut's that I have dropped in the past and this access has been a godsend.
sb in gp
Active Member
If you remove the helm seat, (just pull it up) then remove the cupholder/binstorage~o~rama you can then look down aft and you'll see a bunch of cables and wires with a big glob of silicone. Run the transducer wires through there and tie wrap them all tight, nice and out of the way. Once you have it in that area it's easy to simply throw it through side of the helm access hole and voila. DONE! Wire it up and go boating!
Now you are at the heart of my question. So did you pull out the gob of sealant, or did you drill a hole through it, or what? Thanks.
tphinney
New Member
fishnut;
to mount and runt the wiring. I unscrewed the dash panel where my stereo control is and on my 'o4 theres a fold down panel under the sterring wheel which give you access to the fuse panel, the open accessory blocks and the ground bus, along with an access hole lead to the area accessable via the "cupholder/bin storage~o~rama" Bin. all of these panels are simply held in with screws so the come out and go back in real easy.
take a screw driver and start taking you;re boat apart you'll be amazed at what you fined behind the shiny cosmetic fronts.
Nehalennia
Well-Known Member
- Aug 22, 2007
- 10,006
- Boat Info
- 2001 310DA twin 350 MAGs, Westerbeke 4.5KW
- Engines
- Twin 350 MAG V-drives
Now you are at the heart of my question. So did you pull out the gob of sealant, or did you drill a hole through it, or what? Thanks.
I didn't see this until now. I went through the gob of sealant. Then run your wire and re-gob~o~sealant.
I think you saw my other posts on the install right?
sb in gp
Active Member
Thanks Todd. Easier than I thought. All hooked up and working great. Appreciate your assistance.
Nehalennia
Well-Known Member
- Aug 22, 2007
- 10,006
- Boat Info
- 2001 310DA twin 350 MAGs, Westerbeke 4.5KW
- Engines
- Twin 350 MAG V-drives
Cool let's see pictures........
sb in gp
Active Member
Cool let's see pictures........
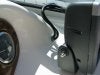
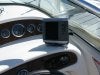
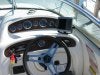
Here are some pics. I chose to mount mine on the right. My criteria were: 1) least amount of visibility obstruction, 2) being able to see it standing, 3) being able to see the gauges.
This seemed to be best for me.
Attachments
Nehalennia
Well-Known Member
- Aug 22, 2007
- 10,006
- Boat Info
- 2001 310DA twin 350 MAGs, Westerbeke 4.5KW
- Engines
- Twin 350 MAG V-drives
Looks good. Does it block your view of the temp gauge?
I have found where I have mounted mine to be really handy and easy to reach the buttons as we're underway.
Nice job though.
I have found where I have mounted mine to be really handy and easy to reach the buttons as we're underway.
Nice job though.
sb in gp
Active Member
You have to lean a bit to the left to see the temp gauge, but the unit is as close to the glass as I could get and still have range of movement. You can easily see around it because is is mounted several inches in front of the gauges on the upper ridge of the dash.
Previous owner had a smaller unit mounted back further and directly in front of the temp and I found that to be unacceptable because it was too hard to see the gauge.
Previous owner had a smaller unit mounted back further and directly in front of the temp and I found that to be unacceptable because it was too hard to see the gauge.
