Manifold removal on a 2008 8.1s

So, I get to work on a boat, and take a day off????? HHHmmmmm, let me think about that.......

OK, I'll do it, but only if your bilge is cleaned by then - I don't want to get dirty

Dale
Dale, I am replacing my oil pressure sending unit next weekend. Come on out and give me a hand! I'll dust my bilge for you...
 
Ken
a TRUE friend would get the flight out to Pelosi land... ;-)

I was up all night scrubbing.. Clean enough?
DSCN1841_zps1aad2a1a.jpg


DSCN1840_zpsa1ea63e9.jpg
 
There are still some stains.

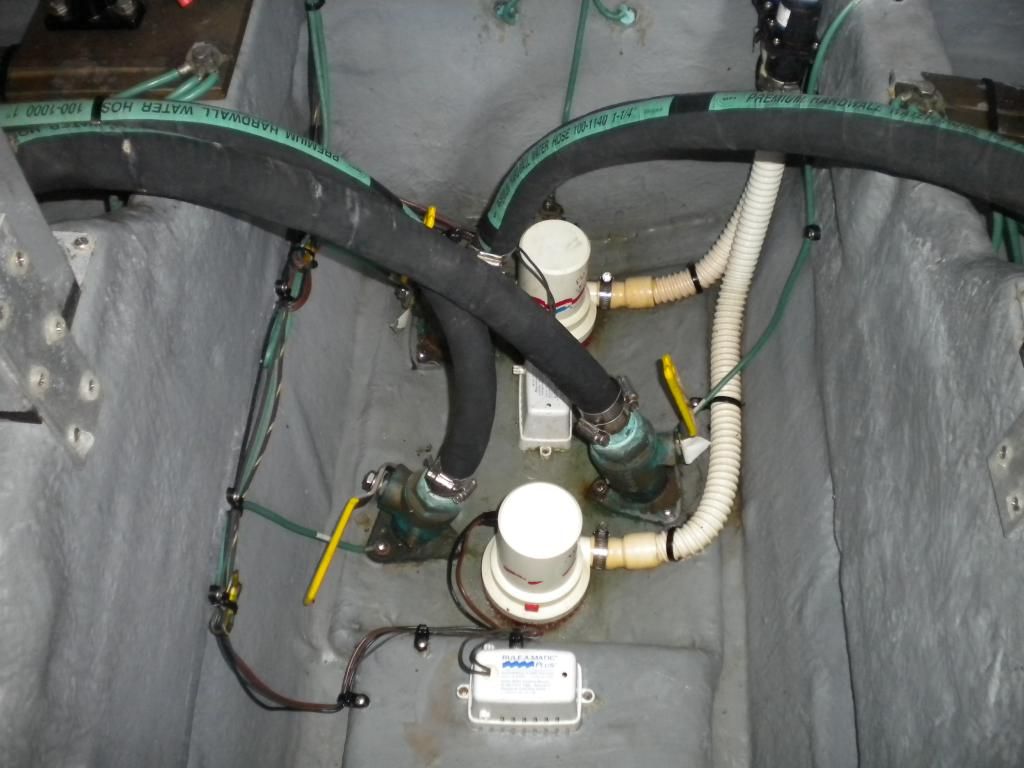
Your bilge pump wiring is secured too low, and it looks like there may be a couple butt splice connectors in the wiring.

The bonding system wiring is secured underneath lag screws for the seacocks and stearing gear mount - these cables should be secured under dedicated screws, threaded directly into the fittings.

The transom zinc thru-bolts need to be cleaned up and re-bedded.

It's gray - I prefer white. The whole thing will have to be stripped and repainted.

I am not sure I can work under these conditions. Let me sleep on it....

Dale
 
Well, if you do come, all that stuff will give you something to do if you get bored.
 
Hey MasterFab I know you do some excellent work, but can you comment on your reason behind these comments? I am not being egregious here, just trying to learn something.

Thanks

"Your bilge pump wiring is secured too low, and it looks like there may be a couple butt splice connectors in the wiring.

The bonding system wiring is secured underneath lag screws for the seacocks and stearing gear mount - these cables should be secured under dedicated screws, threaded directly into the fittings.

The transom zinc thru-bolts need to be cleaned up and re-bedded."
 
On a high level, I am poking fun at Ron, so I am being especially critical. But, this is also factual info, so here goes:

Bilge wiring should always be routed as high away from potential bilge water as possible, just as a best practice. If you look at the picture of Ron's bilge, you can see that the wiring is secured, at three places, right to the bilge floor with zip ties and screws. The screws create potential water intrusion points, which is never a good thing. I prefer to route the wiring up and away from the pumps and switches immediately, and secure that wiring to a vertical surface well away from any potential water accumulation, to prevent this problem. Also, butt splice connectors (at least the cheap ones) do not seal moisture out of the connection, and that can result in corrosion leading to a poor connection and eventual failure. Much preferred are high quality connectors that incorporate shrink tubing and an adhesive sealant. Finally, bilge wiring that is compromised, and winds up under water, can lead to stray current corrosion, which can rapidly destroy any metal fittings in the vicinity.

On the bonding system, the green wires that lead to Ron's seacocks are secured under the seacock mounting screws. This is not best practice, since these screws can loosen over time, again resulting in a poor connection, possibly leading to galvanic corrosion of the fittings, since the respective item will not be protected by the transom zinc. To assure a tight, long lasting and minimally resistive connection, the bonding wire lugs should be secured under a dedicated machine screw that can be properly torqued, and will provide for a low resistance connection. If you look at the left hand, foremost seacock in Ron's picture, just aft of where the bonding wire is now attached, you can just make out the dedicated machine screw provided for this purpose. It is unfortunately sitting there unused. Also, in the top left of the picture, you can see three bonding wires under a lag screw. This is actually two violations - the wires are not secured under a machine screw that won't loosen over time, and this joint is acting as a junction. If it loosens in time, all three bonding wires will be poorly connected. Junctions, where possible, should be made at a junction block.

Lastly, if you look at the two bolts at the very top of the picture, where the bonding wire attaches to the transom zinc, there is a bit of corrosion and staining. This indicates that the transom zinc through bolts need to be pulled next time the boat is on the hard, and re-bedded (probably replaced too). These bolts should be bronze material, secured with bronze washers and nuts. Stainless is less desirable, due to its proclivity to crevice corrosion in this type of application.

Ron, sorry to put your new bilge in the spotlight - nothing there has gotten to the point of panic. It is a relatively clean bilge!!

Dale
 
Last edited:
I just want to know how he got it that clean!!
 
I just want to know how he got it that clean!!

Masterfab, Thanks for your answers.

dc380,, what I have found to work pretty good is Spray 9, spray all down and scrub with a brush, then rinse.
 
Now I'm going to have to see how clean I can get mine. Pseudomind I've used Simple Green and or Spray 9 but I've never gotten it that clean.

I have bilge envy! I think he used dental tools.
 
It was pretty clean when I got it. I shop vac any water out regularly and I did scrub it down with some "green" spray made by Mr Clean or some such household cleaner company and have two different sized scrub brushes. Also pulled out the float switches and "power washed" them with the hose. Got to stay ahead of it.

Dale, I'll get right on all that stuff! ;-)
 
I will just say this my marina pulled my Westerbeke out and naturally put it back.

Pseudo, did they haul the boat? There's some question in my mind about water entering via the underwater exhaust if the muffler is pulled out.
 

Forum statistics

Threads
113,259
Messages
1,429,515
Members
61,135
Latest member
Gregger
Back
Top