

- Feb 14, 2009
- 1,361
- Boat Info
- '07 42SS Carver, full electronics array
'03 380DA, RL80C+, ST7001, Kohl 7.3,4kw o/array sold
- Engines
- 8.1S Crusader express drives
My vacuflush was not flushing, the vacuum pump was making noise, and I read every thread I could find to try and determine the problem. Water was staying in the bowl, so I deduced that there was either a blockage or...the dreaded "duckbills" had to be replaced. In all the threads, I couldn't actually find instructions...just people saying it was simple and messy (if you gave instructions, please forgive me...I just didn't find them). Anyway, given that I have a seven year old boat and having lost complete faith in the assertions of the seller that "all services have been done and the boat was meticulously maintained". I decided to go after the ducks.
I have read the manuals, and done a little homework (in fact, I followed the instructions and repacked the fart filter...thanks CSR!)-so I knew vaguely what the vacuflush looked like. I turned off power to the unit, found some latex gloves, and went to work. Not a really bad idea to use a digital camera while you are doing this and take pictures in case you need to retrace your steps.

Although I didn't know it at the time, the goal was to get to the black pump looking thing in the center of all that white plastic. To get there, take the top curved plate off (there are two small phillips screws). You will then see the pump.
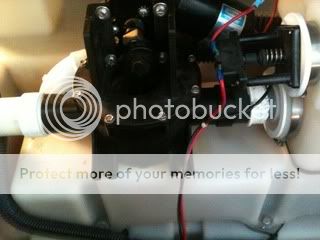
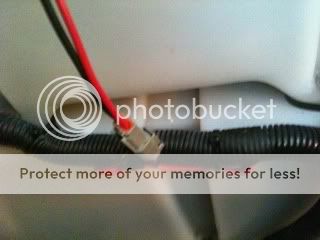
It is connected to a wiring connector and a black and red wire with pull apart connectors. Pull them apart.
The pump itself is bolted to the main tank with four 7/16ths bolts. Loosen them and remove (the back two are a bit tough to get to). Now you have to twist the collars holding the pump on. I used a big pair of pipe pliers and they came loose (I also was prepared with a cool strap wrench that was completely worthless...I should have bought Craftsman instead of Harbour Freight for this one).
After twisting off the pipes, the pump was loose and I removed it for inspection.

Have a hose and some towels and disinfectant handy...its a little messy. Inside the tubes on both sides are the first of the duckbills (duck bills?). The one on the right just pulled straight out. The one on the left was encased in a piece of exterior shell that had to be twisted off.

I used a small pair of pliers to pull out the offending ends
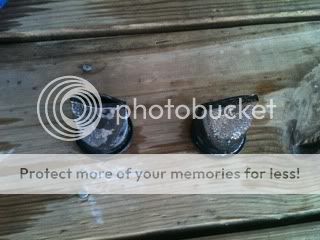
and replace them with new. What was not intuitive is that the two pipe ends also have duckbills.
and

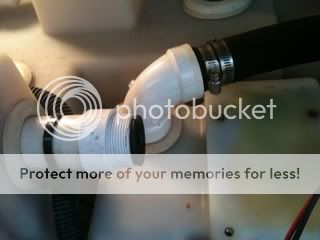
The connector on the left was simply a pull out and replace. The one on the right required that I disconnect the two pipes and replace the new duckbill.
 .
.
Now it was simply time to reverse the process and reassemble.
I wish I had taken some PVC pipe dope and added some extra sealing to the pipes, but they sealed pretty well. Otherwise, it went well. You are definitely dealing with some gunky mess, but not a lot of it, and nothing that gloves, a towel, and some sanitizing spray can't handle.
Hope this helps the next guy.
I have read the manuals, and done a little homework (in fact, I followed the instructions and repacked the fart filter...thanks CSR!)-so I knew vaguely what the vacuflush looked like. I turned off power to the unit, found some latex gloves, and went to work. Not a really bad idea to use a digital camera while you are doing this and take pictures in case you need to retrace your steps.
Although I didn't know it at the time, the goal was to get to the black pump looking thing in the center of all that white plastic. To get there, take the top curved plate off (there are two small phillips screws). You will then see the pump.
It is connected to a wiring connector and a black and red wire with pull apart connectors. Pull them apart.
The pump itself is bolted to the main tank with four 7/16ths bolts. Loosen them and remove (the back two are a bit tough to get to). Now you have to twist the collars holding the pump on. I used a big pair of pipe pliers and they came loose (I also was prepared with a cool strap wrench that was completely worthless...I should have bought Craftsman instead of Harbour Freight for this one).
After twisting off the pipes, the pump was loose and I removed it for inspection.
Have a hose and some towels and disinfectant handy...its a little messy. Inside the tubes on both sides are the first of the duckbills (duck bills?). The one on the right just pulled straight out. The one on the left was encased in a piece of exterior shell that had to be twisted off.
I used a small pair of pliers to pull out the offending ends
and replace them with new. What was not intuitive is that the two pipe ends also have duckbills.
and
The connector on the left was simply a pull out and replace. The one on the right required that I disconnect the two pipes and replace the new duckbill.
Now it was simply time to reverse the process and reassemble.
I wish I had taken some PVC pipe dope and added some extra sealing to the pipes, but they sealed pretty well. Otherwise, it went well. You are definitely dealing with some gunky mess, but not a lot of it, and nothing that gloves, a towel, and some sanitizing spray can't handle.
Hope this helps the next guy.

