Hello and "OH BOY!"

Is refurbing/rebuilding a 30-YO boat a good idea?


  • Total voters
    275
  • Poll closed .

Bluejacket1992

New Member
Aug 15, 2010
6
Mansfield, OH
Boat Info
1979 Sea Ray ??? (Model in question!)
Engines
Ford 302 888
Newly-found Friends,

I just acquired a 1979 Sea Ray 20'. It doesn't have a Cuddy Cabin...it has a through-windshield access to the "Sun Deck" (???) and anchor hatch. I have no idea what the model is.

I got the boat for next to nothing with the 'promise' that it ran early in the year...we've all heard that, before. The floor was shot so I embarked on the task to completely remove it and the poly-foam. Stringers were shot (what few stringers there were) and I found out that the engine bay stringers are just as bad. As such, I'm assuming the transom is dry rotted, too, so I'm gonna tear it out and replace - since I'm this far into it!

It's a labor of love but I LOVE the look of this boat and both my wife and I are very excited to work on it and get it back on the water!

I'm new to boat ownership...though not new to boats...and any help anyone can provide in the way to manuals, diagrams, electrical info., etc, would be greatly appreciated. :smt100

I love this forum and will post pics of the progress as I go along.

Thanks!
 
Well you must love them to do this. and some times you must gut them to make them right and safe most of all. The more you do this the less intimidating and confusing it becomes.[YOUTUBE]http://www.youtube.com/watch?v=-1SSf3w_L6o[/YOUTUBE]
This is how it can look and it feels like you are never going to finish... But you will Stick with it.
 
Thank you to those who have already replied. I found out that our boat isn't a '79, it's a 1976 SRV200! Oh well, what's 3 more years, right?! :huh:

I'll have pics posted tonight (I forgot the cable to my camera @ work!) and then will hve some specific questions to ask about the new stringers I'm installing.

BTW, I've had a couple people respond to my survey then ask me just how long I do expect to keep the boat. My response: as long as possible!

Thanks again and check back soon for the pics!
 
I have a 76 SVR200 also. Check out my profile of the interior redo we did last year. Only problem is that this spring I found soft spots in the floor. We had unusually heavy snow fall this year and my canvas cover let a lot of water in.

Please attach any pictures you have of the floor redo. I will be redoing mine this winter.

BTW.. Spookeay (AKA Heather) is the resident redo queen of this site. Watch and learn from her as she does this for a living.
 
Well you must love them to do this. and some times you must gut them to make them right and safe most of all. The more you do this the less intimidating and confusing it becomes.[youtube]-1SSf3w_L6o[/youtube]
This is how it can look and it feels like you are never going to finish... But you will Stick with it.

Not trying to steal the thread but great job on the rebuilt.:thumbsup::thumbsup:

I had a 135 Evinrude on my Glasspar and loved it.
 
Okay, I promised pics...here they are:


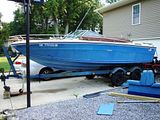
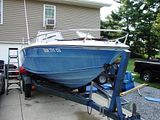
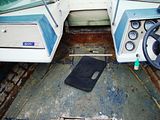
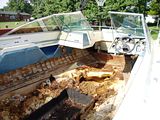
Our 1976 SeaRay SRV200

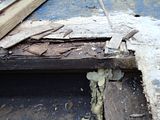
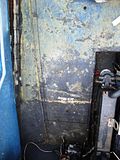
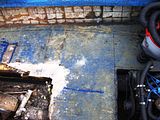
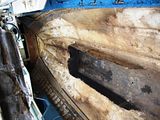
A couple views of the extent of the water damage and dry rot...


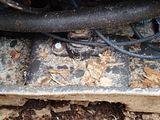
The reason behind this atrocity: The factory built or Previous owner(s) "Repaired" the boat by drilling holes through the cockpit sole AFTER it had been 'glassed' in order to pour expanding Poly Foam and they didn't 'glass' over the holes they drilled:


I began this process of rebuilding by cutting the sole out of the boat just before the tabbing. My hope was that the ply right next to the hull was still good and I could use the uncut tabbing as a reference point for the new floor/sole I am going to install.

Some pics of my 'cut lines'. I simply set my skillsaw (with a very fine-kerfed, carbide blade) to a 3/4" depth and followed the lines. Then used a jigsaw to cut the corners. If you attempt this, a note of caution: When using a jigsaw to cut the sole next to the tabbing, be VERY careful...the travel depth of the jigsaw can puncture the hull. I simply and carefully lifted the nose of the saw enough to cut just the sole...


Removing the damaged sole. I'm hoping to use these pieces as 'templates' for the new 3/4" marine-grade plywood I'll cut and glass over the new stringers...


Removing the water-saturated Poly Foam from under the Cockpit Sole. I took this mess to the local dump and the foam and what little wood I removed weighed a whopping 626 lbs.!!!


As of 08.17.2010, the current state of our craft...


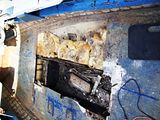
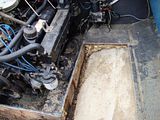
After assessing the extent of the damage with all internals removed, I'm considering removing the engine, too. The 2nd pic above shows the non-existant Stringers (AKA mulch!) that used to define the engine bay.

You can't tell in this pic but this engine mount has bowed the fiberglass due to the rotted supports and I'm guessing the engine-to-I/O alignment has suffered, too...


Okay, so I've emptied the inner hull of all the 'bad' stuff (except the engine...that's this weekend) and I've begun my research on the prodcuts I'm going to use to rebuild the structural integrity of this fine boat. Here's what I've come up with:

1. New Stringers will be treated 2"X8" lumber; I'll completely encase these new stringers in epoxy and fiberglass. (As you can see, the previous construction material used was plywood. Why??? This doesn't make any sense. In fact, the plywood wasn't even entirely 'glassed' so it was only a matter of time until it rotted out.)
2. All Stainless Steel fasteners. I don't want to risk it.
3. West Systems 105 Epoxy Resin - used in most professional rebuilds today.
4. West Systems 206 Hardener - this is the 'slow-setting' hardener. I've never 'glassed' before so I want the assurance that I can at least work with it well enough and long enough to build my comfort level.

Additionally, I've acquired another engine: the 233 HP Mercrusier 351. I'm having it rebuilt over the winter. I've also acquired another Mercruiser Alpha One I/O and, along with the one I removed from the boat, I'm either going to rebuild it myself or have it rebuilt by our local marine service center.

Here's are a few asks I have of my new 'family of friends' here at CSR:
a. If someone has the diagrams of the I/O and parts list, I'd love to try to rebuild the I/O, myself. I'm very mechanically inclined and don't believe this is that hard...I just need direction.
b. Has anyone ever run across a "Service Manual" of sorts for this boat? If so, would you be willing to share (if it's 'softcopy') or direct me to where I can acquire one or at least a hardcopy of one? If I get one, I'm going to make it 'softcopy' and share with the rest of this forum...
c. "Ditto" for the electrical system. I'd like a schematic because I'm going to completely rewire the craft.

Well, friends, this is it for now. Next week, I should have a few more pics and further progress to report.

Until then, calm seas and fair weather I wish for you all!

BlueJacket1992
 
That's an amazing amount of work! I would love to have the time to do something like this - the lines of the older bowriders are fantastic. I doubt you'll find a wiring schematic but since you're rewiring the boat it wont really matter anyway. There weren't a lot of electronics on them and minimal gauges so you can easily draw them up and wire it according to the current standards. Here's a good table for reference:

http://www.acbsphl.org/Tips_and_hints/ABYC_Wiring.htm

Good luck and thanks for keeping us updated on your progress!
 
1. New Stringers will be treated 2"X8" lumber; I'll completely encase these new stringers in epoxy and fiberglass. (As you can see, the previous construction material used was plywood. Why??? This doesn't make any sense. In fact, the plywood wasn't even entirely 'glassed' so it was only a matter of time until it rotted out.)

The folks at Sea Ray are a little smarter than you are giving them credit for. Plywood has much better dimensional stability than a piece of solid wood. Wood expands and contracts with changes in humidity and temperature. It always does this more across the grain than it does along the grain. In the case of a 2x8, which is really 1-1/2" x 7-1/2", it might go through changes in height (you'll be laying it on it's edge) from say 7-3/8" in the winter to 7-5/8" in the summer. Your engine/drive alignment will be constantly changing with the temperature.

Plywood on the other hand, is made up of several thin layers of solid wood glued together with alternating grain directions. The outer layers have their grain running from end to end, next inner layers have grain running side to side. The middle layer has it's grain running end to end. As the temperature changes, the outer layers of wood will try to change in size across the grain (making the sheet wider or narrower), but not along the length of the sheet. The next layers that they are glued to have grain running the other way. These also change in size with the temperature, but since their grain runs from side to side, they are trying to make the sheet longer or shorter instead of wider or narrower.The layers are constantly fighting each other. Some want to make the sheet longer, some want to make it wider. The thickness of each of the layers is calculated in such a way that they will be strong enough to prevent the adjacent layers from "moving" (that is the technical term from a woodworking perspective) as the temperature changes. If the sheet is designed and built properly, the entire assembly will not change in overall size as the temperature changes.

I would suggest that you buy a sheet or two of GOOD quality marine plywood and cut them into strips that you can laminate together and build up to the proper size for your stringers. One 4x8' sheet can be cut into 5 strips of 8" (you lose 1/8" for the saw blade each time you cut it). Use epoxy to laminate them, and use good woodworking clamps (Bessey) every 6-8". Don't overdo it on the clamping pressure that you can build up with these things. "Normal" woodworking glues like lots of pressure while they are setting up. Epoxy doesn't need as much. Clamp them tight, but excess pressure just squeezes the epoxy out making the glue layer too thin to be effective. Run the clamps all the way down, and crank them tight. Try to move the parts around. If you can't move them, the clamps are tight enough. Glass the whole assembly when finished. Theses stringers will be as good as the originals and your alignment will be better off for your efforts. :thumbsup:

Another problem with a single piece of treated lumber is warping. It will stay straight for a while, and then one day it will just "wake up" and start warping, twisting, or bending itself into a pretzel for no apparent reason. A laminated plywood stack just will not do that.

The last problem is buying two straight 2x8s. You'll probably need to go to 4 lumberyards and pick through their entire inventory to find 2 perfectly straight (along both the sides and the edges) 8' long boards. You have an 8' straigtedge that you can bring with you, right?

One last thing. DO NOT buy any plywood made in China. It WILL warp, twist, and delaminate. It also is not flat on the faces. It will be "lumpy".

Hope this helps. Love the pictures...
 
Last edited:
I complement you on wanting to use treated wood. It just makes scene right? Well do not do it. Treated wood hold moisture and nothing will stick to it. It may stick today or for a few weeks but it is going to contract and let go. Use a good marine grade ply or cabinet grade oak ply. Good luck and good job! Keep at it.

Also as for the service manual and drive rebuild. Get a Mercruiser manual from the 80's you can find them on Amazon used. make sure it covers the alpha drives, It should cover all the engines.

It will have the info you need to re work that drive. But you are going to need to tool up. A lot of the tools are proprietary and need to be made or purchased.
 
Last edited:
Dang, you don't just wade in to test the waters do you - you jump straight off the rocks!

Glad to see you're saving a classic and welcome. Keep the pictures coming and we'll share in your successes.

We've got a red hull '76 195 that we'll get back in the water someday, for now she just rests in the barn...

What Skibum said is very interesting and makes sense.

As for the manuals, Spookeay is right, just search on line for a Merc. Sea Ray only had just a general "owners" manual that was like a basic boating course. They have some archived on their site. Like Appleman said, you'd be better off just rewiring to meet your needs and refer to the Merc manual for the specs etc.

Good luck!
 
Are you going to change the floor plan or restore to original. I would like to open up the cuddy by installing the fuel cell in the floor. Then install a floor mounted cooler in the cuddy with some throw cushions for the kids to lay on. I would lose the ski compartment. Do you think the ski compartment would be deep and wide enough for the tank? Any thoughts on this?

I may change the seating in the back to a full dog house with sun deck over the engine too.


Bill, my wife and I would LOVE to change the floor plan to include:

Floor Plan Changes:
1. An open bow with seats and integrated cooler/storage
2. A cushioned sun deck over the engine
3. We'd even considered a bench seat in front of the engine that would span the beam, too! It could be engineered to be removable or sectional (in front of the engine bay) but still provide a wet storage, too, with proper glassing, that is.

Fuel Ideas:
1. The ski storage would be more than enough volume to hold a fuel cell - though I question how to get the filler neck to it safely and include a vent, by 'code'
- or -
2. Install fuel cells on either or both side(s) of the engine bay under the projected sun deck. The two fuel cells could be engineered to share/shift fuel by volume or as separate tanks with separate sending units, filler necks, and share plumbing to the fuel pump on the engine.
- or -
3. One large fuel tank on the starboard side under both the proposed sun deck and sectional bench seat.

(The 2nd and 3rd ideas might put weight distribution off-balance, though.) :huh:

Let's message one another privately and work together to draw-up plans. This really excites me and without having talked with my wife about it I know she'd be just as thrilled to have a more user-friendly classic boat!!! :smt038

Members, keep ideas flowing...this is why CSR exists! :smt100

Rich
BlueJacket1992
 
Cool. Let me put some thought into this and I'll come back to you. My initial thought for the cell was to use one on either side of the engine with a central tube to balance them much like the semi's use. I just don't want to be to tail heavy. The removable rear seat was spot on for what I was thinking with a sundeck.

The other option is to remove the back cover along the stern and replace it with three section stackable racks, each being 9' wide and the length of the stern. This would yield a 27" wide sun deck over the engine bay when laid side by side. Then when you aren't using it you can stack them and use the seats that are under them as they are now. I'll draw it up and show you.
 
If you have one of those little swim paltforms on the stern then check out my platform I bulit out of composite lumber. Chrissvr195 built one and used the board full width. Check out both his and my profiles to see the differences.

I will need to add anothe support to the ladder area as mine is starting to sag just a bit. The two handle rails used as supports aren't much strength I'm finding out.

http://clubsearay.com/forum/showthre...+swim+platform
 
I have just found this thread and I’m amazed by your work of love, Bluejacket!!! Good luck! :thumbsup:
As someone that has just finished his refurbishing project I can only confirm that CSR will be of great help and support!!!
 
Thanks, Pietro! I'm very excited about it. Today, I'm picking up the 3/4" Marine ply (Grade AB) and the Epoxy resin to laminate the 1.25"-thick Stringers together! I'll post new pics with this process, soon.

I also receive a link to the exact resource needed to re-build the stern-drive and engine and I'm VERY tahnkful to each of you who have replied. This forum ROCKS!!!
 
The other day i was at a gas station in Corona California and i seen this 1958 wooden boat and this thing was freakin cherry. The sides where louvered white the stern was wooden stained and the winshield frame was also wooden stained. I wish i would of asked the Gentleman if i could take a picture.
 
Bluejacket,can you attach some pictures of the hull after you cleaned it out. I want to see how deep and long it is before the keel rises into the bow.
 
I'm getting in on this a little late, but GOOD LUCK & have fun on your project! Sounds like it's going to look awesome when done.

I think building a bench seat with the padded deck over the engine is a great idea. I think the newer boats that have this look great & it adds more space & useability to the rear.

Are you going to cut out the enclosed bow to accomodate the seating/padded area or just make it into a small cuddy? I agree there's a lot of wasted space up there but I also think the fuel sell in the front helps the boat get on plane & ride level better. Either way it'll be interesting to see!

Like OLDSKOOL said, DEFINITELY add a swimdeck. You'll be glad you did & it'll add to the look of the boat. A lot of people are going to say that the composite decking material isn't strong enough, but mine is holding up very well (even though it has seen little use this year).

While building ours I left a few scrap pieces in a bucket of water for a couple of weeks & it had NO EFFECT on the stuff! Just remember to use enough bracing & stainless hardware & it'll be fine.

I got off topic a little here but kkeep us informed & post lots of pic's! :thumbsup:
 

Forum statistics

Threads
113,202
Messages
1,428,452
Members
61,108
Latest member
asigman
Back
Top