Cummins fuel filter change

Russ Calasant

Active Member
Dec 9, 2009
2,128
East Greenwich, RI
Boat Info
2001 480 DB
Engines
CAT 3196
I have a few questions. If I replace the racors I assume I should replace the filter on the mains too?
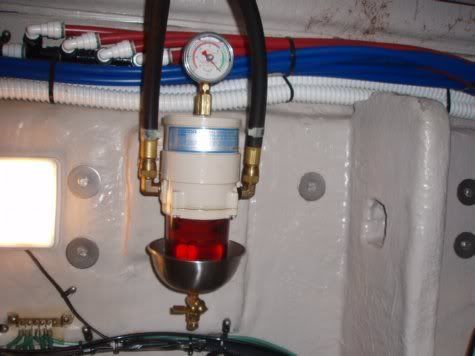
I have dual racors for each main and I see a bunch of crap in the bottom bowls. They should only have 40 or 50 hours max since they were changed. The vacuum gauges appear to have a black out area top center, does this indicate the operating range? Port is reading almost to the left edge of this blacked out area on the gauge and the starboard gauge is reading in the center. Or is it just a change in reading that indicates the need to change filter? - I don't have a baseline.
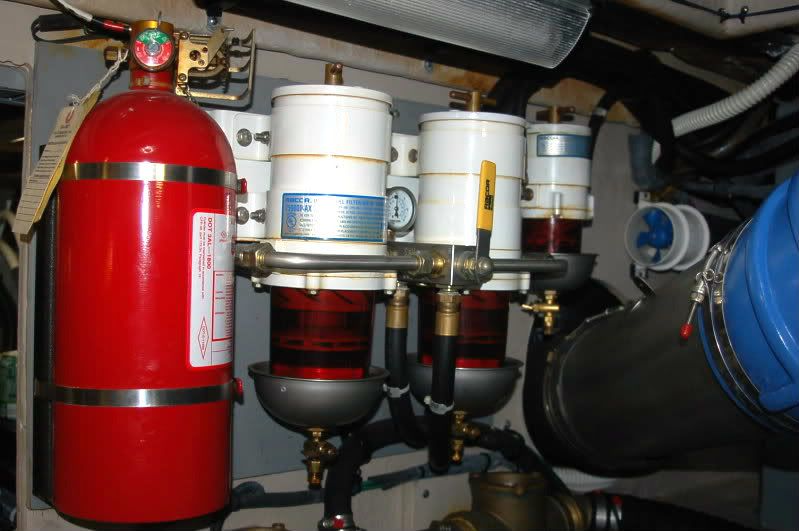
A curious thought, boat is new to me and I requested the mechanic change filters but the valves are only running on one racor for each main but all four bowls are showing sediment in the bottom- should I assume they were not changed and change them regardless, I am thinking so.
Now when I change them the racors are as high or higher than the tanks so gravity will not flush out the bowl will it? Will I need to shut off the valve and pour fresh diesel through it until clean then fill to the top? Or if I crack the top and bleed the bottom will that work? Also when I replace the filter on the main, do I fill the new one with fresh fuel and screw it on or leave empty and prime it? Speaking of prime or bleeding is there a pump? And if so where?

Seems like an easy enough job, I just want to make sure I do it correctly the first time.
I appreciate any input
 
I have single Racors for each engine and the gennie. I also have spin ons for each too. I bought 10 packs of each filter on line, saving a huge amount of money per unit.
I popped the first Racor top and bottom and got diesel everywhere. I then popped the just the top on the others and used a portable oil pump to drain them and then pulled the filters out and place them in a gallon ziplock bag. Then I sprayed brake fluid in each bowl to clean out the debris and sucked that out too. Once everything was clean, I replaced the Racor filters and filled the bowls with diesel. Once that was complete, I put the ziplocks around the screw on filters and removed them. I sealed the bags and no mess. I filled the two engine spin ons with fuel and replaced them. I replaced the gennie filter dry and then used the prime function to refill it. The whole process took 3 hours and I saved $600 doing it myself.
 
Russ,

Forget the ziplock bags....your Racors hold 4X the amount that a single smaller one does and you will have fuel everywhere.

As to the overall design of the system, you can certainly change both the primary and secondary filters at the same time, but they are progressive. You should have 30 micron elements in the primaries and the Cummins filters are probably 2 microns so as long as the engine mounted Cummins filters are flowing the system is working. The Racors are your first line of defense so you can change just them. However, almost everyone changes both primaries and secondaries together at the time of their annual service.

When changing Racors, every boat is different, so some need to have the filter valve turned off while others do not. Generally, here is how: The fuel enters the Racor 1/2 way up on the filter canister so when you turn the yellow handle on the dual Racor pointing down or you turn off the fuel flow at the fuel manifold, you just have the amount of fuel in the canister and bowl to deal with. Get a small plastic gas can and cut the bottom off about 4" up then use it to catch the fuel spill. Slide the cut off gas container under one Racor......do them separately......then remove the pipe plug in the bottom of the bowl. Some fuel will drip out, next grasp and loosen the T handle on the top of the Racor to break the air lock in the filter and fuel will rush out. When the bowl is empty, reinstall the plug and remove the T handle and lid and grasp the bail on the filter and pull it out of the canister and replace it with a new element. Dispose of the old fuel. Then do the same thing on the other Racor on that same side of the boat. Last fill both canisters to the brim with fresh clean diesel fuel, let them sit a few seconds for the paper elements to absorb the fuel then top off with more fresh fuel and reinstall the lids. Always use the new o-ring for the T handle and the new lid gasket that comes with the element....be sure you don't twist the flat gasket.

Note: The Racor will not prime itself even if you do have a lift pump or priming pump installed. There is no way to prime a racor other than pouring fuel in it...unless you try to run a lift pump with the Racor lid removes and you are asking for a big fuel spill if you do.

Also, if you have a big accumulation of sludge in the Racor bowl, you might have to take the Racor apart and clean the bowl by hand....avoiding that is a real good reason to service the Racors frequently.

It sounds to me like you may have some accumulated moisture and sludge in your fuel tanks. Take a look at the fuel management article in t he open p[age and the last paragraph tells you how to clean up a fuel system with additives.


Frank
 
Frank - Everything in your procedure looks good. But I am wondering, why not use the ziplocs?

I actually use the gallon size ziploc bags too. I open it up and hold it right next to the racor with the lid off. I then pull the old element out and slip it right into the bag and zip it up, no mess. I do put one of those oil absorbent pads underneath to catch the little drips.
Where do you put the old element when you pull it out?

I am lucky, my Racors are below the top of the fuel tanks. So I just make sure I have over about half a tank then I can just open the valve to fill the bowls.

If you search a bit, I recall someone (Gary?) installing a petcock on the bowl drain, to make that easier. But the valve didn't seal well, so he had to cap the valve.

That actually sounded like a neat idea. Any reason not to install a good quality ball valve on the bowl, other than the potential for it to get bumped? Wow, thinking about it now, that would make quite a mess. I think I'll leave it as is.

I do change the on engine filters at the same time. I pre-fill them, I wasn't sure of the flow direction through them so I use a funnel with a piece of filter paper in it. I'm sure it won't trap to 2 microns but I felt better doing it that way.

For the genny, on engine filter, I do not pre-fill it. I also use the prime function on the genny.

You changing them before the trip to Montauk Russ?
 
As Greg mentioned, it would seem to be a great idea to mount a discharge valve at the bottom of the Racors, or any other water separating filter, for that matter. However, boats are subject to considerable vibration and accelerations, and improperly mounting a valve to the filter housing could result in a fuel spill down the road, after the nipple fatigues and the valve breaks off. A ball valve is a quite heavy item, relative to the nipple it will be threaded to, and the nipple will likely fatigue and fail at some point in the future.

As Greg pointed out, it could also be bumped by a well meaning owner or technician, and then fail while you're out at sea. If someone really wants a valve on there, I strongly recommend one that is as short and light as possible, with a locking handle, mounted with a schedule 80 close nipple, and a secondary bracket to minimize vibration induced fatigue.

I'd keep a plug in it too....

Dale
 
Greg,

The ziplock will work ok for the filter, but I didn't want Russ to try to drain the filter bowl into a gallon zip lock since once you get the plug out, you are committed. I have found that the pan method works best for me ..particularly if you have dropped a ziplock full of diesel fuel in your engine room before. I use a cut off fuel can and it will hold the fuel from 2 Racors and 2 elements. After doing each side, I just run up to the shop at the marina and dispose of the fuel in the waste oil tank.

The drain cocks work very well on the Racor bowls and I've had mine for years. Many times we look for something that will work and in this case we end up with valves that are not fuel rated and they leak. Parker Filtration sells a fuel rated valve, but they are very expensive. You can do a little internet searching and find the same valve for about 1/2 what Parker/Racor gets. And, the drain valve makes servicing Racors a lot easier and reduces the mess by about 50%.
 
The petcocks make the job so much cleaner.

racorwithdrainandguage.jpg
 
As Greg mentioned, it would seem to be a great idea to mount a discharge valve at the bottom of the Racors, or any other water separating filter, for that matter. However, boats are subject to considerable vibration and accelerations, and improperly mounting a valve to the filter housing could result in a fuel spill down the road, after the nipple fatigues and the valve breaks off. A ball valve is a quite heavy item, relative to the nipple it will be threaded to, and the nipple will likely fatigue and fail at some point in the future.

As Greg pointed out, it could also be bumped by a well meaning owner or technician, and then fail while you're out at sea. If someone really wants a valve on there, I strongly recommend one that is as short and light as possible, with a locking handle, mounted with a schedule 80 close nipple, and a secondary bracket to minimize vibration induced fatigue.

I'd keep a plug in it too....

Dale


Racor makes/sells a valve for this purpose. The nipple is cast into the valve body. Here is a photo:

http://www.jamestowndistributors.co...adwords!6456&keyword=product_ad_6451&type=pla

Also, the drain valve threads into a large aluminum retaining nut that holds the shield to the bottom of the bowl and the filters are mounted to either a side wall or bulkhead on the boat, never to the engine, so vibration isn't a concern.


As with anything there dozen of ways to skin the cat. I started off with the process Frank described and made slight modifications that I found a bit easier for me.

To catch the fuel spills I use old moisture absorbers. I usually have few within my hands rich, just in case if I need more to catch some extra fuel, but usually single bucket is plenty.
no_damp_moisture_abserber.jpg

One thing I wouldn't agree with Frank on is the "...once you get the plug out, you are committed...". After closing the fuel supply valve I take the drain plug out and let only small amount of fuel out (less than 1/4 of what the bowl holds). This is just to prevent uncontrolled spillage when I take the lid off. I keep the plug in my hand and put it right back when I see that I drained enough fuel. After I get the thread catch it's enough to stop the drainage and you get only few drops until you continue tightening the plug (make sure to use another wrench to hold the nut at the bottom of the bowl). With some room in the bowl I open the lid and pull the racor just enough to hang it with a wire or whatever to hold it above the bowl to drain most of the fuel out of the racor. After few minutes the old racor is ready to go in to the garbage bag or Ziploc.

When I insert new racor I also allow it absorb the fuel and then set it in all the way and tighten the lid. When I open the fuel supply valve it fills the bowl to the top. For this reason I see no point of using the fuel from the can (although I carry 2gal on board just in case).

I also replace both Racors and secondaries at the same time (as part of my spring recommissioning process) for the sake of messing with fuel maintenance items only once.

... Then I sprayed brake fluid in each bowl to clean out the debris and sucked that out too.....

Nice tip on the bowl cleaning process. As Frank said, to have the best results it might be necessary to take the whole bowl assembly apart. But, mine is not too bad and usually due to lack of extra time I'm trying to avoid this small project. Instead I use dish washing brush to get in between the grills of the bowl (sorry guys, I don't know the proper term for all the components) and it does fairly good job. I do this with the bowl almost full, then I take the plug out and let the stuff drain. I repeat it if necessary.
 
Last edited:
I should have been more clear in my initial post, as to the concept I meant to convey. I agree that the dedicated Racor drain valve is appropriate for this application. Note that the valve itself is short, light weight, and has a rugged, thick walled, integral nipple. The force applied to this nipple, under any conceivable boating conditions, is less than the yield strength of the nipple, so the valve can be considered "safe". (Otherwise, Racor wouldn't sell it!).

However, mounting a valve in a cantilevered fashion, using only a pipe nipple as the structural member of the mounting, is bad engineering practice, not only in a fuel system, but in any system. Increased valve mass, longer nipples, thin walled nipples, etc. all contribute to a situation wherein the nipple may fracture due to fatigue or loads that exceed yield strength, or fatigue limits. My point is that piping components should be evaluated for proper mounting, strain relief, loading, etc., and brackets fabricated or purchased to assure that the integrity of the system is not compromised by load, vibration, errant maintenance, and so on.

Some of the machinery I have retrofitted over the years exhibited this very design flaw, and broken nipples have been on display more than once...

Take away - use the properly designed/manufactured components for a given job. (and Frank's link is the proper component!)

Dale
 
Russ,

To answer your question regarding the sediment at the bottom of the bowl and if the filters were changed, the filters could have been changed but the bowls most likely were not drained. I would believe this to be true since you have sediment in both bowls and the valve is set to only one filter. See the instructions below. The collection bowl may need to be drained more frequently than the filter change if you are dealing with contamination in your tank. I would suggest you monitor it since you have sediment.

[FONT=Swiss721SWA,Bold]Service Instructions
[/FONT][FONT=Swiss721SWA,Bold][FONT=Swiss721SWA,Bold]Draining Water:
[/FONT]
[/FONT]
[FONT=Swiss721SWA,Bold][FONT=Swiss721SWA,Bold][/FONT][/FONT]Frequency of water draining is determined by the contamination level of the fuel. Inspect or drain the
collection bowl of water daily or as necessary. The collection bowlmust be drained before contaminants reach
the top of the turbine or when the Water Detection Module (optional) indicates it’s time to ’drain water’.
Vacuum Applications / Installations:
1. Close the inlet valve (or valve #1) and open the drain on the bottom of the bowl with a suitable container
in place.
2. Close the drain after all the water and contaminants have been evacuated -- DO NOT leave the drain
open too long as it will eventually completely drain the entire filter assembly of water AND fuel.
3. Follow ’Priming Instructions’.
Pressure Applications / Installations:
1. Open the drain on the bottom of the bowl to evacuate water and contaminants with a suitable collection
container in place. Head pressure will push any water and contaminants out of the drain while keeping
the filter primed.
2. Close the drain after all the water and contaminants have been evacuated -- DO NOT leave the drain
open too long as it will eventually completely drain the entire filter assembly of water AND fuel, and
possibly drain the entire tank.
[FONT=Swiss721SWA,Bold][FONT=Swiss721SWA,Bold]Element Replacement:
[/FONT]
[/FONT]
[FONT=Swiss721SWA,Bold][FONT=Swiss721SWA,Bold][/FONT][/FONT]Frequency of element replacement is determined by the contamination level of the fuel. Replace the
elements every 10,000 miles, every 500 hours, every other oil change, when the vacuum gauge (optional)
reads between 6 to 10 inches of mercury (inHg), if power loss is noticed, or annually, which ever comes first.
[FONT=Swiss721SWA,Italic][FONT=Swiss721SWA,Italic]Note -- always carry extra replacement elements as one tankful of excessively dirty fuel can plug a filter.
[/FONT]
[/FONT]
[FONT=Swiss721SWA,Italic][FONT=Swiss721SWA,Italic][/FONT][/FONT][FONT=Swiss721SWA,Bold][FONT=Swiss721SWA,Bold]Use only genuine Racor Aquabloc II replacement elements -- see Replacement Part List.
[/FONT]
[/FONT]
[FONT=Swiss721SWA,Bold][FONT=Swiss721SWA,Bold][/FONT][/FONT]All Applications:
1. Bypass filter assembly with bypass valves, if applicable.
2. Remove the T--handle and lid.
3. Remove the element by holding the bail handles and slowly pulling upward with a twisting motion.
Dispose of properly.
4. Replace old lid gasket and T--handleO--ring with new seals (supplied with new element). Lubricate both
seals with motor oil or diesel fuel before installation.
5. Refer to ’Priming Instructions’, otherwise, fill the unit with clean fuel, then replace the lid and T--handle
and tighten snugly by hand only -- do not use tools.
[FONT=Swiss721SWA,Bold][FONT=Swiss721SWA,Bold]Note
[/FONT]
[/FONT]
[FONT=Swiss721SWA,Bold][FONT=Swiss721SWA,Bold][/FONT][/FONT]-- above ground tanks or transfer pump applicationsmay use head pressure to prime the filter assembly.
 
Great info gentlemen, thank you for the help. I'm going to drain them, as I can see contaminants in the bottom and check the gauges. Not sure I need to change the elements but I'm going to find out.
 
EDIT: Found the answer in my QSC thread: http://clubsearay.com/showthread.php/47619-Official-Cummins-QSC-500-Thread/page5

Pre-EDIT: This is a great thread. From the past, it seems that there was some controversy about the micron level of Racor Fuel filters in Cummins engines. I have 1 Racor filter per engine and an engine mounted fuel filter (Seems I remember that some engines don't use them?). I use the book recommended 30 micron Racors. I've read on this forum that that was way too big. What is the latest consensus?
 
Last edited:
Russ,

Forget the ziplock bags....your Racors hold 4X the amount that a single smaller one does and you will have fuel everywhere.

As to the overall design of the system, you can certainly change both the primary and secondary filters at the same time, but they are progressive. You should have 30 micron elements in the primaries and the Cummins filters are probably 2 microns so as long as the engine mounted Cummins filters are flowing the system is working. The Racors are your first line of defense so you can change just them. However, almost everyone changes both primaries and secondaries together at the time of their annual service.

When changing Racors, every boat is different, so some need to have the filter valve turned off while others do not. Generally, here is how: The fuel enters the Racor 1/2 way up on the filter canister so when you turn the yellow handle on the dual Racor pointing down or you turn off the fuel flow at the fuel manifold, you just have the amount of fuel in the canister and bowl to deal with. Get a small plastic gas can and cut the bottom off about 4" up then use it to catch the fuel spill. Slide the cut off gas container under one Racor......do them separately......then remove the pipe plug in the bottom of the bowl. Some fuel will drip out, next grasp and loosen the T handle on the top of the Racor to break the air lock in the filter and fuel will rush out. When the bowl is empty, reinstall the plug and remove the T handle and lid and grasp the bail on the filter and pull it out of the canister and replace it with a new element. Dispose of the old fuel. Then do the same thing on the other Racor on that same side of the boat. Last fill both canisters to the brim with fresh clean diesel fuel, let them sit a few seconds for the paper elements to absorb the fuel then top off with more fresh fuel and reinstall the lids. Always use the new o-ring for the T handle and the new lid gasket that comes with the element....be sure you don't twist the flat gasket.

Note: The Racor will not prime itself even if you do have a lift pump or priming pump installed. There is no way to prime a racor other than pouring fuel in it...unless you try to run a lift pump with the Racor lid removes and you are asking for a big fuel spill if you do.

Also, if you have a big accumulation of sludge in the Racor bowl, you might have to take the Racor apart and clean the bowl by hand....avoiding that is a real good reason to service the Racors frequently.

It sounds to me like you may have some accumulated moisture and sludge in your fuel tanks. Take a look at the fuel management article in t he open p[age and the last paragraph tells you how to clean up a fuel system with additives.


Frank

If you read my post, you would see that I said use ziplocks for the screw off filters
 
EDIT: Found the answer in my QSC thread: http://clubsearay.com/showthread.php/47619-Official-Cummins-QSC-500-Thread/page5

Pre-EDIT: This is a great thread. From the past, it seems that there was some controversy about the micron level of Racor Fuel filters in Cummins engines. I have 1 Racor filter per engine and an engine mounted fuel filter (Seems I remember that some engines don't use them?). I use the book recommended 30 micron Racors. I've read on this forum that that was way too big. What is the latest consensus?

30 was in mine and that's what I used, three different mechanics all told me to use 30 micron.
 
Okay, well I jumped in. What a pain in the a**. I drained one racor and found that the filter was clean. It's the bottom of the clear bowl and the tops of the white fuel outlets (?) that have crap built up on it. I used a hose removal tool and towel to clean the inside of the bowl but no way to clean on top of the white "disc"without taking the bowl off. I then flushed a lot of fuel through it. Since I had it open I replaced the gaskets and the filter, filled and reassembled as instructed. it's a lot cleaner but not as clean as I would like it, there has to be a better way. I have three more to go but I'm not going to do it, I will replace, find a better way or pay someone. Changing the filters is not a problem, cleaning the bowl and fuel disc ,whatever it's called, is a whole different deal. I can't be the first, what does everybody else do?

I learned a lot, thanks all and for the cost of a filter. I know the last mechanic changed the filters but did not clean the racor itself, I didn't ask for that but thought it was common sense. Now I know it's a lot of work and need to figure out how best to address it.
 
The black crud on the bottom of your Racor bowls is probably asphaltenes that precipitate out of diesel fuel. Apparently, ULSD made asphaltene issues worse. Do a google on "aspahltenes in diesel fuel" and you can find more information. I have petcocks on the bottom of my racors and drain out the black crap from the bottom about twice a year from them (about a shot glass worth). There is really not much you can do about this stuff precipitating. I took the bowls off the Racors and few years ago and cleaned them out really good before I put the drain petcocks on.
 
I found a picture of my Racors on the port side. You can see the petcocks on the bottom I added for draining.

DSC_0062-3.jpg


As was mentioned earlier, if you do something like this, make sure you always put the screw/plug in the petcock drain or they can suck air in from the bottom even though they don't leak fuel.

I do use a biocide in my tanks (unless I'm burning 1000's of gallons in a week) and I've never had a fuel problem. I have 10 seasons, 1000 hours and lots of miles up and down the east coast on this boat now, change the 30 micron racor filters and on engine filters (have no idea what the micron rating is as Cummins thinks it's a secret) once a year, add a dose of 911 at the beginning of each season and never had to service an injector. Of course now my boat will blow up on me for saying that.
 
Last edited:
I removed the whole racor assembly from the boat and took it to the garage for a good cleaning. It was easier then trying to disassemble/clean on the boat. You get the opportunity to really clean the filter housing and all the passages well, blow compressed air through it, etc. 2 hoses and 4 screws.

As for micron rating, the 6CTA's can take a 30 micron filter, the newer comon rail engines need a finer filter.
 

Forum statistics

Threads
113,196
Messages
1,428,293
Members
61,103
Latest member
Navymustng
Back
Top