AFT Cockpit Rott 1996, 300

Goatz

New Member
May 16, 2022
23
Gloucester, VA
Boat Info
1996 Sundancer 300
Engines
T-VD-5.7L Mercruiser - Blue Water Series - Thunder Bolt V - Closed Cooling
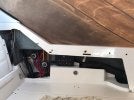
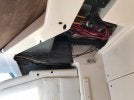
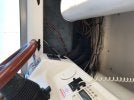
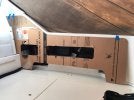
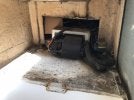
So those of you with this vintage, watch out. Removed Aft cockpit panel, so that I can re-wrap it with vinal. Was excited that the plywood for the panel was in good condition, however the plywood structure under it is mess and a few pieces are mush. Looks like I will need to remove whole piece and bring it home to repair. I guess the good news is, I now know how water is getting on top of the water heater. Looks like the water is running down the cover, under the cushion (the back rest along the stern of the boat) and behind the panel, where it finds the aft navigation light wire (black thing next to the pink wraper in pic), and into the engine room. Fun! Right?
Back 1.jpeg
 
  • Like
Reactions: QT1
Here is the starboard side with the cockpit sides removed.
 

Attachments

  • Starboard Side 1.jpeg
    Starboard Side 1.jpeg
    2.3 MB · Views: 33
  • Starboard Side 2.jpeg
    Starboard Side 2.jpeg
    1.5 MB · Views: 33
  • Starboard Side 5.jpeg
    Starboard Side 5.jpeg
    1.6 MB · Views: 33
Test fit of the new sideboard templates. Measure 20 times,cut once hopefully.
 

Attachments

  • Template 2.jpeg
    Template 2.jpeg
    2.1 MB · Views: 24
Anyone that is wondering what your cockpit heater looks like, here you go!
 

Attachments

  • Cockpit Heater 2.jpeg
    Cockpit Heater 2.jpeg
    2.4 MB · Views: 30
Still so much cleaning to do. I was nasty behind the side panels. Here is the old removed side panel. Believe it or not, this was the good side. Port came out in 6 pieces last year.
 

Attachments

  • Old 1.jpeg
    Old 1.jpeg
    2.9 MB · Views: 22
  • Old 2.jpeg
    Old 2.jpeg
    2.7 MB · Views: 23
Removed the stern of the cockpit yesterday so that I could bring it home to repair/replace any of the rotten wood. Here is a before, during, and after pic. Made a 2x4 wall and then wrapped it in an old tarp. Used some snap studs to screw into plywood so the boat cover will still work.
 

Attachments

  • TempStern.jpeg
    TempStern.jpeg
    1.9 MB · Views: 21
  • Stern_Removed2.jpeg
    Stern_Removed2.jpeg
    1.6 MB · Views: 23
  • Stern_Before.jpeg
    Stern_Before.jpeg
    1.9 MB · Views: 21
Here is the removed stern that I will take home and two closeups of the original bad spots. However, I removed the carpet tonight and there are bad spots all over.

Spring is here, hope I can start putting things back together soon.
 

Attachments

  • RemovedPiece.jpeg
    RemovedPiece.jpeg
    3.5 MB · Views: 23
  • Closeupofrot.jpeg
    Closeupofrot.jpeg
    2.6 MB · Views: 23
  • Closeupofrot2.jpeg
    Closeupofrot2.jpeg
    2 MB · Views: 24
Removed the old name. Guess I am going to need to figure out wet sanding as the gelcoat look brand new under the letters. Going to be hard to not see it.
Name Removed.jpg
 
The emblem needs some work. It is really pitted and has no shine left. Anyone have any good ideas to make it look better. I dont think polishing will work.
 

Attachments

  • emblem.jpg
    emblem.jpg
    117.6 KB · Views: 4
Seems like you are learning and getting to know your boat well. If that emblem is O.E. and you have a bunch of other pieces that you could remove/gather they may be worth sending out to be re-chromed if your objective is to keep her original.

PS; hope that topside "mush" hasn't infiltrated your stringer's or transom.
 
Went down to test fit the new side panels today. Went pretty well. Only have to trim one place.
 

Attachments

  • Templete 5.jpeg
    Templete 5.jpeg
    664.7 KB · Views: 5
  • Templete 4.jpeg
    Templete 4.jpeg
    802.7 KB · Views: 5

Forum statistics

Threads
113,220
Messages
1,428,858
Members
61,115
Latest member
Gardnersf
Back
Top