Navigation
Install the app
How to install the app on iOS
Follow along with the video below to see how to install our site as a web app on your home screen.

Note: This feature currently requires accessing the site using the built-in Safari browser.
More options
You are using an out of date browser. It may not display this or other websites correctly.
You should upgrade or use an alternative browser.
You should upgrade or use an alternative browser.
a/c strainer flush cap
- Thread starter jackson
- Start date

CJ Martin
Member
Hey that looks great. :thumbsup:
I need to find a shop around here that can do that. :smt017
Also, can I ask how much that ran you?
-CJ
I need to find a shop around here that can do that. :smt017
Also, can I ask how much that ran you?
-CJ
PMvdb395DA
New Member
- Oct 12, 2006
- 1,165
- Boat Info
- 360DA '03 6,5 kw kohler generator, AC, etc.
- Engines
- Yanmar 315Hp diesels
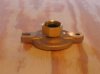
jackson said:Here is a pic of the a/c strainer cap I just got back from the machine shop. I just plan to use this for winterizing and flushing. The cap was drilled and threaded so the hose fitting can be removed.
Nice job :thumbsup:
Thanks for the photo and the idea.
Peter
jackson
Member
cap
The Perko strainer cap is about $25 and the fitting is only a few dollars. A friend of a friend drilled it for me so I'm not sure what it would actually cost, but it can't be much. It is only a hole, drilled and threaded, through the center of the cap. You could also attach a ball valve to the cap if you wanted to allow for a shut-off.
The Perko strainer cap is about $25 and the fitting is only a few dollars. A friend of a friend drilled it for me so I'm not sure what it would actually cost, but it can't be much. It is only a hole, drilled and threaded, through the center of the cap. You could also attach a ball valve to the cap if you wanted to allow for a shut-off.
- Oct 4, 2006
- 2,344
- Boat Info
- 2006 300DA Sundancer
- Engines
- 350 Mags / Bravo III
Jackson - thanks for sharing....my Groco cap is made out of nylon or polycarbonate material, but I should be able to drill and tap a pipe thread into one for winterizing purposes.
This really looks like a time and skinned knuckle saver!
This really looks like a time and skinned knuckle saver!
Just make sure you don't step on it.
- Oct 6, 2006
- 12,155
- Boat Info
- 1996 450DA
- Engines
- 3116 Caterpillars
Please do not drill and tap a poylcarbonite cap and then try to use it for more than temporary flushing or winterizing. Pipe threads are tapered and get tighter as the fitting is inserted in the threads. Cracks too small to see can and probably will occur during assembly.
While you are at it, just go ahead and replace the plastic strainer caps with bronze ones........plastic if just wrong for this application even it it does save $100/ boat.
While you are at it, just go ahead and replace the plastic strainer caps with bronze ones........plastic if just wrong for this application even it it does save $100/ boat.
Sea Ray 300
Senior Sea Ray Enthusiast
- Oct 12, 2006
- 612
- Boat Info
- 2005 300 Sundancer
- Engines
- Twin 5.0 liter with Bravo III drives.
Jackson - thanks for sharing....my Groco cap is made out of nylon or polycarbonate material, but I should be able to drill and tap a pipe thread into one for winterizing purposes.
This really looks like a time and skinned knuckle saver!
Buy some Groco bronze caps.
(I got mine from West, expensive, but you only do it once. [I want to say maybe $25 each, but I forget]).
Put the bronze on the strainers for full time use. They're much more rugged than the plastic.
Then drill and tap the plastic ones, for flushing only.
1/2 thread, with a 1/2 nipple, ball valve, and hose adapter works out nicely.
For added strength, I epoxied the nipple in place, as the tapped portion of the cap is very thin.
- Oct 4, 2006
- 2,344
- Boat Info
- 2006 300DA Sundancer
- Engines
- 350 Mags / Bravo III
Frank - Good point about pipe threads...
Steve - Do you use an anti-sieze paste with the bronze caps?
Steve - Do you use an anti-sieze paste with the bronze caps?
- Oct 6, 2006
- 12,155
- Boat Info
- 1996 450DA
- Engines
- 3116 Caterpillars
There isn't enough meat in the bronze caps to hold a full 1/2" NPT thread. ANy bump or pressure could cause the threads to break off since there are about half enough to get full physical properites of a threaded connection. I think this is the reason Thoroughflush went out of business.
If I were doing this, I'd use a metallic epoxy like J&B weld for a thread sealer.
If I were doing this, I'd use a metallic epoxy like J&B weld for a thread sealer.
Sea Ray 300
Senior Sea Ray Enthusiast
- Oct 12, 2006
- 612
- Boat Info
- 2005 300 Sundancer
- Engines
- Twin 5.0 liter with Bravo III drives.
Frank - Good point about pipe threads...
Steve - Do you use an anti-seize paste with the bronze caps?
Jeff,
A little O-ring lube on the O-ring, and wiped into the outside threads of the cap. I have a Groco wrench.
As far as the thinness of the tapped portion of the cap is concerned,
once the nipple is threaded into the newly cut threads, (only about 1-1/2 to 2 threads), have the nipple flush with the bottom of the cap.
Pour epoxy into the dished portion of the cap, around the nipple.
This will strengthen and seal it.
The following is the best way to use a tap:
The drilled hole must be precisely the right size for any given tap.
This will be indicated on a tap chart, or sometimes on the tap itself.
Once drilled, when tapping, go clockwise 1/2 turn, and then counterclockwise 1/4 to 1/3 turn, to clear the cutting flutes of chips.
Continue this way for the entire depth of the tap.
You'd be surprised as to how many people tap by keeping turning clockwise, without clearing the flutes,
and wonder why their threads are all torn and ragged.
MbuschSr
New Member
I made one using a new bronze cap and a bronze 3/4" tru-hull fitting with a ball valve and hose adaptor. I did not have to tap the cap.
- Oct 4, 2006
- 2,344
- Boat Info
- 2006 300DA Sundancer
- Engines
- 350 Mags / Bravo III
I made one using a new bronze cap and a bronze 3/4" tru-hull fitting with a ball valve and hose adaptor. I did not have to tap the cap.
Another good idea! Heck of a first post too....Welcome to the board!
chef_doctor
New Member
- Dec 12, 2006
- 20
Great idea now all I need is a small monkey that can crawl down there and reach the strainer.
- Oct 4, 2006
- 2,344
- Boat Info
- 2006 300DA Sundancer
- Engines
- 350 Mags / Bravo III
I'm reviving this old thread. I just bought a Groco bronze cap ARG-501-C to be fitted with a 3/4 id x 1/2 mpt hose barb that will be used for winterizing the AC and the genny. I can't believe that time of year is approaching...again.
Instead of messing with a cap and making it do something it wasn't designed to do, you may want to look at installing these:

I have them installed on all my sea cocks and a hose goes right on the side for flushing.
I have them installed on all my sea cocks and a hose goes right on the side for flushing.
- Nov 26, 2006
- 7,628
- Boat Info
- 2008 44 Sedan Bridge
- Engines
- Cummins QSC-500's
Straight Drives
Or, you could purchase a custom fresh water rinse manifold for rinsing engines, genny, and A/C (from me).
- Oct 4, 2006
- 2,344
- Boat Info
- 2006 300DA Sundancer
- Engines
- 350 Mags / Bravo III
Gary - I didn't want to have to buy a pump to push the AF through the AC an Gen. Gravity has worked in the past, the temporary cap fitted with a 3/4 id hose will be better than what I have done in previous years...If I had to flush engines and other systems as much as you guys have to, damn right I'd have these to! ; )
- Oct 4, 2006
- 2,344
- Boat Info
- 2006 300DA Sundancer
- Engines
- 350 Mags / Bravo III
The AC pump requires head to work, so it won't suck anti-freeze from a container.
My process has been to pull the hose from the sea cock hose barb, raise it to point up, then jam a funnel into the end. I then fill the funnel w/ anti-freeze w/ the pump running.
Been there, done it too, that's why I'm modifying the cap.
