Club Sea Ray banner

Winterizing twin inboards by myself

5.8K views 54 replies 13 participants last post by  Strecker25  
#1 ·
I have winterized many engines, including inboards, but never by myself. I will be winterizing the 3126 CATs by myself this weekend. I am trying to figure out how to do this with me in the engine compartment:
  • see the pink stuff come out the thru hull
  • shut down the engines quick enough w/out damaging the impellers

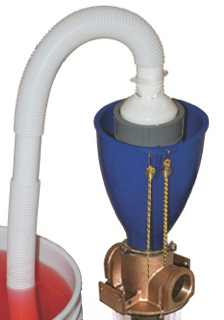
A member here said I could use his SeaFlush. This will make getting antifreeze into the strainers easier, no hoses to disconnect, etc. but with me in the engine compartment pouring antifreeze, how can I see when I have poured enough, and then shut the engines down quickly?

I could place my phone on the dock and video the thru hull. I could then watch the video before disconnecting stuff to make sure a good flow of pink stuff came out. That still leaves shutting down the engine timely though.

My other thought is to disconnect the hose coming out of the strainer, insert a barb fitting, connected to a garden hose, connected to a pump in a 5 gallon bucket full of antifreeze. Similar to the cooper flush I did here, but w/antifreeze and only one hose:

 
#2 ·
You could use the Sea Flush and swap the AF jugs, but that's really not at all optimal. These bigger engines suck in coolant so fast that a gallon at a time won't keep up. My QSC will drain a full 5 gallon pail of AF in under 10 seconds.

Instead, a better way is to use the Sea Flush with their snorkel. Pic below.
Image


The way I do it is this:
  1. Close the seacock. Drain the canister/bowl.
  2. Set up the Sea Flush
  3. Insert vacuum end into grey Sea Flush insert.
  4. Blow air through the Sea Flush - open the sea cock to blow out any water, then close before shutting off the vacuum.
  5. Install the snorkel attachment.
  6. Fill a 5 gallon pail with suitable AF and put the snorkel end in the pail.
  7. Open and remove the seals from 5-6 more gallons of AF, or have another 5 gallon pail of it at the ready.
  8. Start the engine and let the engine suck up the AF via the snorkel.
  9. If using the gallons, immediately start pouring the AF into the pail. Make it go faster by cutting a large air slit in the bottom of the AF container so it empties faster into the pail. You may be able to keep up if you work faster enough. If not, stop the engine long enough the refill the pail then start again. (Easy on a Cummins; they have the start/stop panel in the engine room).
  10. If using a 2nd full pail, swap the snorkel when the first pail is empty.
  11. Stop the engine when the AF pail is empty.
So how to check if there is AF coming out the engine? A couple options.
  • Set up a phone/video camera like you suggested and watch the replay.
  • If you are on land, check if there is AF around the exhaust/around the boat. This is how I figured out I needed about 10-11 gallons of AF to do my engine.
  • Get a webcam like a Wyze and connect it to a power source (like a portable USB battery pack), and use that to stream video to your phone.
  • Set up a face time between your phone and another device like an iPad to watch the exhaust.
  • Refill the AF pail, or use a 2nd pail. Stop the engine before using this 2nd pail. Get it all ready with the snorkel, then start it up and run the back to see the exhaust. Then go back and shut down the engine. Based on observations, use more AF as needed.


You could also use the garden hose adapter, subbing it for the Sea Flush. The throughput is lower because of the smaller hose size so you should have a longer time to drain the AF pail - likely not by too much though.
 
#4 ·
@mrsrobinson Greg, don't make this harder then it has to be. It's pretty simple, if you were able to do the flush then your ready to winterize. I am guessing your keeping the boat in the water? If so then disconnect the hose from the output of the strainer and just use a PVC plug or reducer and put a hose connector in the end. Then you can just connect a container with the anti-freeze and your done.

I also use a Y for the dock water and anti-freeze so I can switch between them. First run the engine with a the dock water hose connected until the engine is warm or the temp gauge moves as far as it will. Then while still running switch over to anti-freeze and your done. I use six gallons of -50, that seems to be the right amount for me. Then drain the mufflers.

I go an extra step and use an air compressor to blow air back out of the through hull. While air is bubbling out from under the boat turn the through hull off and then put some -50 in the hose and reconnect to the strainer and put all hoes back on and your ready for spring.
 
#5 ·
Thanks everyone, this was very helpful, I found out today the one I'm borrowing has a snorkel as well. So I have lots of options now. It's getting cold here quicker than I thought so I want to make sure I'm prepared when I make the trip to the boat, and yes it will stay in the water.
 
#6 ·
If you want to check your work get a refractometer and pull a couple zincs after the job to make sure the points all show the correct mix. I tend do this as a check along with measuring the output from the catch bucket (since I do ours out of the water)

it’s easy and will give you piece of mind.

 
#7 ·
Greg - while I’m new to winterizing inboards as you know from previous posts, After reading and watching all winterizing ideas I use the following.

My strainers have the screw on covers so I bought these (2 sizes for motors and ac/genny).

Image


Then I made this bucket to sit on the cockpit floor and used a clear hose to go to the strainer cap. The procedure is the same as everyone describes but when I fill the bucket I keep the valve off and only open when the engine is running. It’s gravity feed so timing is not super critical. Why I like this vs the snorkel is that the bucket is in the cockpit like on the video, and I can control it without jumping in the bilge from above. I can also look over the sides as my water spits out the sides. I put a styrofoam cup under the hull after the engine was off and saw and tested the antifreeze as an extra precaution.
I had these fittings but saw better ones online for a few bucks. I also added the quick disconnect to the two strainers so I don’t even have to screw it together :)

Image

Image
 
#8 ·
Thanks @boatrboy , my strainer lids are not the screw on kind, I did see those though.

I have this left from when I owned a boat with twin outdrives. I think I can use this with a barbed fitting into the hose coming in or out of the strainer. Between this or the SeaFlush I think I've got it.

Most of my anxiety around things like this are around being 2 hours from the boat and wanting to have everything I need when I get there to get the job done. And not having to come back at a later date because I didn't have something.

Image
 
#9 ·
Thanks @boatrboy , my strainer lids are not the screw on kind, I did see those though.

I have this left from when I owned a boat with twin outdrives. I think I can use this with a barbed fitting into the hose coming in or out of the strainer. Between this or the SeaFlush I think I've got it.

Most of my anxiety around things like this are around being 2 hours from the boat and wanting to have everything I need when I get there to get the job done. And not having to come back at a later date because I didn't have something.

View attachment 136589
Funny - that’s where my clear hose came from. I have two of those set ups. I saw someone cut a large hold in the top to both bleed the air quicker and allow filling while the threaded hose pieces are still connected in case you have to add another gallon while motor is running. You will defiantly need to open the bleed hole diameter at the very least because that 1/4 hole is just too small. I just decided to use a more robust bucket but that set up will do the same thing.
 
  • Like
Reactions: mrsrobinson
#10 ·
"drain the mufflers"

I have heard others say this, how does one do that? On my boat there's a smaller hose that goes to the thru-hull and a larger diameter exhaust hose that goes to the underwater muffler. What you see in @Strecker25 video above.

I've had both of those off and don't recall seeing any way to drain them other than removing them.

I thought with this guy did was pretty original, especially the block of wood, shelving liner and adapter.

 
#12 ·
"drain the mufflers"

I have heard others say this, how does one do that? On my boat there's a smaller hose that goes to the thru-hull and a larger diameter exhaust hose that goes to the underwater muffler. What you see in @Strecker25 video above.

I've had both of those off and don't recall seeing any way to drain them other than removing them.

I thought with this guy did was pretty original, especially the block of wood, shelving liner and adapter.

your mains won’t have the water lift muffler, straight out the two locations you describe. The generator might but I don’t bother because it’s a pain to get to so I just run 3 gallons through
 
#13 ·
See the bolt in the bottom - it has a rubber washer to seal it.
Remember I have gassers
View attachment 136595
[/QUOTE]
Thanks, mine has the same mufflers even with the diesels.

When I pulled the exhaust hoses this year to do some work on the engine, I noticed a lot of water sits in the muffler, which is a little concerning, but I guess not enough to freeze and crack the fiberglass muffler.
 
#15 ·
@mrsrobinson One thing that I'll add to all of the great advice people have given. My first step is to use the SeaFlush and a shop vac to blow air through the strainer and down through the sea cock until you hear bubbles slapping againsts the bottom of the hull. Then, close the sea cock. This ensures that you drain the hose from the strainer all the way back through the sea cock. I then pre-fill the strainer with AF. When the level gets to the top, it will gravity feed back to the sea cock. Keep adding AF by hand until the whole thing is full. THEN use the Sea Flush or whatever gizzmo you're using, to run AF through the engines.

THE LAST THING I DO: On each sea cock, there is a square drain plug. I remove that and then using a small tube, blow air (by mouth) to push any water that may be in there out. I generally leave the drain plugs out until Spring, but it is OK to put them back in. When you do, put a little lubricant on the threads.

You could make the arguement that this step isn't necessary since I blow all the water out of the sea cock back down through the thru-hull and then close the sea cock with just air in the ball cavity. However, it is very cheap insurance.

Jaybeaux
 
#20 ·
I used a 1/4" female x male ball valve from McMaster and drilled/tapped the muffler for the male thread. I kept a plug in the female side when not in use and swapped it with a barb fitting when draining.

View attachment 136600
I didn't think the muffler wall was thick enough for that. Thats great news and will be done this weekend. Thanks!
 
#30 ·
Image


Just winterized my boat solo today. A little hectic running in and out of the bilge but in the end it cost me $265 in antifreeze vs $1500 to have it done for me.

11 gallons to each QSM11, 3 gallons to the generator.

I used the clear screw on cap with the hose adapter for the generator and the SeaFlush for the engines. Only because the clear cap thingy was too small for the engine strainers.

What really sucked, or should i say didn't suck was the fact that neither the engines nor the generator had enough "pull" to get the pink stuff from the bucket to engine when the bucket was in the bilge. Had to use some hose, electrical tape and placed the 5 gallon bucket in the cockpit. Even then it wouldn't pull the pink. Had to really work to prime the system to get it to flow. Once it started I was good to go.

Tried the clear cap and also the SeaFlush system for the AC units and failed miserably. The only way the AC pump (1 big pump to 4 AC units) would pull is if the seacock was open and the strainer cap was on tightly. Once I closed the seacock there was nothing I could do to prime the pump. Tried lots of gravity, funnel in the strainer while dumping pink and a few other things and no go. Strainer was full of pink but could never get the pump to pull it through.

I'm out of town for a week during this brief cold stretch but it'll be OK. Bilge is relatively warm (twin hornet 1000w heater) and the cabin is staying at 60 with the portable heater in there.
 
#34 ·
View attachment 136660


Just winterized my boat solo today. A little hectic running in and out of the bilge but in the end it cost me $265 in antifreeze vs $1500 to have it done for me.

11 gallons to each QSM11, 3 gallons to the generator.

I used the clear screw on cap with the hose adapter for the generator and the SeaFlush for the engines. Only because the clear cap thingy was too small for the engine strainers.

What really sucked, or should i say didn't suck was the fact that neither the engines nor the generator had enough "pull" to get the pink stuff from the bucket to engine when the bucket was in the bilge. Had to use some hose, electrical tape and placed the 5 gallon bucket in the cockpit. Even then it wouldn't pull the pink. Had to really work to prime the system to get it to flow. Once it started I was good to go.

Tried the clear cap and also the SeaFlush system for the AC units and failed miserably. The only way the AC pump (1 big pump to 4 AC units) would pull is if the seacock was open and the strainer cap was on tightly. Once I closed the seacock there was nothing I could do to prime the pump. Tried lots of gravity, funnel in the strainer while dumping pink and a few other things and no go. Strainer was full of pink but could never get the pump to pull it through.

I'm out of town for a week during this brief cold stretch but it'll be OK. Bilge is relatively warm (twin hornet 1000w heater) and the cabin is staying at 60 with the portable heater in there.
I always had been able to pull antifreeze into the engines until last year. After a few frustrating tries on port at idle, I had my helper run up the engine as soon she started it. I think i got pull at about 1500 RPMs. I got after the problem after de-winterizing in spring. Turned out the belt was just a little loose, not enough to impact the alternator or coolant flow at speed but enough to impact coolant flow at idle. My generator has always pulled pink from the bilge so maybe a look at that belt would help you as well.
I've had the same problem with the AC. I used to crimp off three hoses at a time and that worked but was a lot of effort. I've just used the SeaFlush to blow out the system for the last couple of years and and that has worked well for me.
 
#31 ·
I love that photo. Your challenges are the reason I've posted these threads; I want to make sure I'm prepared with everything I need when I get there and have other options in case those don't work. Plus my marina quoted me $2,500 to do everything.

After contacting twin hornet I just purchased the 45, they said for my boat size it would do the same as the 66, especially with the boat staying in the water.

I'm going to try to blow air through the AC strainer versus pumping in antifreeze. On my last boat I pushed antifreeze through the thru-hull fitting back to the strainer, using a pump on my drill, and that worked well. You could disconnect the AC hose after the strainer and use a pump to push the antifreeze through like I did.
I'm bringing my drill pump to the boat as well as the pump I used with the 5 gallon bucket this summer to flush the coolers in case I have challenges.
 
#32 ·
FWIW - My thought is with my set up there is gravity working in my favor as I’m not trying to vacuum the antifreeze from 3 ft above. I’m actually pushing it into the strainer the minute I open the valve, albeit the force of gravity only, but I had no problem with my ac priming. I too vacuumed out the strainer, cleaned the screen, and filled it with antifreeze. I did open my valve here before turning on the ac so antifreeze was filling the clear hose. (Edit) I did see you said you tried lots of gravity but was it with the funnel set up? Maybe the extra head pressure on my set up helped?

I am no expert here, just sharing what worked for me. I used this set up for my two motors, generator and ac.

I also remember during the year the thru hull got shut off and ac lost its prime while I was at the dock. I had to use my small vacuum and hold it up to the discharge fitting on the outside of the hull. It primed in ten seconds.
 
#33 ·
Losing prime on an AC in general sucks, it's happened to me before especially when having the boat hauled out and not closing the seacock ahead of time. I think trying to push or pull the antifreeze through with a pump or vacuum might be your easiest solution.
 
#39 ·
I use the same set up as boat. I first drain most of the water out by removing a transmission zinc and vacuum out the strainers. Admiral starts engine, pump 7 gals, I pull on a rope running up the steps to the bridge and she shuts it down. Checked with refractometer the first year to confirm 7 gals was enough.
Your main problem seems to be how to start and stop the engines by yourself since CATs dont have remote start stop panels like Cummins. I have been looking how to do that without success.
 
#40 ·
I hate having to depend on someone to assist with the winterization process however it does make life easy with 2 people. Especially on a bridge boat. Here is a pic of my setup. The size of the bin is over kill but it allows me some flexibly to do it myself as I don't have to worry about it tipping over as it empties. I also store all my descaling and winterization kits in it. In the past when I had help I timed how long it takes for the bin to empty. All in my 450s suck down 6 gallons of AF in about 10 secs. If I'm doing this by myself I add an extra gallon and time it from the bridge.
Image
 
#42 ·
Went to the boat today to do the main engines, grnny and freshwater systems. Used an air compressor on the freshwater system, that went well. Use a SeaFlish for the first time to do the main engines. Used a Shop-Vac to blow out the seacocks from the strainer. That went well.

Started with the port engine, couldn't get it to pull from the 5 gallon bucket using the seaflush and snorkel. Figured out I needed to fill the strainer with antifreeze and use the paper towel for a seal. That worked, put 7 gallons in.

Repeated the steps on the starboard engine with no success. Took a lot of wiggling, trial and error moving things around but I was finally able to pull 7 gallons through.

Both engines initially wouldn't pull water, I shut them down after about 4 to 5 seconds. Tried again, same. Really hoping I didn't do any damage to the impellers based on my overheating challenges this spring and summer.

I could not get the generator to start so I was not able to winterize it. I'll try again soon and will push antifreeze through if it won't start.

And yeah did it all by myself.
 
#43 ·
First year I could not get my generator to stsrt either, the fuel selenoid shut off as soon as I let go of the preheat switch. There should be a remote vs panel control toggle but there is not. Discovered I can only start the gen from the salon panel but can shut it down from the gen panel when winterizing.

Irie, I like your set up but dont recognize the parts. What are you using to connect to the strainer etc?
 
#45 ·
I went back today. It took about 20 tries but I got the generator started, and winterized.

@SeaNile I used the SeaFlush with a shop vac to winterize the AC pump and both ACs. It worked well. Found a dock mate to check for air/water coming out the thru hulls as a blew air into the strainer.

Generator was the most difficult one to winterize alone. Once I got it started I let it run for about 20 minutes while I did the AC systems. Then I sucked the water out of the strainer.with the shop vac Then I attached the SeaFlush blue thing to the top of the strainer, closed the seacock, then shop vaced forced air into it while I opened the Seacock. Waited until I heard bubbles outside the boat, held it for about 5 more seconds then closed the seacock handle. The clearance from the top of the SeaFlush blue funnel to the underside of the exhaust hose was about 2-3", so I could not use the grey insert funnel and the snorkle. I left the blue one in, filled the strainer with antifreeze, up to the top of the blue funnel, then used the grey one as a funnel from the top to pour antifreeze in as I started the genny. It was a slow process, but it worked. Runny back and forth from the genny seacock to turn on the vacuum, get something, go back, go in, go out, was painful and time consuming.

With the exception of the holding tank, main engines and genny, there's no pink stuff in any of the systems.

Total winterization time was 6 hours, lots of that was trial and error and me hopping in/out of the engine compartment to do things a helper would have saved time on. 6 hours of driving time, so 12 hours of my time total. $200 in antifreeze, $150 in tools/stuff I had to buy that I will resuse next year. Quote from the service shop was $2500.
 
#47 ·
For the price of a case of beer, you can get two buddies to come down/meet you down there and knock the three engines out in about 45 minutes. I'm happy to help next time.

Regarding the blow-back of water: On the main engines and Generator, the impellers form a seal. The water pump is actually a positive displacement pump. What that results in is that you can NOT use the shop vac to blow air through the raw water circuit on the engines/generator. You cannot get past the impeller. The Air conditioning systems are different, but I still run pink through mine. About a gallon per unit.

With 3 guys, it is so easy: One on the switches, one at the bucket, and one watching the engine discharges for pink. Holler next year and we will knock it out quickly.

Jaybeaux