SearayPaul
Active Member
I had several requests to post my antenna mount after I broke a few bones in May. I now can use both hands so here we go.
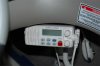
I purchased an Icom 302 because of it's small foot print, it is water proof and has a loud speaker. The radio can be heard at cruise speed and I can rinse the boat with out worrying about ruining the radio. You will note the location was choosen to avoid conflicts with the steering wheel, throttle and my knees.
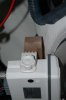
To install the radio I made a three piece wooden bracket held together with wood glue. The wooden pieces were shaped to fit the contour of the dash. Close is good enough and trial and error will get you the shape. I used cardboard for a template and then shaped it with the grinder. When I had my shape I ran a couple of screws thru all three pieces for good measure, probably over kill. To attach the mount I used to "l" brackets bent carefully with a hammer. For those who do not want to drill visiable holes most helms have a lip or space behind the dash. Put your hand in there and use your imagination as to how to make a bracket. This bracket is held in with three screws, one of which was a bear to get to. Got to love bubble gum.
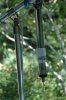
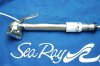
In the next photo is the antenna and mount. From left to right. I used a stainless ratchet mount Shakespeare 4190, six inch extension 4700, AaptII connector, Gam Antenna. The mount was choosen for the ablitity to position the antenna in any phyiscal plane. The extension was choosen to get the antenna above the bimini. The antenna was choosen for it's small wind load.
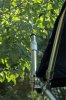
The next picture shows painter's tape wrapped around the bimini support to prevent scratching. This tape comes off easy and leaves no mess. If you have a canbote substitute Duct Tape.
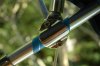
Next is the bracket instalation. I only get to the coast a couple of times a year so I put the antenna on when I need it and remove it after the trip. If I lived close to the water I would leave it on.
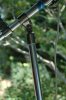
The coax is shown hanging down from the mount. It is attached to the bimini support with two tie wraps when under way. I have been known to use painters tape when I forgot my tie wraps. In this photo the tie wraps are not on.
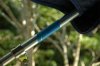
The next two pictures show the antenna in the veriticle position and then inverted. In the verticle position you can see the antenna is clearing the bimini. The inverted position should never be used as water might get into the loading coil. The picture was taken to show the full range of motion available just by releasing the lever.
I purchased an Icom 302 because of it's small foot print, it is water proof and has a loud speaker. The radio can be heard at cruise speed and I can rinse the boat with out worrying about ruining the radio. You will note the location was choosen to avoid conflicts with the steering wheel, throttle and my knees.
To install the radio I made a three piece wooden bracket held together with wood glue. The wooden pieces were shaped to fit the contour of the dash. Close is good enough and trial and error will get you the shape. I used cardboard for a template and then shaped it with the grinder. When I had my shape I ran a couple of screws thru all three pieces for good measure, probably over kill. To attach the mount I used to "l" brackets bent carefully with a hammer. For those who do not want to drill visiable holes most helms have a lip or space behind the dash. Put your hand in there and use your imagination as to how to make a bracket. This bracket is held in with three screws, one of which was a bear to get to. Got to love bubble gum.
In the next photo is the antenna and mount. From left to right. I used a stainless ratchet mount Shakespeare 4190, six inch extension 4700, AaptII connector, Gam Antenna. The mount was choosen for the ablitity to position the antenna in any phyiscal plane. The extension was choosen to get the antenna above the bimini. The antenna was choosen for it's small wind load.
The next picture shows painter's tape wrapped around the bimini support to prevent scratching. This tape comes off easy and leaves no mess. If you have a canbote substitute Duct Tape.
Next is the bracket instalation. I only get to the coast a couple of times a year so I put the antenna on when I need it and remove it after the trip. If I lived close to the water I would leave it on.
The coax is shown hanging down from the mount. It is attached to the bimini support with two tie wraps when under way. I have been known to use painters tape when I forgot my tie wraps. In this photo the tie wraps are not on.
The next two pictures show the antenna in the veriticle position and then inverted. In the verticle position you can see the antenna is clearing the bimini. The inverted position should never be used as water might get into the loading coil. The picture was taken to show the full range of motion available just by releasing the lever.