Transom Rot or Not?

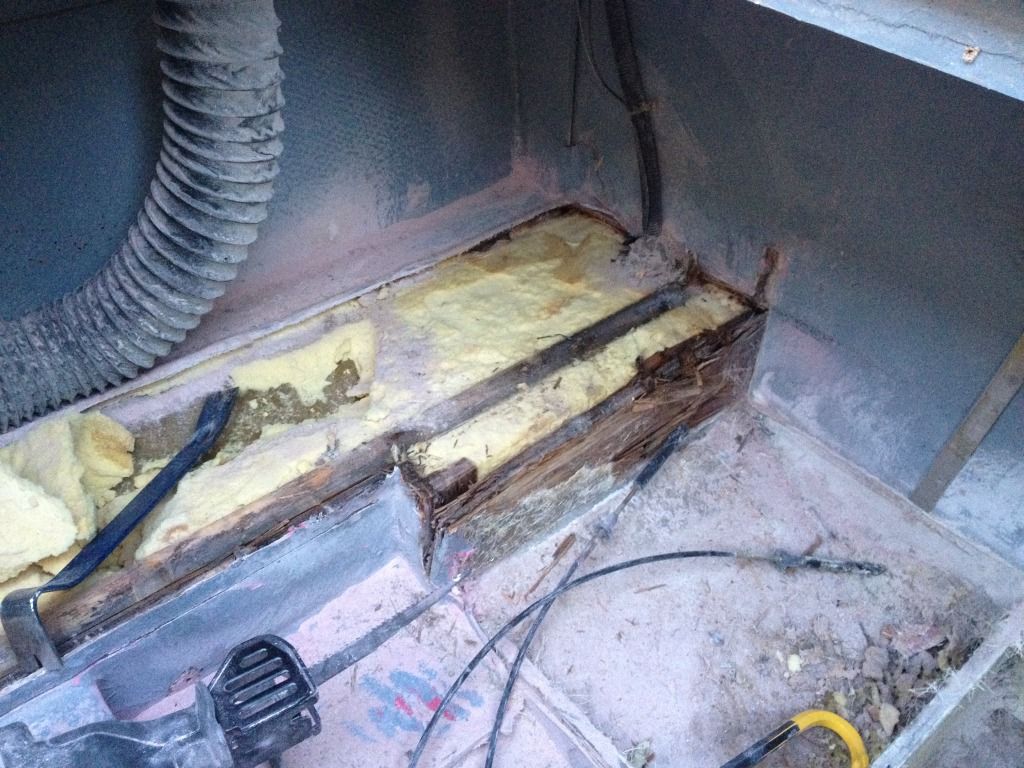
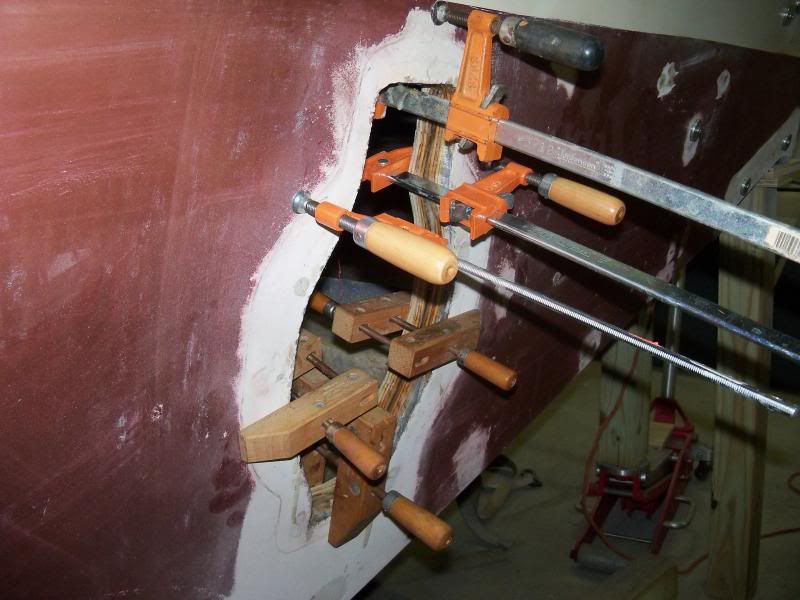
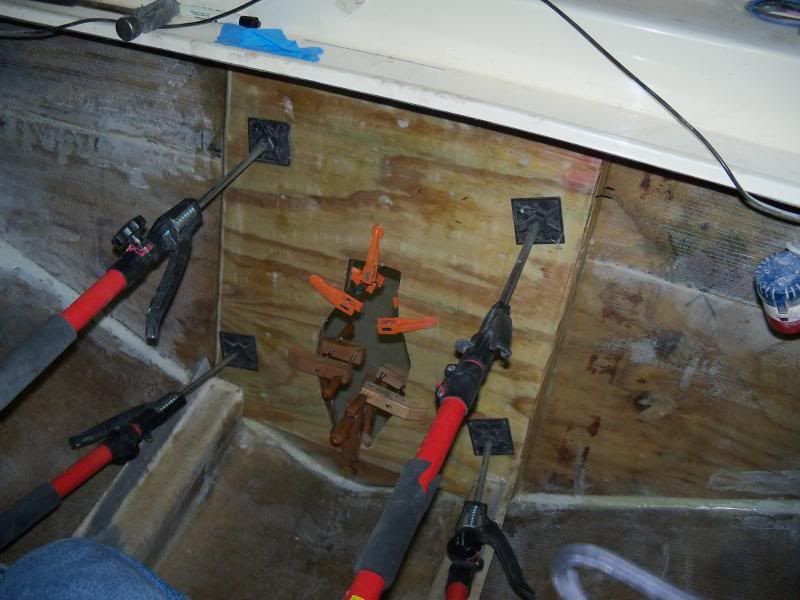
Hello! Read your thread and I and very impressed with your work so far. I think the tear out would be the hardest part and the most labor intensive area of the project. So you are way on the way to getting it back together.

If you choose to have someone else finish it, here is a guy who does excellent work. He did a transom replacement for a friend last year and was quick and very professional. I know it may be a five hour drive from Chicago, but he may be what you are looking for.

His web site is:

http://www.advantagegfr.com/

I live a few miles away from this outfit and they seam to keep jobs moving and without delay. I rarely see the same boats there sitting in his lot too long. To me that means he likes to get work done and move on to the next project, a mark of a true professional.

Good luck with your decison.
268 Frankenboat

Frankenboat, what are you THINKING? You're breaking the #1 Rule: when you know a good marine mechanic or glass guy, you only tell enough people to keep them in business - never let them get TOO busy! :)

In all seriousness, I've known the owner of Advantage for about a decade now, and I have to say that this isn't just a random reference. He has owned and completely refurbished his own 268 (among many others). He does great work and he's honest. If you again get to point of discouragement, I would highly recommend reaching out to Advantage.

I'll have some work for him this spring/summer. If he's too busy, I'm holding Frankenboat responsible!
 
IMG_0179.jpg


Before you go too much farther, stop. You are already cutting too much of the engine stringers away. Leave some of the old glasswork in place and dig out the wet wood.

This way, you only need to precision cut the new wood and fit it back into the existing engine mount and stringer areas, then glass back over everything. Take a good look at this pic I sent to you:

October2010162.jpg


You will notice that we cut one side of the engine mount away and dug the old wood out leaving some of the old fiberglass. Also, notice the lip where the old bulk head used to be. This was to precisely locate the new bulk head. We left "lips" of old fiberglass everywhere there was some sort of contour. This way we knew how everything went back together.

Before you cut things away, really think hard about how you will put this back together.
 
Remember he is also doing an OMC to Merc conversion. His motor mounts may need to be built to fit the new engine setup.
 
Thanks again Getaway for all the info and experience! Very Helpful! I tried to send you another PM, but your inbox is full. :smt038

Could this be the glass material you were referring to?

5.7oz x 40 and 50 inch wide , 2x2 Twill Weave Carbon Fiber
 
James,
I just cleared my pm box.

Right off the order from US Composites:

1708 50" Biaxial weave, 2-FG-170850

We also used 1-1/2 oz, 50" Fiberglass mat, 2-FG-105050

On top we used the Fiberglass Chop

Our resin was B-440 Premium Polyester Resin.

It was good talking to you. Keep us posted.
 
James,
I just cleared my pm box.

Right off the order from US Composites:

1708 50" Biaxial weave, 2-FG-170850

We also used 1-1/2 oz, 50" Fiberglass mat, 2-FG-105050

On top we used the Fiberglass Chop

Our resin was B-440 Premium Polyester Resin.

It was good talking to you. Keep us posted.

Do you have a number or Web page for them. I will need to start ordering the same soon as well.
Thanks
 
I have been watching this thread and wanted to chime in with my pre-project research.
From what I found, though more expensive, Epoxy was a better option when doing repairs for two reasons:

1/ Epoxy bonding to existing polyester resin is 20 percent stronger than polyester to polyester.
2/ Epoxy is less "brittle" once hardened.


You may have already seen this in my repair post but thought I'd re-share the pictures of materials I used:


TR_matl_1.jpg

Bi-Axial Cloth. Consists of a fiberglass matte sewn to a fiberglass cloth.
Two layers of this were used to cover the transom blending out onto the floor.

TR_matl_2.jpg

Epoxy Used:
E-cast CCA EPOXY RESIN w/ #305 HARDENER
(5) gallons total
From Eastpoint Fiberglass Sales near Detroit Mi
 
Epoxy doesn't smell either!

by-the-way, that square spot in your bilge, was for your float switch.
 
Quick Update:

I have received my order of 1708 fiberglass and resin today. I plan to work this weekend to build my panels for the transom and do further testing on the moisture rating in the Aft Cabin. Fearing that the firewall and stringers in the Aft cabin will need to be replaced as well. I will be doing a lot of measuring and logging so I know where everything will be put back together.

I have decided to go composite (Seacast). I know I will hear from some of you on this decision, but I'm committed now. I have placed my first order along with the necessary supplies. I have a lot of prep work ahead of me before my first pour.

I dropped off the two Merc Transom Assemblies at a local Marine Shop to be checked out and prepped for reinstallation. All new bushings and cables. The Marine Shop already warned me about the RAMs needing to be tested. To make sure the threading is okay and they are not leaking. I’m hearing that OEM replacements are super expensive.

I have also order my new swim platform today. I know what you are thinking... seems kind of strange as I am no where near dropping the engines in as I haven’t even started the fiber work. I am taking advantage of some 2013 pricing and I have been working with this guy for the page year and a half on what it is that I want.

NewSwimPlatform_Ordered_zpsb3b7022b.jpg


Please stay tuned as I hope to share some good progress this weekend.

James
 
Makes sence to me to get all you can now at good prices. The new stuff hanging around will keep you motivated.
 
Jitts,
Here's the link to US Composites:
http://www.uscomposites.com/

We dealt with Nan.

Good luck with the SeaCast. I can't quite picture how you would use it, but I'm sure it can be done. Shoot us some pics as you get going on it.

Here is a pic of the new stringers and supports before we started the final glass work.

100_1377_zps38eca77b.jpg


Bob
 
Here is how we put the new transom in place:


100_1139_zpsedc942ef.jpg


100_1140_zps74bf9c57.jpg
 
Weekend Update:

I received the Seacast on Saturday. Properly stored in the basement until I'm ready for it.

I was able to complete the 3'x8' jig for the new fiberglass panels. I will need at least 3 panels and possibly a 4th. I did create the first panel today and I believe it is dry and ready to be released out of the jig. I decided to let it cure for another day or so to be absolutely sure it is ready. This was my first fiberglass work and I have to say thanks to you guys here and to YouTube.

I cut out the transom pattern out of 1/2" foam insulation. I also made a pattern for both of the I/O cut outs. I will be using the patterns to create a plug for both I/O keyholes. This will help save on Seacast costs and make it easier to prep the cavities for reinstallation.

I also used a Moisture Meter to check the Aft cabin stringers. Both Port and Starboard stringers where reading low to mid 30 percent. The firewall was completed soaked at 35+%. This means it all must come out and will be replaced. More work, but the job will be done right in the end. I will start cuting into the Aft Cabin next weekend.

I feel pretty good about the progress and super excited about the first time fiberglassing. I'm hopeful the panel will turn out and I will get it cut into the transom next weekend.

Onwards and Upwards!
 
James,
Do you use use spacers to hold the fiberglass panels in place, then pour the SeaCast in to fill the void?

Still trying to get a grip on how you use the SeaCast to do that job.

Thanks!
Bob
 
Hey Bob,

Yes, you secure the new inner skin using Seacast spacers and blocks. The block come in two styles. 1.5x1.5 and 1.5x12 blocks. You also tab in the skin to the sides and bottom. You then use a false transom to hold everything in place prior and during the pour.

It is all in the prep work and the final step is the pour and capping with fiberglass,

Here are a few pics of the Seacast diagram

d03a5dc0-a9f9-46e3-8d70-e40167c2c90a_zps7ff30f89.jpg


AF65330D-B11B-4860-8E60-BC52FA4ADA6D_zps7t2oakdk.jpg


8853E9D8-5A58-43EA-85C2-EFC0EF8600EC_zpsrrsupftv.jpg


8D469462-0FC1-4F2F-84D3-371619DA0158_zpsjavrs6cz.jpg


9F373014-FC8A-4596-AB50-F96FD082CFDE_zpsdtuanr2e.jpg
 
Interesting. It would save cutting, preping, and fitting the plywood.
 
At the risk of you guys thinking that I'm crazy... Seacast is $200 a 5 gallon bucket plus shipping. It will take 15 gallons for the transom alone. Please remember that I will never have to worry about wood rot every again.
 
So many ways to get a good result.
I looked into other composite options when planning for ours but the additional cost did not justify it for me.
It made it 25 years with the original thrown together factory plywood job.
I figured I could get at least that out of my work using a high quality epoxy and taking the extra time to seal up holes and edges not done by the factory.

Thought I would share this, a surveyor article you may want to browse through for more tips on structural re-assembly: http://www.yachtsurvey.com/HullFailP2.htm
 

Forum statistics

Threads
113,154
Messages
1,427,384
Members
61,060
Latest member
Danileo
Back
Top