Shock cords for canvas

Thanks for the tips, I think I will try to move the ring as skibum had suggested. According to the company that makes the STAY-PUT, the cords are available in several lengths- 70,80,90,100,110mm lengths. Sailrite does not say what length the ones they sell are. I am headed down after lunch to remove one from the camper canvas to compare. If I am lucky, the cord length is the same on the camper aft curtain and the cockpit cover. All the cords were destroyed on the cockpit cover so they would have been no good to compare anyway.

If I had to guess I would say the ones received from Great Lakes are correct. The ones on my camper canvas are pretty sung and they have 4 years of wear on them.

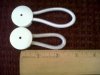
OK, well I went and pulled one off the camper canvas. I have placed a picture below. The units advertised are in mm so it hard to get an *exact* measurement with a standard ruler. I just took inches x25.4 to convert.

According to a canvas distributor's website, these measure from the center of the fastener to the end of the loop.

Here is what I got-

NEW- 3 inches/76.2mm
OLD- 2.75 inches/69.85mm

By these measurements I am assuming using rounding that the NEW one from Sailrite is the 80mm unit and the OLD one from GL is 70mm.

It does not sound like much but it does make a difference in how well the cord holds down the canvas.

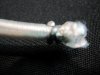
So far, trying to re-locate the hog clip has not been successful. Getting it loose was easy enough but getting it back on correctly is proving to be a challenge. I can get it back around the cord but not sure it will hold properly. That is a concern giving the constant tension it needs to be under.

I am going to call tomorrow and see if I can order new (already hog-clipped) 70mm cord length or new clips and the pliers. My gut tells me I may end up having to re-order the clips from Great Lakes for $4.35 each and call it lesson learned on this one.
 

Attachments

  • shockcords.jpg
    shockcords.jpg
    73.6 KB · Views: 270
Well here is the update. I talked to the U.S. STAYPUT distributor today. The shock cords that Great Lakes use on their products are a custom length made just for them and are not generally available except from Great Lakes. The "custom length" is 5 inches of cord end to end. The bottom line here is unless you think you can shorten the ones from Sailrite you should consider ordering the fasteners direct from Great Lakes at $4.35ea to get the correct size. I have tried to re-crimp the brass end with no success- others may have better luck. The brass ring does not seem to want to work properly a second time. Not sure what I am going to do from here but don't have much use for the Sailrite fasteners for now. Just thought I'd pass on this information.

Jason
 
I repaired my own worn out shock cord on the Stayput button after reading this thread. Thanks for digging this up everyone!

Ski-bum had it right, I bought some stainless 3/16" hogrings from WM today and a 12" piece of 3/16" shock cord. Using his tip on the block with a hole in it (I drilled a 1" hole) I was able to separate the buttons and easily remove the old chord. I made up a new chord and it went back together just fine. Here are a couple of photos of my supplies. The only real trick to using the stainless hogrings I found, was to be sure and get a tight crimp rolling them around the shock cord so they fit back into the Stayput button slot. The second photo shows the crimp finished.

Thanks everyone, worked like a charm :thumbsup::thumbsup::thumbsup:
 

Attachments

  • Stayput Repairs 002 (640x480).jpg
    Stayput Repairs 002 (640x480).jpg
    93.9 KB · Views: 246
  • Stayput Repairs 003 (640x480).jpg
    Stayput Repairs 003 (640x480).jpg
    76.9 KB · Views: 247
I went to the boat today and installed some of the new shock cords from sail rite, and , as others have noted, they were a bit too long. Then it started raining/snowing and I couldn't buff anymore, so I took a couple shock cords back off and when I got home, I went into the basement and started looking around for a fix. It seems to have worked pretty good, so I snapped a bunch of pics and came up to post them, and now I see that chuck beat me to it... his fix looks pretty easy, but if you have the stuff laying around like I did, here's an alternative.

I measured the pocket in the shock cord housing where the hog ring sets and it was right around .21", so I drilled a 13/64 hole in a piece of scrap 1/4" bar stock
shockcords001.jpg


Then I cut the material so that half the hole would be left on the bar.
shockcords002.jpg


Then I cut the hog rings off the shock cord and I took some 1/4" copper tubing that I had left over from another project, and cut it into 1/4" long pieces
shockcords003.jpg


The tubing cutter crimps the ends in on the tubing pretty good so I put the little pieces in my flaring fixture to hold them and ran a 3/16" drill through the pieces to open them back up
shockcords004.jpg


slide the tubing over the shock cord
shockcords005.jpg


Then I held it over the "u" shaped cutout in the bar and "crimped" it in with a sharp point flat chisel
shockcords008.jpg


Then I tapped it into the cuttout while rolling it untill it was "formed" into the cuttout and would fit into the housing
shockcords013.jpg


Now if this weather staightens out, I'll go put them back on and maybe get some waxing done.
shockcords012.jpg
 
Beautiful work and pictures both Mark and Chuck. Like others, I ordered mine too long and will be following your advice.
 
doi that plastic buttons screw apart or pry apart???
 
doi that plastic buttons screw apart or pry apart???

To add to what my3sons said, I found it was easiest to place a medium, flat blade screwdriver under the Tab that says "STAY-PUT" and gently work the screwdriver back and forth between twisting clock wise and counter to loosen it. Just be careful you don't dig in to the canvas.

Jason
 
Then if it doesn't unscrew why does it have threads?
 
I went to the boat today and installed some of the new shock cords from sail rite, and , as others have noted, they were a bit too long. Then it started raining/snowing and I couldn't buff anymore, so I took a couple shock cords back off and when I got home, I went into the basement and started looking around for a fix. It seems to have worked pretty good, so I snapped a bunch of pics and came up to post them, and now I see that chuck beat me to it... his fix looks pretty easy, but if you have the stuff laying around like I did, here's an alternative.

I measured the pocket in the shock cord housing where the hog ring sets and it was right around .21", so I drilled a 13/64 hole in a piece of scrap 1/4" bar stock
shockcords001.jpg


Then I cut the material so that half the hole would be left on the bar.
shockcords002.jpg


Then I cut the hog rings off the shock cord and I took some 1/4" copper tubing that I had left over from another project, and cut it into 1/4" long pieces
shockcords003.jpg


The tubing cutter crimps the ends in on the tubing pretty good so I put the little pieces in my flaring fixture to hold them and ran a 3/16" drill through the pieces to open them back up
shockcords004.jpg


slide the tubing over the shock cord
shockcords005.jpg


Then I held it over the "u" shaped cutout in the bar and "crimped" it in with a sharp point flat chisel
shockcords008.jpg


Then I tapped it into the cuttout while rolling it untill it was "formed" into the cuttout and would fit into the housing
shockcords013.jpg


Now if this weather staightens out, I'll go put them back on and maybe get some waxing done.
shockcords012.jpg
Holy crap! Are you retired? I admire you "do it your selfers" Got mine for free with a phone call. Even if I didn't they were pretty cheap as far as boat stuff goes. ;) http://www.greatlakesboattop.com/
 
Last edited:
Then if it doesn't unscrew why does it have threads?

The threads hold the two pieces together. It is just not threaded upwards to unscrew- kind of like one of those fasteners that hold the inside door panel on your car door frame.

They are not designed to come off once installed. Initially Great Lakes told me I would have to drill them or break them off. I found that was not necessary after working with them.
 
Holy crap! Are you retired? I admire you "do it your selfers" Got mine for free with a phone call. Even if I didn't they were pretty cheap as far as boat stuff goes. ;) http://www.greatlakesboattop.com/

These seem to be like the Stainless AC pans. I called GL and asked for a free replacement and they basically told me to go to he** .
 
If you look at some of my earlier posts in this thread, you will see the problem I ran in to with the Sailrite Stay-Put assemblies, they were too long to fit snugly over the binding post.

I ended up having to order them from Great Lakes to get the right one. After talking with the only North American distributor for STAY-PUT, I learned it is a special size they supply to Great Lakes (at least at the time it was)

You are probably better off to order them from Great lakes if you need 1 or 2 but if you want to replace them all, email Dave at http://www.obecoinc.com/. At the time I was doing all this he told me he was going to start stocking the shorter length Great Lakes uses at a better price. I had already ordered mine from GL at the time but he was very helpful.

GL also has the pull tabs if you need to replace those as well.
 
You are probably better off to order them from Great lakes if you need 1 or 2 but if you want to replace them all, email Dave at http://www.obecoinc.com/. At the time I was doing all this he told me he was going to start stocking the shorter length Great Lakes uses at a better price. I had already ordered mine from GL at the time but he was very helpful.

G
Jason, How much cheaper than GL? What was the price for each "stay-put"
 
Holy crap! Are you retired? I admire you "do it your selfers" Got mine for free with a phone call. Even if I didn't they were pretty cheap as far as boat stuff goes. ;) http://www.greatlakesboattop.com/

Not retired yet...working on that.
It was just a matter of me wanting them fixed "today", at the time.
Besides, that was April....long winters make us restless up here. :smt101
 
Jason, How much cheaper than GL? What was the price for each "stay-put"

I dont remember exactly and the price is not on the packing slip. As I recall, GL wanted about $4.50ea and the other company I posted was going to be about half that. This includes the Plastic Stay-Put assembly and the shock cord piece. I replaced all of them on my camper aft curtain and my cockpit cover. I did end up needing 2 of the longer sailrite assemblies though for one spot- go figure. If you order from Obeco, be sure to measure the cord length to make sure they send you the right one.

I took pickyness to the next level and replaced all the pull tabs too which were about 50 cents each from Great Lakes.


Jason
 

Forum statistics

Threads
113,186
Messages
1,428,188
Members
61,098
Latest member
Klawson83
Back
Top