Navigation
Install the app
How to install the app on iOS
Follow along with the video below to see how to install our site as a web app on your home screen.

Note: This feature currently requires accessing the site using the built-in Safari browser.
More options
You are using an out of date browser. It may not display this or other websites correctly.
You should upgrade or use an alternative browser.
You should upgrade or use an alternative browser.
Restore of 1986 Sorrento 19' bowrider
- Thread starter jroach
- Start date

jroach
Member
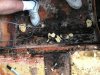
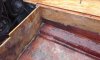
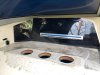
The rot has been removed and new wood has been glassed into place. In order to prevent this from happening again, John (Performance Fiberglass) is looking for ways to attach the fuel tank cover without screwing into the top of the stringers. Has anybody figured something out to eliminate the design flaw in this area?
One thought was to add tabs to the front of the cover and then add composite blocks to each side of the tank area that can be used to secure the cover in the middle and back (drawing attached...cover, tabs and blocks are in green)
Thoughts appreciated.
One thought was to add tabs to the front of the cover and then add composite blocks to each side of the tank area that can be used to secure the cover in the middle and back (drawing attached...cover, tabs and blocks are in green)
Thoughts appreciated.
Attachments

The gas tank cover is not a structural piece. It just needs to be secured enough that it firmly stays put. There's no reason it has to be secured within an inch from it's edge/perimeter. So moving the screws another two inches inboard to those blocks would be perfectly fine. Keep it simple - no reason to get too crazy with this.
I would, however, take the extra step of overdrilling the stringer where the those block's screws will enter the stringer. Fill the hole with epoxy, then run the screws into the epoxy. That eliminates any chance of water entering the stringers via those screws. Doesn't take much time, but is worth it for the long run.
I would, however, take the extra step of overdrilling the stringer where the those block's screws will enter the stringer. Fill the hole with epoxy, then run the screws into the epoxy. That eliminates any chance of water entering the stringers via those screws. Doesn't take much time, but is worth it for the long run.
Regarding your fuel tank....
When I pulled the tank out of my Cobalt (it sits above the floor) there was come corrosion on the bottom where it had bee wet a long time. There were several deep pits that had me concerned enough that I thought about having a new bottom made. Then a friend told me about a place that does a baked on coating on classic car fuel tanks. I took my tank (56 gallon) to him and I had it done. The first clean the outside of the tank and then do a light etch to the surface. Next the coating is applied and baked on. It looks like a spray in bed liner but not as thick. I don't remember the cost but it was reasonable. They are in Stockton, CA. Might be something to look in to.
Shawn
GypsmJim
Well-Known Member
- Aug 8, 2018
- 1,173
- Boat Info
- '19 SPX 190 OB, 150 & 5 Mercs
'17 Whaler 150 Montauk
'15 Yamaha FXHO
'60 Mulray Dinghy
'52 Lyman 15'
- Engines
- Mercury 150 4-stroke
72 Outboards representing 12 manufacturers
Drilling holes for seat bases, tank covers, etc. poses no problem for water intrusion if done "correctly". As in epoxy sealed like stated above. The problem is boat manufacturers often do not take the extra effort.
Fiberglass boats (polyester resin) does have a small amount of porosity to it. Thus, after eons of sitting in water, the wood stringers, transom, etc. will eventually get wet.
The key to longevity is to never let water sit inside the boat....not even in a glassed bilge area. Storing a boat in a northern climate with water in the bilge makes things even worse. The freezing action opens the pores even more, resulting in accelerated penetration and rot.
jroach
Member
The gas tank cover is not a structural piece. It just needs to be secured enough that it firmly stays put. There's no reason it has to be secured within an inch from it's edge/perimeter. So moving the screws another two inches inboard to those blocks would be perfectly fine. Keep it simple - no reason to get too crazy with this.
I would, however, take the extra step of overdrilling the stringer where the those block's screws will enter the stringer. Fill the hole with epoxy, then run the screws into the epoxy. That eliminates any chance of water entering the stringers via those screws. Doesn't take much time, but is worth it for the long run.
Lazy Daze,
Agreed. Going with composite wood, over-drilled, and epoxy'd.
jroach
Member
Regarding your fuel tank....
When I pulled the tank out of my Cobalt (it sits above the floor) there was come corrosion on the bottom where it had bee wet a long time. There were several deep pits that had me concerned enough that I thought about having a new bottom made. Then a friend told me about a place that does a baked on coating on classic car fuel tanks. I took my tank (56 gallon) to him and I had it done. The first clean the outside of the tank and then do a light etch to the surface. Next the coating is applied and baked on. It looks like a spray in bed liner but not as thick. I don't remember the cost but it was reasonable. They are in Stockton, CA. Might be something to look in to.
Shawn
NorCal Boater,
The SeaRay Sorrento already had a baked on coating. It keeps the electrolysis issues at bay.
The tank has been scoped and approved for re-use!
jroach
Member
Is there a part of the Sea Ray Club forums that can be used to put documents into for other people use?
I have a brochure, outdrive installation, owners manual, etc. The only thing on the Sea Ray site is the spec sheet and there isn't any interest in adding material for sharing so it's up to forums like this to help maintain the past") .
.
I have a brochure, outdrive installation, owners manual, etc. The only thing on the Sea Ray site is the spec sheet and there isn't any interest in adding material for sharing so it's up to forums like this to help maintain the past
.techmitch
Well-Known Member
- May 1, 2008
- 8,338
- Boat Info
- 1999 270 DA
- Engines
- Twin 4.3s W/Alpa I Gen II's
Start a new thread with the correct title, post the docs or links that you and hopefully a moderator will make it a sticky.Is there a part of the Sea Ray Club forums that can be used to put documents into for other people use?
I have a brochure, outdrive installation, owners manual, etc. The only thing on the Sea Ray site is the spec sheet and there isn't any interest in adding material for sharing so it's up to forums like this to help maintain the past
jroach
Member
Understood. Was hoping to get some traction to have a section vs sticky.
Swapped emails with Sea Ray and they look to these websites to provide manufacturers data (when it is available). That would be the logical place to consolidate.
I’ll start scanning and post what I have.
Swapped emails with Sea Ray and they look to these websites to provide manufacturers data (when it is available). That would be the logical place to consolidate.
I’ll start scanning and post what I have.
jroach
Member
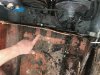
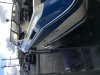
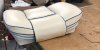
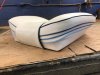
Hull/Stringer work is complete! Cleaner/Shinier than I ever remember, even new. The guys at Performance Fiberglass did good work, highly recommend them if you are in the LA or OC area. Stripes go on this week. Went with looked to be the blue to match the hull and silver/grey keeping with the original theme.
It's now getting the engine/outdrive work done. Fingers crossed that all goes well and doesn't need any lower end (block) or head work.
The material has arrived at the upholsterer (Sorensen Top Shop). They have one seat bottom (rough fit) and it looks and feels great. Tony was able to reproduce the stripes below the piping.
The upper seat back is at a place to duplicate the stitched logo. I really wish I had the original vector or ??? file, it would have saved me money and guaranteed the right look. We are going with a white thread...if anybody thinks it was a different color, let me know (we couldn't tell if it was white or silver).
Torn on the carpet colors...can't find an identical match. Recieved samples from Marideck and Nautolex. While I'm sure they are more durable than what the boat came with it takes away from the restoration look we are going for. I have found some from Corinthian but I think they are just a reseller. Any thought on OEM like carpeting would be appreciated.
Attachments
jroach
Member
Carpet is in and looks pretty close to the original. I left the original carpet on the side pockets, everything else is new. Parts are starting to come back from the upholsterer. Installed the passenger dash pod today. I've looked high and low for the laminate used on the dash, table and cupholders on the engine cowl. Gave up and order a carbon fiber laminate.
Attachments

jroach
Member
jroach
Member
Any recommendations for an A/B switch for the batteries? Looks like a hundred or more on the internet but would prefer a reference. I'd like one that kept both batteries charged while running.
I was also thinking of a solar battery minder for my garage when the boat is stored...any opinions would be appreciated.
I was also thinking of a solar battery minder for my garage when the boat is stored...any opinions would be appreciated.
Stingrayaxe
Active Member
- Oct 29, 2015
- 344
- Boat Info
- 2009 Sea Ray 205 Sport
2015 Chevy Tahoe, Max Towing
- Engines
- 5.0 Merc Alpha 1
I'm a big fan of the Blue Sea ACR and a simple on off switch. It will charge your start battery first and then your house battery. You have the option to combine the batteries in the unlikely event both get low.
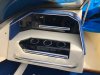
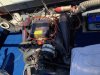
This won't be a Sea Ray item but rather a Mercruiser item. I would check eBay first. Always a lot of stickers there. Or you may have to buy another cover....new or used.Anybody know where to find the Sea Ray sticker (circled in red) for the top of the Engine (4.3V...although I don't think it's any different than other engines) air cleaner?
see photo.
Thanks in advance.
Shawn
jroach
Member
Thanks Shawn but I think it's a Sea Ray part or at least made for Sea Ray by OMC (or Merc). The
part (see attached photo) has more SR branding and in small letters it has "powered by OMC". No part#'s so it's difficult to find.

part (see attached photo) has more SR branding and in small letters it has "powered by OMC". No part#'s so it's difficult to find.
jroach
Member
Stingrayaxe,
Thanks. that helps.
Thanks. that helps.
