Repairing holes in the radar arch

Irie308

Well-Known Member
May 28, 2013
2,598
CT
Boat Info
2004 420 DB, GHS Hydraulic Lift
Garmin 8600/Garmin 1222 plus
AB Mares 10 VSX with 30 hp Tohatsu
Engines
Cummins 450C 8.3 L Turbocharged
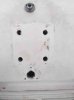
What is the best way to go about repairing holes in the the radar arch? I'm in the processing of adding a dual mount which replaces a single radar mount. The picture attached shows what's left after I removed the old mount. I'm not too concerned about the four holes in the middle as they will be covered by the new mount but I want to make sure they are water tight. Now the holes that housed the anchor light and the radar cable will be exposed. What's the best method/product to fill and seal them up? I'm not to concerned about looks as they are on top of arch.
 

Attachments

  • ImageUploadedByTapatalkHD1428275933.307118.jpg
    ImageUploadedByTapatalkHD1428275933.307118.jpg
    13.4 KB · Views: 548
Is there an access on the other side?If so i would get a piece of luan and seal it with epoxy,then use six10 adhesive to affix it to the insides blocking the holes then fill the holes with six10 untill almost level then finish with spectrum gel repair kit to match the color.
 
I'd just fill the holes with Silicone Sealant since they're going to be covered anyway...and get the small clamshell vents filled with sealant to seal the cables.
Or, the cables could be sealed with "BLUE SEA SYSTEMS CableClam Waterproof Through-Deck Fittings" or similar.
 
Or you could do it the right way, grind out the holes, lay up glass mat in the holes and then gel coat, sand an buff the surface. It would look as good as new and never crack. Boat works Today has an excellent series on repairing a hole in Fiberglass. It is a bit of work, but you would learn a lot and it would be permanent.

Fiberglass repair., There's a hole in my boat part 1 https://youtu.be/i9hfpOCnzEs

Good luck,

Pete
 
Or make some thin stainless steel cover plates using the same fastener holes.
 
Thanks for the suggestion thus far. I should add that this is also keeping me from removing my cover since the arch would then be open to the elements so I'm more in favor of the quickest fix.
 
Cut a circular cover plate out of thin starboard (or whatever material you choose... SS, Al, etc), match the holes in the cover plate to the (3) that are already there, add sealant, screw down, done.
 
It's time to remove the cover here in CT....
Almost nobody is going to repair hidden holes in the top of an arch the same way you'd fix a visible hole in the side of the hull.

Go and get a tube of Six10. Countersink the top of the old holes with a larger drill or dish it out with a small grinder. Masking Tape the bottom of the holes by removing the underside access plate, fill with the thickened epoxy material, wait 40 min....Done.
Six10 is great stuff, you can drill it sand it, screw it, tap it and its strong so, if the new mounting holes are close to the old ones you'll still have strength in that area.

I've used the product in such repairs with great success.
Don't delay our short season (almost starting) with this very minor decision.
 
Last edited:
It's time to remove the cover here in CT....
Almost nobody is going to repair hidden holes in the top of an arch the same way you'd fix a visible hole in the side of the hull.

Go and get a tube of Six10. Countersink the top of the old holes with a larger drill or dish it out with a small grinder. Masking Tape the bottom of the holes by removing the underside access plate, fill with the thickened epoxy material, wait 40 min....Done.
Six10 is great stuff, you can drill it sand it, screw it, tap it and its strong so, if the new mounting holes are close to the old ones you'll still have strength in that area.

I've used the product in such repairs with great success.
Don't delay our short season (almost starting) with this very minor decision.

Thanks, will give it a try.
 
I completely agree that there are many ways to "skin this cat". And given the lightweight requirements of this fix, I'm not sure one way is inherently better than the other. Heck, you could simply cover the holes with shrink tape.

Regarding six10... I have never used it (I typically just go for straight epoxy), I understand it falls between the 105 system and Gflex. What I don't know is whether or not it is UV stable. It would be important to find this out before using it since it would then also need some type of topcoat and ocassional reapplication. Not that it's a big deal, just something to be aware of.

Thanks for the insight. Will check with the guys at WM.
 
Hey, I just read the OP again and see you DO have holes that aren't going to be covered with your new mount.
I should have read it more carefully......I agree the epoxy filler probably will need a top coat of gel or paint or a piece of stainless.

My apologies for only thinking of the 4 holes they are going to be covered with the new mount.
 
Thanks for the insight. Will check with the guys at WM.

I would go right to the source and check with West. It's better to know for sure than to take some person's word for it at West Marine.
 
The user manual for west systems dosnt specify uv stability for six10 but it does say it is a two part epoxy.I have used it before and also this year a bit,it is basically clear with a slight yellow tinge to it like honey.I have never had a problem with it not working.I have had a few snap screws pull out and just clean the hole with acetone and a mini bottle brush for paint gun cleaning then pump some six10 into the hole let dry and redrill.I used a piece of teak sealed in six10 as a backer this year for the same job and also filled a couple of screw holes from the previous owner.It is pretty thick like gel.You can contact west system at 1-866-937-8797.They have a workshop they hold for people like us in Baycity where my boat is kept and i am going to try and get in it some day.
 
"It's a 2-part epoxy"... That's what got me wondering. I'm extremely familiar with their 105 system (which is their traditional, full strength epoxy) and it is a 2-part system. It is NOT UV stable. It is also that "honey" color you refer to... Although may not mean anything.
 
I completely agree that there are many ways to "skin this cat". And given the lightweight requirements of this fix, I'm not sure one way is inherently better than the other. Heck, you could simply cover the holes with shrink tape.

Regarding six10... I have never used it (I typically just go for straight epoxy), I understand it falls between the 105 system and Gflex. What I don't know is whether or not it is UV stable. It would be important to find this out before using it since it would then also need some type of topcoat and ocassional reapplication. Not that it's a big deal, just something to be aware of.

LD
to do something similar, what product would you use instead of six10?

thanks in advance!
 
Last edited:
Hi Chris. I guess a lot of this depends on how "perfect" you want it to be? Or is the main thing just to be sure it is a solid fix? It also depends on what you currently have on hand/at your disposal as far as product goes? Is just screw holes that need filling?

I should clarify my comments about being "UV stable"... with the stuff I was referencing, it just means it's going to turn a darker color over time - it won't affect the effectivness of it. But topcoating it (whether gel or paint) can fix the color changing part.

For what it's worth... you could have a local paint store mix up a small batch of paint that matches your gelcoat. You just need to get a bunch of sample cards. Or, in my case, with my Sundancer, I took a part into the store to have it scanned. If I remember correctly (it was a while ago!) I think I removed the anchor hatch. I used that to paint a new inspection plate that I used to cover a new hole I made in the boat.
 
Last edited:
Thank you LD

My boat stays under cover when not used, which is 5 months in the winter and 5 days a week during the summer 7 months... this is a little depressing, my boat is out about 60-65 days a year....


Anyway, just looking for something that looks good. Not many boats are above mine in this inland lake to see it.... lol

I am planning on pulling the sat dish off this week. I will tape it temporarily to get a plan

thank you!
 
Sure - post a pic, if you can. Would it be a few screw holes and a larger pass-thru hole? Probably just a simple cover plate - either aluminum or even 1/4" starboard - will do the job and be just about the cheapest repair you'll ever do on a boat! :)

You can paint it with a spray can and probably get a 90% color match which is likely good enough?

Re-use the existing attachment screws with washers.
 

Forum statistics

Threads
113,148
Messages
1,427,289
Members
61,058
Latest member
Axlthepaxl
Back
Top