Finished the swim platform

OldSkool

Active Member
May 8, 2010
4,360
Boating on Raystown Lake, Pa
Boat Info
restored 1976 SRV200
Engines
188 Mercruiser I/O
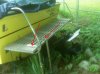
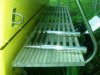
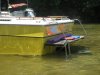
I just finished and installed my swim platform. I built it out of composit deck boards that I cut down to 1X1 1/2 strips then bolted through with stainless rods. I also routered out 1/2 X 3/4 slots in the underside of the cross stays slats so I can install LEDS at a later date without them hanging out in sight. It's simple but works nicely. (Ding in the handle rail is compliments of the previous owner) The origianl platform was only 24" long X 18" wide. I had to move the right hand rail to the right side of the boat. Ladders is new stainless steel three step that replaces the single step "loop" ladder. I chose gray as opposed to red cedar to match my gray/yellow theme. Sorry for the picture quality. I'll post some more of the underside when the weather permits.
 

Attachments

  • Copy (2) of IMG00066.jpg
    Copy (2) of IMG00066.jpg
    26.8 KB · Views: 332
  • Copy of IMG_1688.jpg
    Copy of IMG_1688.jpg
    22.1 KB · Views: 317
  • Copy of IMG_1712.jpg
    Copy of IMG_1712.jpg
    25.5 KB · Views: 315
Last edited:
Nice job! Looks nice and won't require all of the teak oil!:smt038
 
Looks awesome! Can you tell me how you are supporting the platform underneath in the middle? I have the same smaller teak step/platform and swing out step you had on our 79 SRV195. I would LOVE to make the same thing for ours.
 
O.K., Nice job!
Now it's time to get her out of the weeds and into the water!
 
Elbie, If the weather gets nice I plan to do just that.

Chrissrv195, I'll sit down and make a measured drawing for you and post it. Maybe tomorrow or so but I'll get 'r done. I used aluminum struts on either side of the OD. I was real reluctant to put screws in the transom but plenty of silicone set my mind as ease.

BTW, drilling the holes for the stainless screws revealed a solid transom. Nice thing to know...

Thanks to all for the comments.
 
Thanks Oldskool, I really appreciate you doing that! I look forward to studying it. I was going to see if anybody sells full width swim platforms for older boats, but now I think I'll try & duplicate what you did, hopefully it'll look as nice as the one you built!
 
Hind sight being 20-20 I would try to do few things different like making the leading outside edge more rounded rather than straight. Also I may put and extention over the OD to cover it a little better so no one hits it if they fall or dive off the center of the platform. I'll include this in the notes when I get them finifshed. Here are a little better pitures. I still need to finish plugging the old holes and cleaning up but the weather has me in the house right now.
 
Last edited:
OK Chris here you go. I hope this attaches and it is helpful. Ask if you need to I'll be here.

Pitures didn't attach. Can you send me your e-mail address?
 
Last edited:
Hey Oldskool. You should have a message from me with my email, if not let me know. Thanks for posting the extra pic's, I'll be using them as a reference when I build my swimdeck. I'd bet you could sell these if you had the time to build 'em. I think a lot of people with "classic" boats (like me) would like a swimdeck for their ride, but are unable to find a place that makes them for older boats that doesn't cost an arm & a leg. I'm not sure how a new fiberglass deck would look on these style boats anyways. They look awesome on newer boats, but this style goes better on older boats I think.:thumbsup:
 
Chris use the info I sent and let me know how it goes. Maybe I'll put together a diagram and instruction kit and sell it on Ebay.:grin: You are right about the look on the classics. When I step back and look at it it looks like it came with the boat. Cool thing is that is is maintanence free and as it wears it remains skid free. That's the beauty of composite. I want to use it for a season to see how it works out. If it does then maybe I'll sell them. Stainless rod will need to be found at a steel supply wharehouse. You will need to thread the rod which is no easy task. If you want to you can use aluminum rod from Lowes. The torque on the nut does not need to be that tight so aluminum rod should work nicely. Just be careful and don't over tighten.
 
Thanks for all the info you've provided! I'll be sure to post pic's as soon as I get mine done. I'm hoping to start on it soon.
 
I just noticed how nasty the "unfinished" sides look. I am going to cut a 1/4 inch strip with the wood grain out and stainless steel screw it to the sides. Some other mods I may do. This is very much a proto type. Thanks to all for your comments. Anyone looking to do this just send me a line.
 
Last edited:
It's a nice job, but the ladder supports look awkward as one could easily snatch his fingers in! Couldn't you manage to hang the ladder from underneath the platform?
 

Attachments

  • IMG00065.jpg
    IMG00065.jpg
    106.2 KB · Views: 401
Very nice looking job. Was that material hard to work with? Does it cut and shape easily? Did you glue and screw the pieces together?

If you were to do this as a business I would make two suggestions. One would be to use a router to round the bottom edges at the ends, and find a way to mount the ladder beneath the platform. That would put it out of the way and not present a tripping hazard or toe stubber.

On your boat a grab handle mounted directly ahead of the swim ladder would make climbing up the ladder and getting onto the platform much easier.

Nice job and thanks for sharing the photos.
 
It's a nice job, but the ladder supports look awkward as one could easily snatch his fingers in! Couldn't you manage to hang the ladder from underneath the platform?

Then how would it fold?
 
Great comments by all. Yes the ladder is a toe stubber and I have been looking at different ways and kinds to mount. The problem is folding it back onto the deck. I'll keep looking and will use this on my tug until I can find something better.

The material is great to work with and I actually like it better than wood. It is not quite as ridged as wood so it requires a bit more bracing. Also it is heavier than wood. (About like teak or PSI treated) It is great to work with but I would use a particulate filter mask as the dust, though it is less than wood, is very fine. I haven't used it in a glue up application yet but I will do some testing and see how it holds up under multiple glue up application.

I am going to do a few improvement to it now that it is mounted. I will make facier strips with wood grain out to add to the sides where the angle cut was made. (First glue test) Give it a more finished look. Also may add a fold out extention over the OD so kids/me don't fall into the OD from the deck.
A grab handle on each side will be added next week and as soon as I can get the Admiral to sign off on it, LEDs strip lights mounted in the channels I made under the deck.

As I make improvements I will post them for your comment. Who knows, Maybe there is a market for these. I have about $120.00 in this one fully mounted.
 
Pietro, I just looked at the link you provided and see that the slide mounted ladder would really keep the deck stubber free. Bought the present ladder last year and had it on the old deck (It is not part of the $120.00 I used for the platform). I used all stainless screws on it. I bought all the material except for the stainless throught rods from a local home improvement store. For the hole plugs I mixed clear silicone with the milling dust from the composite and made a paste I jammed into the holes. Color came out pretty good to use as hole plug.

Chris, I want to add that you need to pre drill all your screw holes. Remember this stuff has no grain and will slip like putting screws into the end grain of plywood. Once the screw are in it will hold an elepant.
 
Last edited:
Hopefully I can go for materials tommorrow (Sat. the 12th). My wifes Trailblazer is throwing fits so I might not be able to. Just what every mechanic wants to do, wrench on the wifes truck on his days off! I wonder if a guy should put some marine adhesive in the predrilled holes to help the screws stay tight & keep from eventually stripping? I was also wondering, did you re-use the original screws going from the braces into the transom or replace with larger ones?
 

Forum statistics

Threads
113,164
Messages
1,427,633
Members
61,073
Latest member
kolak3
Back
Top