Dash 3" Hole Cover

OllieC

Well-Known Member
SILVER Sponsor
Mar 11, 2013
6,879
N.W. ‘Sconnie
Boat Info
Sara Belle
2005 Weekender 215
Engines
Mercruiser 5.0 mpi, Bravo III
Happy New Year! I hope everyone had a wonderful Christmas!

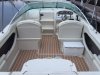
Next year I have plans to remove my Sony head unit and replace it with a Fusion head unit with a NMEA 2000 network to 'Fusion Link' it to my Garmin. I purchased a Sony Head unit in 2012 with a helm remote, that remote required me to drill a 3" hole:( to mount it. Well now of course, now I want something different. Now I need a cover or a plate for that 3" hole at the helm. You can see the location of the remote, it is directly to the left of my Marine VHF and below the ignition key . So the hole is in the fiberglass / gel coat.

I've been looking online and can't really seem to find much. There's a couple of gauge plates but I don't see too much information on them. Any ideas would be much appreciated.

ps. I may add a Fell Marine cut off switch to that location or onto the plate - I believe the knockout hole for the Fell Marine 2" 1/16 so I would center it on the hole plate/cover.
IMG_3486.jpg
 
I'm actually going to sell it to my buddy who is in the process of restoring a pontoon / party barge. He's in need of a decent head unit & is on a budget. So, there will be a hole.
 
If you want to purchase the Fusion remote to work with your head unit it will give you the ability to control your stereo when the Garmin is powered off. That way you wouldn’t need to have it on when at anchor or at the dock (That’s what I chose to do)
Is so, then Google “Fusion MS-NRX200 Adapter Plate” and see if that one will work for you.
If you don’t want the Fusion remote then you can always just use a piece of starboard to cover the hole and either put a USB Charger in it https://www.wholesalemarine.com/blu...MIgM60k62-3wIVTUsNCh3aawrqEAQYBCABEgKblfD_BwE
or install a digital battery monitor like one of these https://powerwerx.com/panel-mount-d...MI48_jwK2-3wIVAYnICh1KzA5cEAQYAiABEgLCJvD_BwE
 
Last edited:
I think the easiest way to cover the hole would be to have Boat Outfitters make you a custom circle out of King Starboard, probably in the Artic White color and routered on the outside edge, and screw it in from behind the dash.

If you’re not happy with a visible patch like that, you could fill the hole with epoxy and apply matching gel coat over it. If you’ve never done it before, it’s a great skill for a boat owner to have, and it’s easy to learn. I’ve become pretty good at it just from following advice on this forum.

Finally, I’m not sure how helpful this will be, but attached are photos showing how I modified the dash on my 225WE. The Simrad GO7XSE fits perfectly on that side. To free up that area for it, I eliminated the OEM stereo remote and OEM depth finder, and moved the ignition key switch to the starboard side bulkhead using a custom trim plate I designed and had made by Tecnografic. It was a lot of work, but it was a great upgrade.

HTH and good luck.


12D61E8E-AD42-46FE-BE71-7B65A565F07F.jpeg
64D9E11C-923C-4227-8096-91A18C3A95BF.jpeg
FE889307-5600-44A7-86E3-C3415E945383.jpeg
 
IMG_2098.JPG


IMG_2131.JPG
IMG_0574.JPG
You will get a more factory look with a nice piece of matching plastic. It may be lexan, but an expert could direct you to a source. Our boat has inspection panels by the arch for pulling wires and servicing the compressor for the air horn. The pic in the slings shows the plastic panel installed and the pic in the shop shows the access to the wire chase. A tiny bead of matching white calk makes the cover blend right with no voids, and the appearance is pleasing to the eye.
 
go get a piece of stainless steel plate and get it cut tosize to fit in the hole, then you could mount any kind of switch/switches you wanted.I'm sure a machine shop near you might have a piece laying around and could do it for you. Might also consider a piece of aluminium
 
You could get a burl wood panel that matches the other panels, template it to the dimensions of the entire rectangular area in that section of the dash, then recut the hole for the VHF.
 
You could get a burl wood panel that matches the other panels, template it to the dimensions of the entire rectangular area in that section of the dash, then recut the hole for the VHF.

I was thinking the same thing.
 
I thought you were talking about the dark round spot above the keypad. It looks like a hole in the photo. Is that the original depth finder?
 
I think the easiest way to cover the hole would be to have Boat Outfitters make you a custom circle out of King Starboard, probably in the Artic White color and routered on the outside edge, and screw it in from behind the dash.

If you’re not happy with a visible patch like that, you could fill the hole with epoxy and apply matching gel coat over it. If you’ve never done it before, it’s a great skill for a boat owner to have, and it’s easy to learn. I’ve become pretty good at it just from following advice on this forum.

Finally, I’m not sure how helpful this will be, but attached are photos showing how I modified the dash on my 225WE. The Simrad GO7XSE fits perfectly on that side. To free up that area for it, I eliminated the OEM stereo remote and OEM depth finder, and moved the ignition key switch to the starboard side bulkhead using a custom trim plate I designed and had made by Tecnografic. It was a lot of work, but it was a great upgrade.

HTH and good luck.


View attachment 63468 View attachment 63469 View attachment 63470

Wow!! Nice Job!! I don't think my new Garmin will fit in that location with it's 7" display. I really like that setup though. Really clean.

I 'DO' know how to repair holes and use matching gelcoat. I haven't done one that size, however it isn't a bad idea. Worse case I get a cover. I actually enjoy doing it too! I have, I believe up to 2000 wet/dry sand paper to really make it smooth.

As I mentioned before, because I boat on Lake Superior most of the Summer, and fish by myself, I am looking at installing a Fell Marine remote cutoff switch. I'd hate to be floating in the water alone, while my WE cruises to Canada. So I may put it in the same spot. I would have to epoxy it, gel coat and finish it, then drill it back out to fit the Fell Marine receiver.

Nice to see a fellow 'Weekender'!
 
You could get a burl wood panel that matches the other panels, template it to the dimensions of the entire rectangular area in that section of the dash, then recut the hole for the VHF.
Sometimes my feet go there when the bolster is up. I believe those plastic faux panels would be too weak.
 
I thought you were talking about the dark round spot above the keypad. It looks like a hole in the photo. Is that the original depth finder?
That used to be the older Clarion remote for OEM system that was in there. I found a 1.5" plate and installed 2 button switches that control 2 different sets of lights. A set in the gunnels and a set for the speakers and drink holders.
 
Sometimes my feet go there when the bolster is up. I believe those plastic faux panels would be too weak.

Thanks for the kind words about the modification.

Funny you say that about putting your feet there. My feet always wind up there too.

One of the future projects I would like to do on mine is to move the VHF microphone outlet and the 12V outlet from that flat bottom space to the angled flat space just above it, fill the holes, and put a non skid pattern in the gel coat there that matches the rest of the non skid on the boat.

One of the other ways I thought of doing it would be to have a slotted plate made out of King Starboard that matches the slotted King Starboard plates on the top edges of the side upholstery panels (I assume yours has those too) and mount it in that flat bottom space as a foot rest.

Maybe you could have two matching slotted plates made of King Starboard (which is pretty strong stuff), and install them on both sides of the VHF as foot rests? My feet don’t usually wind up in the middle, more to the sides of center.

I was wondering what the extra outlet was. I thought it may be a USB port. I'm assuming the VHF outlet is on the bottom left?

I like the idea of epoxying & gel coating the hole. I may install the Fell Marine where the current cigarette lighter location is on the right and leave it blank if I can match it well. Then move the cigarette lighter (change it to dual USB) up higher on the helm by the cup holder or by the ignition.

I'm going to re-measure the ignition location. I would love to put my Garmin 73sv there.

I'm a drillaphobe as I think most are in regards to their boats. You can see my subwoofer in the cuddy housed in it's own box. I really don't want to cut out a bunch of hole locations for 'stuff'. I'd feel I'd run into the same issue I'm having now if and when I want to upgrade. Hopefully the next upgrade is a 260 DA or 280 DA

Here's a better photo of what I have going on.

IMG_3481.jpg
 
Maybe you could have two matching slotted plates made of King Starboard (which is pretty strong stuff), and install them on both sides of the VHF as foot rests? My feet don’t usually wind up in the middle, more to the sides of center.

As far as a foot rest, maybe a matching piece or pieces of SeaDek? This way it can be removed.
 
I was wondering what the extra outlet was. I thought it may be a USB port. I'm assuming the VHF outlet is on the bottom left?

Yes, the outlet for the VHF microphone is on the bottom left. The VHF itself is a Standard Horizon PS2000 black box unit mounted inside the dash. I wanted to conserve dash space, which this boat is a bit short on.
 
I'm going to re-measure the ignition location. I would love to put my Garmin 73sv there.

I really like that location for the display unit. I had another one mounted in a bracket up on the dash before. It took me a long time to come up with a way to put it where it is now. I played around with a couple of ideas, including building up that area of the dash with additional fiberglass or some type of mounting plate so I could fit a bigger unit, and then I found the Simrad display which just happened to have the perfect dimensions. If you want to move your Garmin there and it is a bit too large, I think it would still be doable with some fiberglass work or a custom plate made by a CNC vendor.

I don’t know if your upper dash is the same as mine. If so, you might have the issue of how to repair the holes in the upper dash from the old mounting bracket. That area is textured gel coat, and after a long time researching it I realized no one makes a matching pattern to repair it, and no professional gel coat guy would touch it. Eventually I figured out a really simple way to do it. The texture itself is a very thin layer, on top of a normal thickness of gel coat, and it can be sanded off with 600-1000 paper to leave regular smooth gel coat. So I repaired the holes the normal way, then using masking tape to protect the area of the texture I wanted to keep, I sanded the unprotected portion of the texture off to effectively move the border between smooth and texture farther forward on the dash. Problem solved. Even on close inspection you’d never know it was done, and to my eye the position of the textured portion looks as good as, or maybe even better than, the way they did it at the factory.

Also, just to show you, I did the same thing you did with the flooring, just different color “caulk” lines.

Seems like we’ve been doing a lot of similar things to what are essentially the same boats!
 

Attachments

  • 77B2AF72-444F-4CE6-9B32-3C9620C7D820.jpeg
    77B2AF72-444F-4CE6-9B32-3C9620C7D820.jpeg
    162.7 KB · Views: 159

Forum statistics

Threads
113,143
Messages
1,427,150
Members
61,056
Latest member
Rafael Saraiva
Back
Top