utdeja
New Member
Hi All,
This is my first post on here so I hope its informative and helpful for anyone else who might take on a project like this.
I know the 240 is a rather small cruiser, but I am often on the boat by myself and wanted to be able to control the ground tackle as well as the helm at the same time. Also, since the front cleats on the boat are slightly back from the very front when I would tie off the anchor the boat would sit slightly sideways in the wind. So I set out to fix these two issues.
Before I started this project I searched all over the internet trying to find anyone else who had advice or had done something like this before. I came across some articles about other models of boats, but not a '97 240 Sundancer.
I had a few challenges I knew I would have to figure out early on. This boat originally did not have a bow roller, or a nice flat spot on the bow in which to mount one. The boat also did not have much room in front of the anchor locker lid to mount a windlass.
I saw some older boats with wood pulpits on them and newer boats with fiberglass/gel coated pulpits on them. This boat did not really have much other wood on it to speak of, but the colors on the striping, biminis, covers, etc were brown. So I figured if I made this out of wood it could still still look ok on this boat if done correctly.
I knew I was going to have to take off the locker lid and use that space to mount the windlass. I also wanted to make sure that whatever I did to the boat was easily removable and had a way for me to be able to get access to service inside the locker. Since this model sea ray does not have access to the anchor locker from inside the cabin like other boats (some bayliners for example) I needed to be able to service the chain and rode from the top if needed.
So here goes:
1) Here is a before pic of the boat.

2) I needed to install the electrical for the windlass. This was a little tricky as I am pretty meticulous about cleanliness of wiring and connections AND hiding it out of sight. I had to get power from the batteries, which I pulled off the dual battery switch. I installed the circuit breaker just above the battery switch in the compartment back by the transom door. I ran the + and - up to the helm where I installed the contactor/relay. Everything is soldered with heat shrink tubing.


3) I cut a small hole in the cluster panel and mounted the helm up/down control right next to the blower switch so as to keep all the switches together and not have to cut any holes in the fiberglass. This also gave it a semi-factory look. I also wanted to have foot switches to be able to control the windless from the bow, so I needed to build a wire harness for the contactor that would allow me to connect both the helm switch and the bow foot switches.
 View attachment 47391
4) I needed to get the electrical from the helm up to the bow. To do this I choose to run it behind the existing interior trim pieces where some other wiring was already located. It took a little bit of work to get them off without damaging the fabric or backing, but it was worth it. This allowed to to get the wiring up to the bow with minimal effort and without cutting any holes.


5) I needed to figure out how to create a pulpit that would cover the existing lid opening, which was recessed into the boat. I also needed the pulpit to stick out over the bow so I could put the bow roller on it. I solved this by creating two separate pieces and bonding/screwing them together. I built a base out of wood that sits down inside the recessed opening where the old hatch lid sat. I then built my pulpit out of 3 x 1.25" Mahogany pieces jointed and glued together. Once it was setup I planed it down to the 1.18"(ish) overall thickness I wanted to end up with and cut out my rough shape. I bonded the base and pulpit together with screws and more glue. I then routed out around the edges and sanded to give it a nice curve and feel around the entire assembly.
Once I was this far, I test fit it on the boat to make sure I was headed where I wanted to be. Notice in the pics that the assembly sits on top of the nav light? More on that a little bit later, but I knew it would not be good to have something sitting on top of the nav light.


6) Once I knew that it was a good fit, I set out to layout my holes for the Access Hole, Windlass, Foot switches, Bow Roller, and Cleat.


7) Now I set it back up on the boat and measured out and drilled my mounting holes. (That lip was very thick and strong, so it was more than sturdy enough to support this stress and it gave me a clean look. If I ever decided to take this off for whatever reason I would be able to easily fill in those holes would not have a lot of fiberglass work to do. Putting the old hatch lid back on would cover those back up.)


8) Back to that nav light situation. I needed to move the light so it was properly visible once I installed the pulpit AND I wanted to use that spot as another place to support the front of the pulpit. Since this pulpit was a little long from front to back I was a little worried that with only the mounting bolts around hatch hole in back I would get some flex on the front end of it if I got a lot of downward force out where the anchor roller was.
I fabricated a bracket out of 3/16" stainless steel and drilled a 1/2" hole through it. I used a 1/2" x 4" stainless carriage bolt to go down through the pulpit, the bracket and deck. I put a stainless backing plate and lock nut on it from underneath once I did the final installation.
This gave the front end of the pulpit a incredible amount of stability and strength.
You can see the bracket test fit in where the nav light used to be.

9) Now that I had the mechanics of it all figured out it was time to oil the wood. I choose Tung Oil for this step. There are other ways to do it I'm sure, but this worked well for me in the past on other projects. This really brightened up the wood and highlighted the wood grains. It was still fairly wet in the next two pics, so it appears a little more shiny and red than the finished product will be.


10) It was finally time to install the parts onto the pulpit. The bow roller I chose is the easy self launching variety with a hinged section. This allows the anchor to tip forward and come out of the roller once the tension on the chain is taken away. Works wonderful. I also mounted the Lewmar V-700 windlass, up/down foot switches, navigation lights, cleat, and 6" access door on the pulpit.


11) Once I had all the parts mounted I built the electrical harness. Again, I wanted to be able to easily remove this from the boat if needed for servicing, etc so I put quick connects on the electrical. For the windlass power cables I used an ATV winch disconnect. For the foot switches I used Weather Pack connections from amazon.
Bonus: I wanted to be able to see into the anchor locker at night if I need to untangle a knot or something without trying to hold a flashlight and work with my hands at the same time. I put a small, but bright, sealed LED light on the underneath side, just inside the opening so I could pull off the access cover and reach in with my hand and turn on the switch. Nice little feature.
In these pics you can see closer how the base was built that fits into the hatch opening.


12) Time for final installation and testing. It worked EXACTLY as planned.
The chose carriage bolts (1/4" stainless) because I wanted a nice clean look on top.
On the underneath side I made backing plates/strips for the bolts using the 1" wide strips of 3/16"stainless (sorry I don't have pics of these). Doing the final tightening was a little tedious because once the pulpit was sitting on the boat the only access I had to the bottom side of the bolts was through the 6" access hole. I just reached my arm through and was able to get around everywhere I needed. It wasn't too bad.
For the safety lanyard I got a stainless spring hook and a short 3/8" dock line. I clip the hook on the anchor eye and tie the rope off to the cleat while cruising or towing to make sure that if the windlass let go of the chain for some reason the anchor stayed put.


13) Last thing to do is put my fender holders back on and take it to the lake.


That was a long post. Thanks for hangin in there with me. I would love to see your comments on this project, or if you have any questions feel free to ask and I will answer them the best I can.
Happy boating ya'll.
This is my first post on here so I hope its informative and helpful for anyone else who might take on a project like this.
I know the 240 is a rather small cruiser, but I am often on the boat by myself and wanted to be able to control the ground tackle as well as the helm at the same time. Also, since the front cleats on the boat are slightly back from the very front when I would tie off the anchor the boat would sit slightly sideways in the wind. So I set out to fix these two issues.
Before I started this project I searched all over the internet trying to find anyone else who had advice or had done something like this before. I came across some articles about other models of boats, but not a '97 240 Sundancer.
I had a few challenges I knew I would have to figure out early on. This boat originally did not have a bow roller, or a nice flat spot on the bow in which to mount one. The boat also did not have much room in front of the anchor locker lid to mount a windlass.
I saw some older boats with wood pulpits on them and newer boats with fiberglass/gel coated pulpits on them. This boat did not really have much other wood on it to speak of, but the colors on the striping, biminis, covers, etc were brown. So I figured if I made this out of wood it could still still look ok on this boat if done correctly.
I knew I was going to have to take off the locker lid and use that space to mount the windlass. I also wanted to make sure that whatever I did to the boat was easily removable and had a way for me to be able to get access to service inside the locker. Since this model sea ray does not have access to the anchor locker from inside the cabin like other boats (some bayliners for example) I needed to be able to service the chain and rode from the top if needed.
So here goes:
1) Here is a before pic of the boat.
2) I needed to install the electrical for the windlass. This was a little tricky as I am pretty meticulous about cleanliness of wiring and connections AND hiding it out of sight. I had to get power from the batteries, which I pulled off the dual battery switch. I installed the circuit breaker just above the battery switch in the compartment back by the transom door. I ran the + and - up to the helm where I installed the contactor/relay. Everything is soldered with heat shrink tubing.
3) I cut a small hole in the cluster panel and mounted the helm up/down control right next to the blower switch so as to keep all the switches together and not have to cut any holes in the fiberglass. This also gave it a semi-factory look. I also wanted to have foot switches to be able to control the windless from the bow, so I needed to build a wire harness for the contactor that would allow me to connect both the helm switch and the bow foot switches.
View attachment 473914) I needed to get the electrical from the helm up to the bow. To do this I choose to run it behind the existing interior trim pieces where some other wiring was already located. It took a little bit of work to get them off without damaging the fabric or backing, but it was worth it. This allowed to to get the wiring up to the bow with minimal effort and without cutting any holes.
5) I needed to figure out how to create a pulpit that would cover the existing lid opening, which was recessed into the boat. I also needed the pulpit to stick out over the bow so I could put the bow roller on it. I solved this by creating two separate pieces and bonding/screwing them together. I built a base out of wood that sits down inside the recessed opening where the old hatch lid sat. I then built my pulpit out of 3 x 1.25" Mahogany pieces jointed and glued together. Once it was setup I planed it down to the 1.18"(ish) overall thickness I wanted to end up with and cut out my rough shape. I bonded the base and pulpit together with screws and more glue. I then routed out around the edges and sanded to give it a nice curve and feel around the entire assembly.
Once I was this far, I test fit it on the boat to make sure I was headed where I wanted to be. Notice in the pics that the assembly sits on top of the nav light? More on that a little bit later, but I knew it would not be good to have something sitting on top of the nav light.
6) Once I knew that it was a good fit, I set out to layout my holes for the Access Hole, Windlass, Foot switches, Bow Roller, and Cleat.
7) Now I set it back up on the boat and measured out and drilled my mounting holes. (That lip was very thick and strong, so it was more than sturdy enough to support this stress and it gave me a clean look. If I ever decided to take this off for whatever reason I would be able to easily fill in those holes would not have a lot of fiberglass work to do. Putting the old hatch lid back on would cover those back up.)
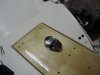
8) Back to that nav light situation. I needed to move the light so it was properly visible once I installed the pulpit AND I wanted to use that spot as another place to support the front of the pulpit. Since this pulpit was a little long from front to back I was a little worried that with only the mounting bolts around hatch hole in back I would get some flex on the front end of it if I got a lot of downward force out where the anchor roller was.
I fabricated a bracket out of 3/16" stainless steel and drilled a 1/2" hole through it. I used a 1/2" x 4" stainless carriage bolt to go down through the pulpit, the bracket and deck. I put a stainless backing plate and lock nut on it from underneath once I did the final installation.
This gave the front end of the pulpit a incredible amount of stability and strength.
You can see the bracket test fit in where the nav light used to be.
9) Now that I had the mechanics of it all figured out it was time to oil the wood. I choose Tung Oil for this step. There are other ways to do it I'm sure, but this worked well for me in the past on other projects. This really brightened up the wood and highlighted the wood grains. It was still fairly wet in the next two pics, so it appears a little more shiny and red than the finished product will be.
10) It was finally time to install the parts onto the pulpit. The bow roller I chose is the easy self launching variety with a hinged section. This allows the anchor to tip forward and come out of the roller once the tension on the chain is taken away. Works wonderful. I also mounted the Lewmar V-700 windlass, up/down foot switches, navigation lights, cleat, and 6" access door on the pulpit.
11) Once I had all the parts mounted I built the electrical harness. Again, I wanted to be able to easily remove this from the boat if needed for servicing, etc so I put quick connects on the electrical. For the windlass power cables I used an ATV winch disconnect. For the foot switches I used Weather Pack connections from amazon.
Bonus: I wanted to be able to see into the anchor locker at night if I need to untangle a knot or something without trying to hold a flashlight and work with my hands at the same time. I put a small, but bright, sealed LED light on the underneath side, just inside the opening so I could pull off the access cover and reach in with my hand and turn on the switch. Nice little feature.
In these pics you can see closer how the base was built that fits into the hatch opening.
12) Time for final installation and testing. It worked EXACTLY as planned.
The chose carriage bolts (1/4" stainless) because I wanted a nice clean look on top.
On the underneath side I made backing plates/strips for the bolts using the 1" wide strips of 3/16"stainless (sorry I don't have pics of these). Doing the final tightening was a little tedious because once the pulpit was sitting on the boat the only access I had to the bottom side of the bolts was through the 6" access hole. I just reached my arm through and was able to get around everywhere I needed. It wasn't too bad.
For the safety lanyard I got a stainless spring hook and a short 3/8" dock line. I clip the hook on the anchor eye and tie the rope off to the cleat while cruising or towing to make sure that if the windlass let go of the chain for some reason the anchor stayed put.
13) Last thing to do is put my fender holders back on and take it to the lake.
That was a long post. Thanks for hangin in there with me. I would love to see your comments on this project, or if you have any questions feel free to ask and I will answer them the best I can.
Happy boating ya'll.
Attachments

Last edited: