Another Classic Sea Ray almost ready to float again

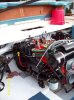
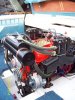
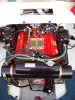
I coated the bilge with professional grade rustoleum semi-gloss white enamel. I scuffed everything then wiped with lacquer thinner to clean it. I decided to go this route after doing some searching on what other folks have done and decided to give it a shot. I put two coats giving 24 hrs between coats and was lucky that the sun is shining this weekend and is "baking" the paint in the bilge. I'm sure there are pros and cons of going this route, as opinions will differ, but for me it will serve my purpose. Quick, easy, inexpensive. If someone goes this route, one tip for enamel is to stir the paint, don't shake enamel, it will put bubbles into the paint.
 
Hi Everyone, been awhile since I've been on board. Its been a long winter and I'm getting ready for spring. The transom repair is fully finished and all new Mercruiser NOS parts where sourced and installed. The engine is finally done and just about ready to be reinstalled. The engine was sourced from the local pick n pull and rebuilt for marine use- forged pistons, roller cam, iron rings, the bottom end was balanced for durability and smooth operation. I had purchased a GLM manifold conversion kit to change from the log manifolds to center riser manifolds. The fellows I work with have talked me into a fresh water cooling system, so I conceded and I am currently waiting fro the kit to be delivered. Hopefully, the engine will be installed and fired up by the end of February. Still quite a bit of work to do, but its getting closer. 000_0002.jpg100_1760.jpg100_1799.jpg100_1800.jpg
 
Awesome! I love the smell of a fresh motor in the morning. haha.
 
:grin:That looks very sweet. This is the first I saw the post but just read it thru. Gives me so much to think about. But it looks great and I'm sure when she's running and dialed in it will flat out smoke it's old self.:grin:

Also from what I am told the center risers will make a world of difference too.:thumbsup::thumbsup:
 
Thanks for the encouragement. Its been quite a learning curve and as was mentioned by the folks here, I have learned quite a lot on this journey. I am looking forward to lighting the gal off and hearing her run. The machinist that did the engine,estimates a conservative 300 HP, so I will need to be cautious with the drive. When its tuned and adjusted properly, I'm hoping it will scoot pretty good across the waves. Once I get the engine dropped in and running, I'll post some more pictures.
 
Today was a good day for the ole Searay. A successful heart transplant- the new engine is installed and waiting to be finished hooked up. I will get some pictures taken and posted with the new engine in place. I do have a question regarding alignment. I searched the old threads and perhaps I missed what I was looking for. When aligning the coupler to the gimbal housing- is it possible to adjust the nuts on the eng isolation mounts up and down with the weight of the engine on the mounts, or do I need to have some of the weight off the mounts? What would be the best course to take?
 
Thanks OldSkool, its been a while coming. The excitement is building the closer I get to putting her in the water. The fun part is just starting- getting all the bits and pieces hooked up and on line and finally firing the engine for the first time. I have some pictures to share showing the eng in place and secured down. I don't have any during the install as I was in the boat guiding the engine in place while my help was running the forklift. As a side note, I did figure out that you can adjust the height of the front of the eng up or down by turning the lower nut on the isolation mount the needed direction to get the gimbal/coupler alignment sorted out.
 

Attachments

  • 100_1821.jpg
    100_1821.jpg
    94.5 KB · Views: 421
  • 100_1822.jpg
    100_1822.jpg
    95.8 KB · Views: 421
  • 100_1823.jpg
    100_1823.jpg
    95.1 KB · Views: 413
Looks Great! Almost makes you want to leave the engine cover off.
 
Thanks guys, funny you mention the engine cover- I may have to modify the one I have now. I made some preliminary measurements and its going to be close to fitting over the engine with all the new additions. You guys got me thinking- a transparent cover of some sort would be pretty cool. Maybe keep the sides covered nice and do some sort of see thru for the top/access cover. Hmmmm -perhaps a wood perimeter frame with a 1/2"-1" thick plexiglass or acrylic cover bonded to it? Something to think about over a few cold adult beverages. There's a bit off an funny story behind the alternator. My folks,(my mom and her husband Tom) being boaters themselves - they have 28ft Chris Craft on the TN river, are aware of the importance of having the proper equipment for safety on the water. When I was talking about putting the eng together with my mom, I heard in the background- "Tell him he better put a marine rated alternator in that damn boat-I don't want to hear about about him blowing his (insert colorful adjectives) all over the Puget Sound because he didn't put the proper marine rated devices on that new engine", (that's Tom's way of saying he cares) so I proceeded to put the proper rated starter and alternator on the engine. I would never hear the end of it if something would happen and for the cost of a few extra dollars, it isn't worth jeopardizing my families or friends safety when we are out enjoying the day on the water.
 
Its been awhile since my last update. Things are coming together, the final bits are being sorted out and I'm getting closer to starting the engine for the first time. I have run into a small snag, which is giving me a bit of difficulty. I hooked up the trim rams and bled the system. The rams ran in and out fine, although the right side was quicker than the left. When running the rams without the drive, the right side would full extend first, then the left side would extend fully. You could hear the pump motor pitch change as one cylinder extended than the other caught up. I installed the drive (maybe a little premature) and ran into another small snag. The drive will tilt up fine using the "up" trim switch and the "trailering" switch and will "load up" when it reaches full travel. When I run the drive down, using the "down" switch, I only get about 3/4 of the way down and then the pump runs freely. With help, I can push the drive all the way down with the pump running with out it "loading up" when then drive reaches full down travel. I put the remote control in the full fwd, neutral and reverse positions thinking it may be related to the reverse lock-out valve which may need adjusting after replacing the drive cable, but no difference was noted in any position. I also jumpered across the trim limit switch to take it out of the electrical loop as it isn't fully adjusted yet either. I'm thinking more bleeding needed or is it possible I have a cylinder issue?
 
May need to adjust the trim limit sensors on the outdrive?
 
Thanks for the suggestion. I bypassed the trim limit switch to operate the trim pump until I got the trim system bled, so at the moment, both the trim position and limit switch are disconnected. I did find one interesting snag and I'm not sure how to proceed. When I run the drive in the down direction, as I was doing prior, I found the starboard side of the gimbal housing and the drive unit hitting so hard, that it is making debris. The starboard cylinder was the one that was not keeping up with the port cylinder. I 'm surmising that the starboard trim cylinder is not producing enough pressure to keep the drive centered by the amount of interference and metal being displaced. The gimbal housing does have the spacers as required and moved freely up and down with and without the drive installed and the trim cylinders connected. Has anyone run into anything similar? thanks for any and all suggestions.
 
After a short absence, I am happy to report today was the day I got the new engine started for the first time. What a good feeling knowing she runs and is getting closer to splashing in the water. The engine sounds GOOD! A little smoke after the first start, but she settled into a nice steady 1500 RPM after adjusting the carb and setting the timing. (its a roller cam engine, so no worries on cam break-in). Temp went to 140 on the muffs and stayed there, oil pressure at 45 psi idle, no leaks, a successful first start. I let the engine run at temp for 10-15 mins, shut her down to check fluid levels-turned the switch to start and she "hits" on the key. Re-adjusted the idle back down to 900 rpm and she purrs. Time to get her in the water and start the initial break in.
 
Finally had the shake down cruise. Happy to report all went well-no water leaks, one small engine leak at the fuel pump pad-(loose fasteners). Made 43MPH (on pitot-not sure how acurate they are)on choppy water, with a high speed miss, so there should be more there after some fine tuning. I was a little apprehensive with the closed water cooling, but the temp went and stayed right at 140 deg and never moved. Oil pressure, alternator charging were all where they should be. One issue I did have was the shift interupt switch definitely needs adjusted- the engine would die if I moved the shift lever too slowly out of gear from forward or from reverse, if I moved it quicker, it would only die coming out of reverse, coming out of forward was fine- perhaps this is normal, must do some more research. I installed Nauticus trim tabs before the first splash and they did make quite a difference in how the boat acted and how it rode. I was able to stay seated while coming up on plane without standing up to see over the bow and the ride was smoother with the choppy water. All in all it was a good first cruise. The family is now looking forward to a fun summer on the water. Happy Boating!
 
Thanks Sloburn, I'll take a peak at the video. It sure was nice to get her back on the water after the long hiatus. As is always the way thngs seem to go, my engine cover doesn't fit as well as it did before I did the mods- the dipstick tube rubs hard against on the inside of the starboard side of the cover and a minor issue is the radiator cap for the heat exchanger pushes the top port drink holder out of its well. guess I get to do a little redesign work on the engine cover!
 

Forum statistics

Threads
113,118
Messages
1,426,534
Members
61,035
Latest member
Lukerney
Back
Top