WWCephas
New Member
I was very unhappy to discover in Mid August that my transom and spars where rotting away on my '88 230 weekender, but I decided to give the boat a major overhaul instead of looking for a replacement because I really like the layout and handling of this old gal.
What started as finding soft wood under the fiberglass in the aft port corner when investigating a leak, has grown to be a major tear down of the entire engine bay. As I cut out the rotten port side platform I found that the rot had extended into the transom. After removing the fiberglass and investigating further I found that while the original rotten plywood on the port side platform was from a leaking scupper drain, the transom was rotted out due to insufficient sealing of the swim step mounting screws on the support rod. I suspected the starboard side would have the same problem, and sure enough it did when I got there. So far, as you can see in the attached pictures, I have removed all the wood in the transom outdrive area (the other wood in the transom all appears good so far). I am going to replace that wood with Coosa composite board and re-fiberglass before continuing on to replace the rest of the wood in the engine bilge. My spars are totally sodden as well thanks to engine mounts that were drilled and installed at an angle, one even punched through the side of the mount block extending into the center of the bilge where water was able to wick into the wood over time.
EDIT: These pictures have been updated with many more photos showing in detail the extent of rot found so that others may have an idea of what they will find if they have rot and to help those intrepid enough to undertake repairing it.

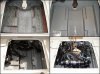
First indication of rot, the trim tab pump (now sitting on upper shelf) pulled loose and took a piece of fiberglass with it, as seen on the vertical wall under the wire bundle.

Cutting into the fiberglass to repair the rot on the L/H shelf I found the transom board badly water damaged.

Uncovering the transom revealed that the two swim step screws were another source of leakage, they were never sealed when installed. The wood all around the screws (barely visible in the pic) was so soft I could scrape the wood off with my fingernails.
The fiberglass on the inside of the boat here was relatively thin and easy to peel off. The outer fiberglass skin is about a 1/4 inch with the gel coat layer.

At this point I had to decide to either scrap the boat or go forward. Obviously I opted for the challenge of the former, not knowing it was going to get much worse. Luckily the other part of the transom wood you can see in the upper right was separated from the trapezoidal shaped area that supported the outdrive and was nice and dry.

Here I have stripped a good portion of the interior skin off and cut out some the 1.5" thick wood transom board. I used a radial saw carefully set to .5" deep and made cross cuts in the wood and then chiseled out between the cuts. I had to be extra careful not to damage the external fiberglass skin. This work was not much fun and a bit nerve wracking. The good part is if you do cut too deep it is fiberglass and can be repaired!

This shows a cross section of the transom board after making the cuts and chiseling. It appears to be made from three 1/2 inch plywood panels sandwiched together as each half inch thick segment split off easiest. You can also see the crosscut saw marks as I worked my way through.

A little farther along, but now it is clear the engine supports are going to need to be removed to get it all. It turns out they were completed saturated and starting to decay as well. At this point you are going to want to put some support structure or jacks under your hull to help keep it from flexing, although it was still surprisingly rigid even when all the spars were cut away.

Engine supports beams cut back, wood removal continues.

Stripping continues, down to bare fiberglass on one side.

All rot removed. The wood boards sandwiched in the rest of the transom were protected by a fiberglass web and remained perfectly dry. (Thank God)

L/H stringers aft, although it appears pretty clean in the light of this photo the wood was soaked through and starting to rot here as well. On the bright side, Sea Ray used a quality foam that did not get water logged.

This picture clearly shows the wood rot just forward of the last picture and how water wicked forward from the transom into the forward engine bay wall, spreading the rot as it went.

Engine forward wall removed and the rot extending into the back of the cockpit. In the bottom right you can see where my saw cut a little too deep into the hull when cutting out the engine supports and forward engine bay wall. Not a big deal though, it did not go too deep and during the rebuild I ground the cut smooth and did a 20-1 patch over the area.

The rot is now limited to the fuel bay board vertical wall on the far right, you can see it is much darker than the outer stringer. This shot gives a good cross section of how the boat is built. Most surprising to me was seeing the outer stringers did not ride on the hull but floated about a 1/2 inch above the hull on a bed of foam. The inner fuel tank wall did ride on the hull but on a bed of fiberglass to spread out the stress to the hull.

This picture shows the fuel bay floor is also soaked thoroughly and starting to rot (where the wood color gets very dark).

One more shot showing how far forward I ended up cutting. Some factory voids in the foam are visible on the left.

Cutting out the L/H cockpit floor to replace the flooring and add new storage space and hatches.
My wife and I did not care at all for carpet flooring in the cockpit.

The forward gray area is the stock storage area, the aft area with all the tools lying loose will be additional storage now that the foam is removed. The sidewall carpet was also removed at a later date and replaces with a TuffCoat finish.

Cutting the lower floor decking out to access the stringers to splice them to the repaired sub structure later.
Later posts will show the rebuild of these areas.
What started as finding soft wood under the fiberglass in the aft port corner when investigating a leak, has grown to be a major tear down of the entire engine bay. As I cut out the rotten port side platform I found that the rot had extended into the transom. After removing the fiberglass and investigating further I found that while the original rotten plywood on the port side platform was from a leaking scupper drain, the transom was rotted out due to insufficient sealing of the swim step mounting screws on the support rod. I suspected the starboard side would have the same problem, and sure enough it did when I got there. So far, as you can see in the attached pictures, I have removed all the wood in the transom outdrive area (the other wood in the transom all appears good so far). I am going to replace that wood with Coosa composite board and re-fiberglass before continuing on to replace the rest of the wood in the engine bilge. My spars are totally sodden as well thanks to engine mounts that were drilled and installed at an angle, one even punched through the side of the mount block extending into the center of the bilge where water was able to wick into the wood over time.
EDIT: These pictures have been updated with many more photos showing in detail the extent of rot found so that others may have an idea of what they will find if they have rot and to help those intrepid enough to undertake repairing it.
First indication of rot, the trim tab pump (now sitting on upper shelf) pulled loose and took a piece of fiberglass with it, as seen on the vertical wall under the wire bundle.
Cutting into the fiberglass to repair the rot on the L/H shelf I found the transom board badly water damaged.
Uncovering the transom revealed that the two swim step screws were another source of leakage, they were never sealed when installed. The wood all around the screws (barely visible in the pic) was so soft I could scrape the wood off with my fingernails.
The fiberglass on the inside of the boat here was relatively thin and easy to peel off. The outer fiberglass skin is about a 1/4 inch with the gel coat layer.
At this point I had to decide to either scrap the boat or go forward. Obviously I opted for the challenge of the former, not knowing it was going to get much worse. Luckily the other part of the transom wood you can see in the upper right was separated from the trapezoidal shaped area that supported the outdrive and was nice and dry.
Here I have stripped a good portion of the interior skin off and cut out some the 1.5" thick wood transom board. I used a radial saw carefully set to .5" deep and made cross cuts in the wood and then chiseled out between the cuts. I had to be extra careful not to damage the external fiberglass skin. This work was not much fun and a bit nerve wracking. The good part is if you do cut too deep it is fiberglass and can be repaired!
This shows a cross section of the transom board after making the cuts and chiseling. It appears to be made from three 1/2 inch plywood panels sandwiched together as each half inch thick segment split off easiest. You can also see the crosscut saw marks as I worked my way through.
A little farther along, but now it is clear the engine supports are going to need to be removed to get it all. It turns out they were completed saturated and starting to decay as well. At this point you are going to want to put some support structure or jacks under your hull to help keep it from flexing, although it was still surprisingly rigid even when all the spars were cut away.
Engine supports beams cut back, wood removal continues.
Stripping continues, down to bare fiberglass on one side.
All rot removed. The wood boards sandwiched in the rest of the transom were protected by a fiberglass web and remained perfectly dry. (Thank God)
L/H stringers aft, although it appears pretty clean in the light of this photo the wood was soaked through and starting to rot here as well. On the bright side, Sea Ray used a quality foam that did not get water logged.
This picture clearly shows the wood rot just forward of the last picture and how water wicked forward from the transom into the forward engine bay wall, spreading the rot as it went.
Engine forward wall removed and the rot extending into the back of the cockpit. In the bottom right you can see where my saw cut a little too deep into the hull when cutting out the engine supports and forward engine bay wall. Not a big deal though, it did not go too deep and during the rebuild I ground the cut smooth and did a 20-1 patch over the area.
The rot is now limited to the fuel bay board vertical wall on the far right, you can see it is much darker than the outer stringer. This shot gives a good cross section of how the boat is built. Most surprising to me was seeing the outer stringers did not ride on the hull but floated about a 1/2 inch above the hull on a bed of foam. The inner fuel tank wall did ride on the hull but on a bed of fiberglass to spread out the stress to the hull.
This picture shows the fuel bay floor is also soaked thoroughly and starting to rot (where the wood color gets very dark).
One more shot showing how far forward I ended up cutting. Some factory voids in the foam are visible on the left.
Cutting out the L/H cockpit floor to replace the flooring and add new storage space and hatches.
My wife and I did not care at all for carpet flooring in the cockpit.
The forward gray area is the stock storage area, the aft area with all the tools lying loose will be additional storage now that the foam is removed. The sidewall carpet was also removed at a later date and replaces with a TuffCoat finish.
Cutting the lower floor decking out to access the stringers to splice them to the repaired sub structure later.
Later posts will show the rebuild of these areas.
Last edited: