Jaybeaux
Well-Known Member
- Jan 3, 2016
- 2,046
- Boat Info
- 2006 Sea Ray 48
Naught On Call
- Engines
- Cummins QSC-540s with V-Drives
11 KW Onan Genset
No, just on the bulkheadThanks for that info. In the 14x 14 grey box in front of the starboard?
Follow along with the video below to see how to install our site as a web app on your home screen.

Note: This feature currently requires accessing the site using the built-in Safari browser.

No, just on the bulkheadThanks for that info. In the 14x 14 grey box in front of the starboard?
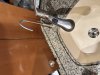
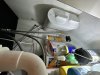
Nice jobMark, Yes we replaced the flooring in those areas. The dinette portion comes out as one pc, may have some silicone holding it in place & also bolts & screws at base of table leg. Dinette step silicone only. Galley is all on one pc of plywood with a few screws coming up from holds underneath, if I remember correctly I had to break the floor into pcs to get it out of that area. View attachment 142485View attachment 142486
Very nice job , that took some time.what did you use for the edges to hide end grain ?Mark, Yes we replaced the flooring in those areas. The dinette portion comes out as one pc, may have some silicone holding it in place & also bolts & screws at base of table leg. Dinette step silicone only. Galley is all on one pc of plywood with a few screws coming up from holds underneath, if I remember correctly I had to break the floor into pcs to get it out of that area. View attachment 142485View attachment 142486
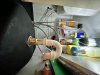
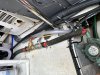
Looking to install a filter on the fresh water system. Curious on others setup. My thought is to install a single cartridge filter right near the water manifold. This would filter shore hookup and water from the freshwater tank.
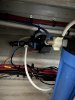
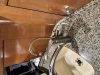
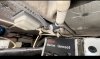
Similar location. But with my accumulator tank I have no room there. Can’t tell your plumbing from the pic though.Mine is near the water pump under the stairs. I suspect it was a SR factory fit (I’ve attached an old pic). Is your pump under the stairs or mid galley hatch?
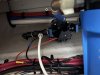
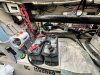
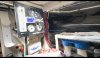
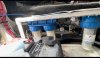
I have the same blue filter housing as shown on the right side of these pictures. It is mounted on a vertical support on the left side under the stairs, as in these pics. It is a factory install, on the outlet side of the pump, before the manifold.Mine is near the water pump under the stairs. I suspect it was a SR factory fit (I’ve attached an old pic). Is your pump under the stairs or mid galley hatch?
I have the same blue filter housing as shown on the right side of these pictures. It is mounted on a vertical support on the left side under the stairs, as in these pics. It is a factory install, on the outlet side of the pump, before the manifold.
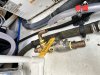
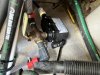
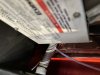
I also have a coarse inline filter on the pump inlet. Here is a picture of it from when I replaced the pump a few years ago. Note the high-tech method to prevent water from continuing to leak out!
View attachment 142628
AEO, I'm curious about the white tubing. Is that from a watermaker?
From the factory, the 44DB had three pairs of GRP31 batteries. A bank of 2 wired in parallel (12V) for starting the port engine, starting the generator, and for house loads. This is called the port battery. Another bank of 2 wired in parallel (12V) for starting the starboard engine, helm electronics, and a few other miscellaneous low amperage loads. This is called the starboard battery. Both the port and starboard pairs were located on the port side of the boat. The third pair is a bank of 2 wired in series (24V) for the thruster(s), located as you describe on the starboard side.Questions about house battery.
I've done the search but still need some help and clarification. My 2008 DB44 has 4D West Marine AGM batteries x 4 on the portside, and gp 31 lead acid x 2 for the thrusters on starboard. The 4D's are over 5 years old and need to be replaced. The boat is docked at our house and constantly connected to the 50 amp charger. We do day trips 99% of the time. We may anchor out 1 or 2 nights a year. Do I really need so many of these heavy and expensive 4D's? Are we safe to replace them with 4 gp 31's or 2 4D's? I wish I could replace them with the lighter Li battery but don't think I know enough about chargers and alterators for Li.
Wait until you have to remove port side after cooler and fuel cooler for maintenance.I could use a little help. I searched but that does not "help".
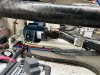
Replacing engine zincs. Any tips for the Port engine port side? I got the larger upper ones but cannot reach the lowers.
I still text with Mark, the previous owner, and vicariously keep him in the loop. He said lay across the stringer and the prop shaft, with a pillow, and you can reach the rear one. The front one you just have to reach. I tried and could not.
Maybe I should take some Alice in Wonderland pills and make me smaller.
Thanks!!