2000 310 Dancer- 'Scout'

James T Kirk

Member
Nov 3, 2020
73
Moab UT
Boat Info
2000 310 Sundancer
Engines
350 MPI V drive
searaywahweep.jpg


Hello all and thank you for such a great forum!

I'm creating this thread to document the maintenance I'll be doing on my recently purchased (December 2020) 2000 310DA, 350 MAG MPI V-Drive. I'm no experienced marine mechanic, but I'm fairly handy and will do as much work myself as possible. I'd also like to shed a bright light on the epic boating we have here on Lake Powell in UT/AZ. The boat came with a slip at Wahweep Marina just outside Page AZ.

searaycastle.jpg


I'll be posting about my repairs, asking questions, providing links to other threads I used to fix stuff and links to parts, manuals, manufacturers ect. ect.

I'm the third owner. The previous owner had her for only 5 months. It seems the original owner had paid for all of the maintenance, upgrades and repairs performed on her and he has done a great job! I was so relieved to find a 'new owner' Sea Ray issued soft briefcase full of repair receipts and user manuals for all of the equipment onboard. I've just gone through 20 years of maintenance records and many of my questions have been answered. She was purchased October 2000 at Marine Max in Tempe Arizona and has spent her whole life in fresh water here in the great desert SW of America!

It seems that the previous owner ran her hard and put her away wet! In the last two years, the maintenance receipts have dropped off. I think I'm catching this slide in upkeep just in time and I hope I'll do as well as the original owner did in keeping her in top shape. But this is a 20 year old boat and I'm going to have my work cut out for me!

Next up: My first projects! AC converter/cabin door track/depth gauge....Kirk Out

searayrecords.jpg


P.S.- It was this thread that inspired me to start my own:
http://clubsearay.com/index.php?threads/sea-ray-sss-1993-63-ft.40951/
 
searaypromatic.jpg


searaypromatic2.jpg


After closing the purchase, the first thing we did was spend a couple nights on the boat in the slip and head out on day trips a few miles here and there. I assumed since I was on shore power I could crank on all DC circuits with no drain to the batteries. Well, I had to utilize the emergency start switch the next morning to get the starboard engine started.

It's hard to make out the color in this picture of the Promatic, but the red light is on and there is maybe 2 amps on the gauge. Voltage on the DC panel read 12 volts, or less if something was turned on. When the engines are running, I had 14 volts showing on the volt gauges at the helm. The AC converter was not charging the battery banks but the alternators were. (I could have deduced this by using a a voltmeter at the battery terminals but the unit I just bought to keep on the boat got lost at a Page AZ laundromat...!)

searaybatterybank.jpg


Promatic 30-3 manual: https://j109.org/docs/promatic30-3manual.pdf

First thing I checked were the inline fuses on the positive leads to the batteries. All good. I tried some troubleshooting of the old Promatic and called customer service. They didn't want to help much and suggested to replace it with a new version, the 1230P. I disconnected/reconnected the negative on the unit to reset it. I opened it up and poked around and I could have checked the reverse polarity fuse within the unit, but it was just too much of a PIA to get to it. A new unit is around $500 and I was about to shell out some boat bucks, but I found a used one on Ebay! $249.95. Thanks Parker Marine, it works!

https://www.ebay.com/str/parkermarineinc

1230P manual: https://www.promariner.com/en/~/media/inriver/365007-38504.pdf

searaypronautic.jpg


The unit installed easily with the same array of electrical connections as the old. I just had to be sure to set the charge rate for AGM batteries. All kinds of lights and digital readouts, wish they could have shown up better in the photo. All good! Batteries charging and DC power supplied by the 1230P while on shore power!

searaydcpanel.jpg


searaypronautic2.jpg
 
Last edited:
very nice, you picked a good charger. I had the 1230p in my 290 and just put a 1240p in our 410.

I'm actually wondering if that old charger was even capable of charging AGM? Some folks with more DC knowledge will chime in but that may have been your problem. Putting that charger on those 3 blue tops is a very good move, those are some pricey batteries so you want to treat them right.

good luck with her
 
And now, the cabin door.

I wanted to fix this first, but power is more important. There's a million threads about this issue and I read a lot of them. Man! what a bunch of horror stories! Then I realized many models have the door sliding beneath the helm which is, indeed, very difficult to deal with.

searaydoor.jpg


The door configuration on this Sea Ray model couldn't be any easier to repair. 4 screws and the port cover is off, exposing both halves of the door and the tracks. The most difficult portion of the repair was deciding how much track to order. It's sold by the inch and I wasn't around the boat when I ordered it. I bought 5 feet from Boat Outfitters in Florida and I only needed 4. Actually, less than 4'. I'll update this post with the exact length when I get back to the boat. Also, I should have gotten the black track. As with everything that's shipped from Florida, it took forever. I lost a couple days of boating waiting for it. But they were really nice folks at Boat Outfitters. I'll do business with them again. $85 plus shipping.
https://www.boatoutfitters.com/boat-sliding-door-white-upper-track

searaydoor2.jpg

searaydoor3.jpg


Once the cover is off, you remove a million screws holding down the track and remove the screws on top of the door holding the trucks. Then take trucks/track off of the door. At this point, you're left with a broken track and probably broken trucks...

searaydoor5.jpg


Trucks were also busted up in the lower track, but the lower track was OK. The new track has no holes in it, you have to use the old track as a template to drill holes in the new track. Fortunately, there is a groove in the center of the track to assist in getting the holes centered. Base to base? One on top of the other? I went with one on top of the other.

searaydoor4.jpg


I was very pleased to find a bag full of trucks/wheels in a junk drawer under the stairs in the cabin. Hats off again to the 1st owner! Woo Hoo!

searaydoor6.jpg


searaydoor8.jpg


Put it all back together. I had trouble with the old screws. A few screw heads broke off, leaving a protruding shaft into the track. Luckily, there was enough clearance for the trucks to roll over them. No doubt, I'll obsess over it and tear everything apart in the future, use vice grips to remove the broken screws and put the new ones in.

Voila! But I still have to wrestle with the doors a little. The upper door drags on the track. I read in a thread somewhere that you can slide washers onto the screws in between the door and the truck, effectively raising the door off of the track. I'll try that when I decide to rip everything apart again. Still, a major improvement. All I had to do is buy a new track...

searaydoor7.jpg
 
And finally, the last project during this session, The Raytheon Raydata head unit!

searaytridata.jpg


(not my actual unit, but this photo will do for now...)
searaytridata2.jpg


Obviously, I have some issues with the antiquated Y2K equipment. I read somewhere that the Raymarine ST60 is a drop in replacement for the old Raydata. I searched a few sites like this one: https://maxmarineelectronics.com/?s=st60+&post_type=product But everything was a little spendy for a used gauge. So, Ebay to the rescue once again!

Found this seller who has replacement LCD screens, but you have to tear into the unit to replace the screen. Difficult.
https://www.ebay.com/usr/skibum187

Then I came across this seller who had a ST60 for an affordable price: https://www.ebay.com/itm/RAYTHEON-ST-60-TRIDATA-DISPLAY-AUTOHELM-SERIES-2050SH/353305873420?ssPageName=STRK:MEBIDX:IT&_trksid=p2057872.m2749.l2649

https://www.ebay.com/usr/sailors_exchange?_trksid=p2047675.l2559

$69.95! Woo Hoo! But it comes with a caveat, "As-Is, for parts only". So I contacted Sailors Exchange and asked if they had tested the unit. The reply was that they had never connected it to power to test it. There was a 30 day return period so I figured, what the hell I'll go for it.

I opened up the fuse cabinet (what is this called again?) under the helm and there was pretty good access to the backside of the instruments. I removed the old Raydata and compared the two units.

searaytridata3.jpg


Overall, it's very similar. You can see the mounting is different, 2 instead of 4 threaded shafts. No NMEA in. But the biggest difference I didn't notice, until I tried to insert it into the dash, was that the circular protrusion is larger on the newer unit. So the hole in the dash is too small! The overall rectangular size of the gauge is very similar to the old unit.

searaytridata6.jpg


I could have used a jigsaw, or a rotary tool, or a hole saw but I didn't have them with me. All I had was a snap-off utility knife, UGH! The dash is plastic, so I could slice slivers off of the hole and enlarge it. I could have heated up the blade and made life easier but I didn't. So I spent at least 30 minutes enlarging the hole big enough to barely fit it in.

searaytridata4.jpg


searaytridata5.jpg


The plastic panel on the dash is mounted onto thicker plywood (?) which forms the helm. Once the whole was enlarged, there was barely enough space to fit the larger circular protrusion without it running into the edge of the plywood. It was almost impossible to screw the nuts on to mount the unit. Actually, I could only thread one on, but the fit was tight and it seems to sit OK.

Once I fired it up, it worked! Depth displayed well and seemed accurate enough. Speed and temperature did not work. I reset it to factory defaults. I swam under the boat in 55* water and brushed off the transducer. I tried to calibrate it, but the process is so complicated I have yet to get it to work. If there is anyone reading this that is familiar with calibrating these gauges, I'm all ears! When I get back to the boat, I'll recheck the connection of the 5 wires for the speed transducer. I might reconnect the old unit and see if speed works. I believe it did. It was hard to read but I thought I saw speed displayed on my first outing after purchase. I need to deal with some issues first with the ancient Raytheon NAV398 GPS and then see if I can get it to send SOG via Seatalk. I wrapped the ends of the NMEA connectors with black tape. What are their purpose?

Being a measly puddle water boater, depth is very important to me, as I beach the bow at various locations to camp. So, I'm happy. Alas, I didn't get any shots of the new ST60 in place and functioning. I'll update this post when I'm back at the boat.....to be continued.
 
NMEA%202000.GIF

NMEA 2000® Interface Standard

Standard for Serial-Data Networking of Marine Electronic Devices

The NMEA 2000® standard contains the requirements of a serial data communications network to inter-connect marine electronic equipment on vessels. The standard describes a low-cost moderate capacity bi-directional, multi-transmitter/multi-receiver instrument network to interconnect marine electronic devices. It is multi-master and self configuring, and there is no central network controller. Equipment designed to this standard will have the ability to share data, including commands and status with other compatible equipment over a single channel. It is based on CAN (Controller Area Network). All NMEA 2000® products must be certified by NMEA. Although this standard is 50 times faster than NMEA 0183, it is not intended to support high-bandwidth applications such as video. NMEA 2000® represents the cumulative efforts of the NMEA 2000® Standards Committee, a committee of multi-national industry and government subject matter experts and professionals who have contributed time and expertise to the development this standard. IEC 61162-3 references NMEA 2000®. NMEA 2000® is a registered Trademark of the National Marine Electronics Association.

If NMEA is there for interconnecting equipment, why is there SeaTalk?
 
NMEA%202000.GIF

NMEA 2000® Interface Standard

Sea Talk was Raytheon/Raymarine communication to link different components together. Like Radar/Chartplotter/Auto Pilot
Nema 2000 is the protocol today.
Standard for Serial-Data Networking of Marine Electronic Devices

The NMEA 2000® standard contains the requirements of a serial data communications network to inter-connect marine electronic equipment on vessels. The standard describes a low-cost moderate capacity bi-directional, multi-transmitter/multi-receiver instrument network to interconnect marine electronic devices. It is multi-master and self configuring, and there is no central network controller. Equipment designed to this standard will have the ability to share data, including commands and status with other compatible equipment over a single channel. It is based on CAN (Controller Area Network). All NMEA 2000® products must be certified by NMEA. Although this standard is 50 times faster than NMEA 0183, it is not intended to support high-bandwidth applications such as video. NMEA 2000® represents the cumulative efforts of the NMEA 2000® Standards Committee, a committee of multi-national industry and government subject matter experts and professionals who have contributed time and expertise to the development this standard. IEC 61162-3 references NMEA 2000®. NMEA 2000® is a registered Trademark of the National Marine Electronics Association.

If NMEA is there for interconnecting equipment, why is there SeaTalk?
 
OK! After that repair session at the marina it's time for a shakedown multiple overnighter with Wife and Dog!

searaycastle3.jpg


searaycastle2.jpg


searaycastle4.jpg

searaywahweep2.jpg


Shakedown discoveries:
Speed calibration failed, no speed readout on ST60
Port RPM gauge, fluctuates +/- 300rpm
Spotlight motor only works in one direction
Windlass finger spring weak

searayscout.jpg


Happy Dog, here's the real Scout!
 
NMEA 2000® Interface Standard

Standard for Serial-Data Networking of Marine Electronic Devices

If NMEA is there for interconnecting equipment, why is there SeaTalk?
Its because the old ones are NMEA 0183, not NMEA 2000. SeaTalk was Raymarine's improvement on NMEA 0183 interdevice communication.
 
The speed on the ST60 is based on a wheel based transducer that is known to fail.
 
That fluctuating tach can likely be fixed by some vigorous exercising of the rotary switches on the back. Just make sure to set them back to their original position.

Also search on here for windlass finger. There's a guy on here that sells reproduction fingers. Either that or just go with all chain like many of us have. Then the finger is superfluous.
 
That fluctuating tach can likely be fixed by some vigorous exercising of the rotary switches on the back. Just make sure to set them back to their original position.
...

Yea, I had a few good reads about this subject after a search here on the site. I pulled the panel and I'm confused on what the rotary knobs look like........

searayporttach.jpg


You mean this knob looking thing that happens to be backed up against the blue wire connector? I would have to swivel those out of the way to move it..........
searayporttach2.jpg
 
Last edited:
Yeah, those are the lights. Look at the hole around "Cal". you need a small flat-head screwdriver to rotate the tiny knob in that hole.
 
Last edited:
Yeah, those are the lights. Look at the hole around "Cal". you need a small flat-head screwdriver to rotate the tiny knob in that hole.

searayporttach3.jpg


Copy, this one? Thanks! I'm on that project when I get back to her....I also have to troubleshoot the non-functioning gauge lights.
 
Yep that's it. While you're on the gage lights consider upgrading to a nice LED with the color of your choice. This may seem silly, but check that your dimmer dial is turned counter-clockwise. It took me a while to figure out that the dim function brightens the lights in CCW direction, at least on my boat. (backwards from what we mere mortals expect)

These are the ones I used;
https://www.superbrightleds.com/mor...-miniature-wedge-retrofit-95-lumens/3305/921/

https://www.superbrightleds.com/mor...1-t3-14-twist-lock-wedge-base-socket/704/962/
 
Last edited:
Been busy busy busy during the last two week stay we had at the boat. How lucky I was to have the time to spend half of February on the boat! Bunch of small stuff and one big item was completed....and of course some great times had out spending multiple days at some great beaches!

First up was replacing the annoying shore power indicator light that was flickering and barely visible. The analog voltage gauge is acting up too, you have to flick it with your finger to get an accurate reading. Once you open the 120v panel you have to cut the old one out and install the new light with spades...$6 from Flounder Pounder:
https://www.searay-parts.com/Panel-indicator-lights-p/light rect green 125vtabs.htm
searaypowerlight1.jpg


searaypowerlight2.jpg


Then there was the broken windlass control cover up at the bow. $19 from flounder pounder, fits perfect...
https://www.searay-parts.com/SPA-10...-for-Windlass-p/spa-10505wfootswitchcover.htm
searaywindlass1.jpg

searaywindlass2.jpg


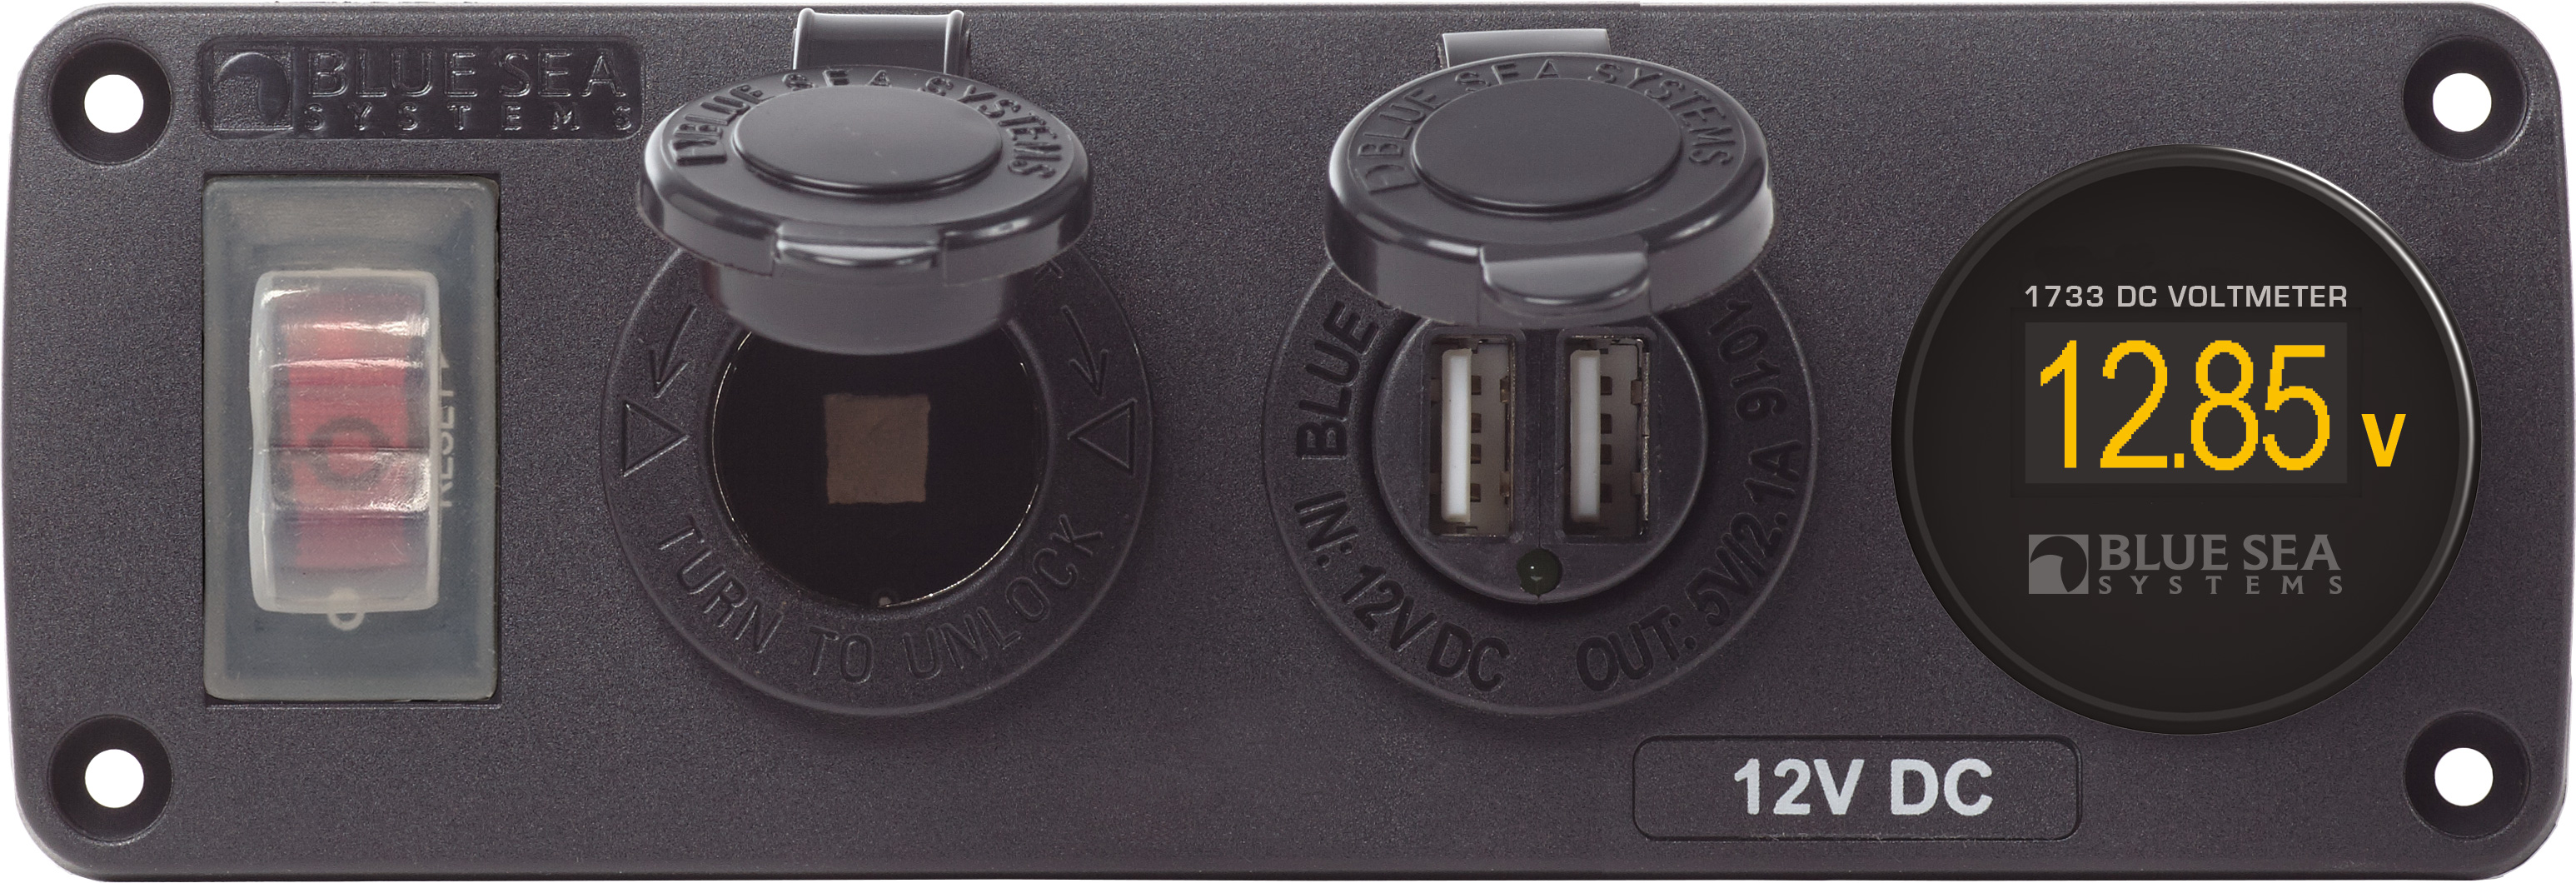
I finally started improving on the charging stations for all the gadgets we have now. I guess USB ports weren't a thing back in 1999 when this boat was built. This is the first of 3 power stations I'm going to install, 2 in the cabin, 1 at the helm. I was kinda rushed getting out of town for the trip and I couldn't find a blank metal switch panel with a 90* flange. So I just grabbed this trailer light mount from the car parts store and fitted some wood paneling on it to accommodate the charging bank I picked up on Amazon. I think this will be a temporary rig until I find something nicer to mount it on. Although, it's quite beefy. The charging bank was a cheapie, but gets the job done and I have the added bonus of tracking the voltage on the house bank at a glance. $27 from Amazon. Trailer light mount $9:
https://smile.amazon.com/gp/product/B07H93ZRM4/ref=ppx_yo_dt_b_asin_title_o04_s02?ie=UTF8&psc=1
searayusb1.jpg


searayusb2.jpg


I tapped into the power at the accessory switch on the 12v panel, that way I can piggy back on the protected circuit for the cigarette lighter most inconveniently installed near the aft berth. I found a ground bar back behind the panel that I could add to, drilled a hole in the bottom of the cabinet to run the wires next the the defunct rope lighting recessed below the cabinets. (that rope lighting is the next project...)
searayusb4.jpg

searayusb5.jpg

searayusb3.jpg


Then, the biggest project we finished was the new flooring from Corinthian Marine!! So happy with the outcome and I picked up the 15% discount for CSR members. Saved me $127. Solstice Sandbar aquaweave with the hydrofelt backing. They had a template for a 2001 Sundancer that fit good but, if I were to do it again, I would create my own template. I had to really stretch the large piece that goes from the transom door to the cabin door. Much stress on the snaps. They were nice enough to loan us a snap tool to get a better result when installing the snap rings. Definitely have a tool.
Total w/shipping $817.50. https://corinthianmarine.com/aquamat/
searayaquaweave.jpg


searayaquaweave2.jpg


From this:
searayaquaweave4.jpg


To This:
searayaquaweave3.jpg


Next trip it's time for that oil change!
Get a mechanic on the boat to replace impellors and Genny tune up.
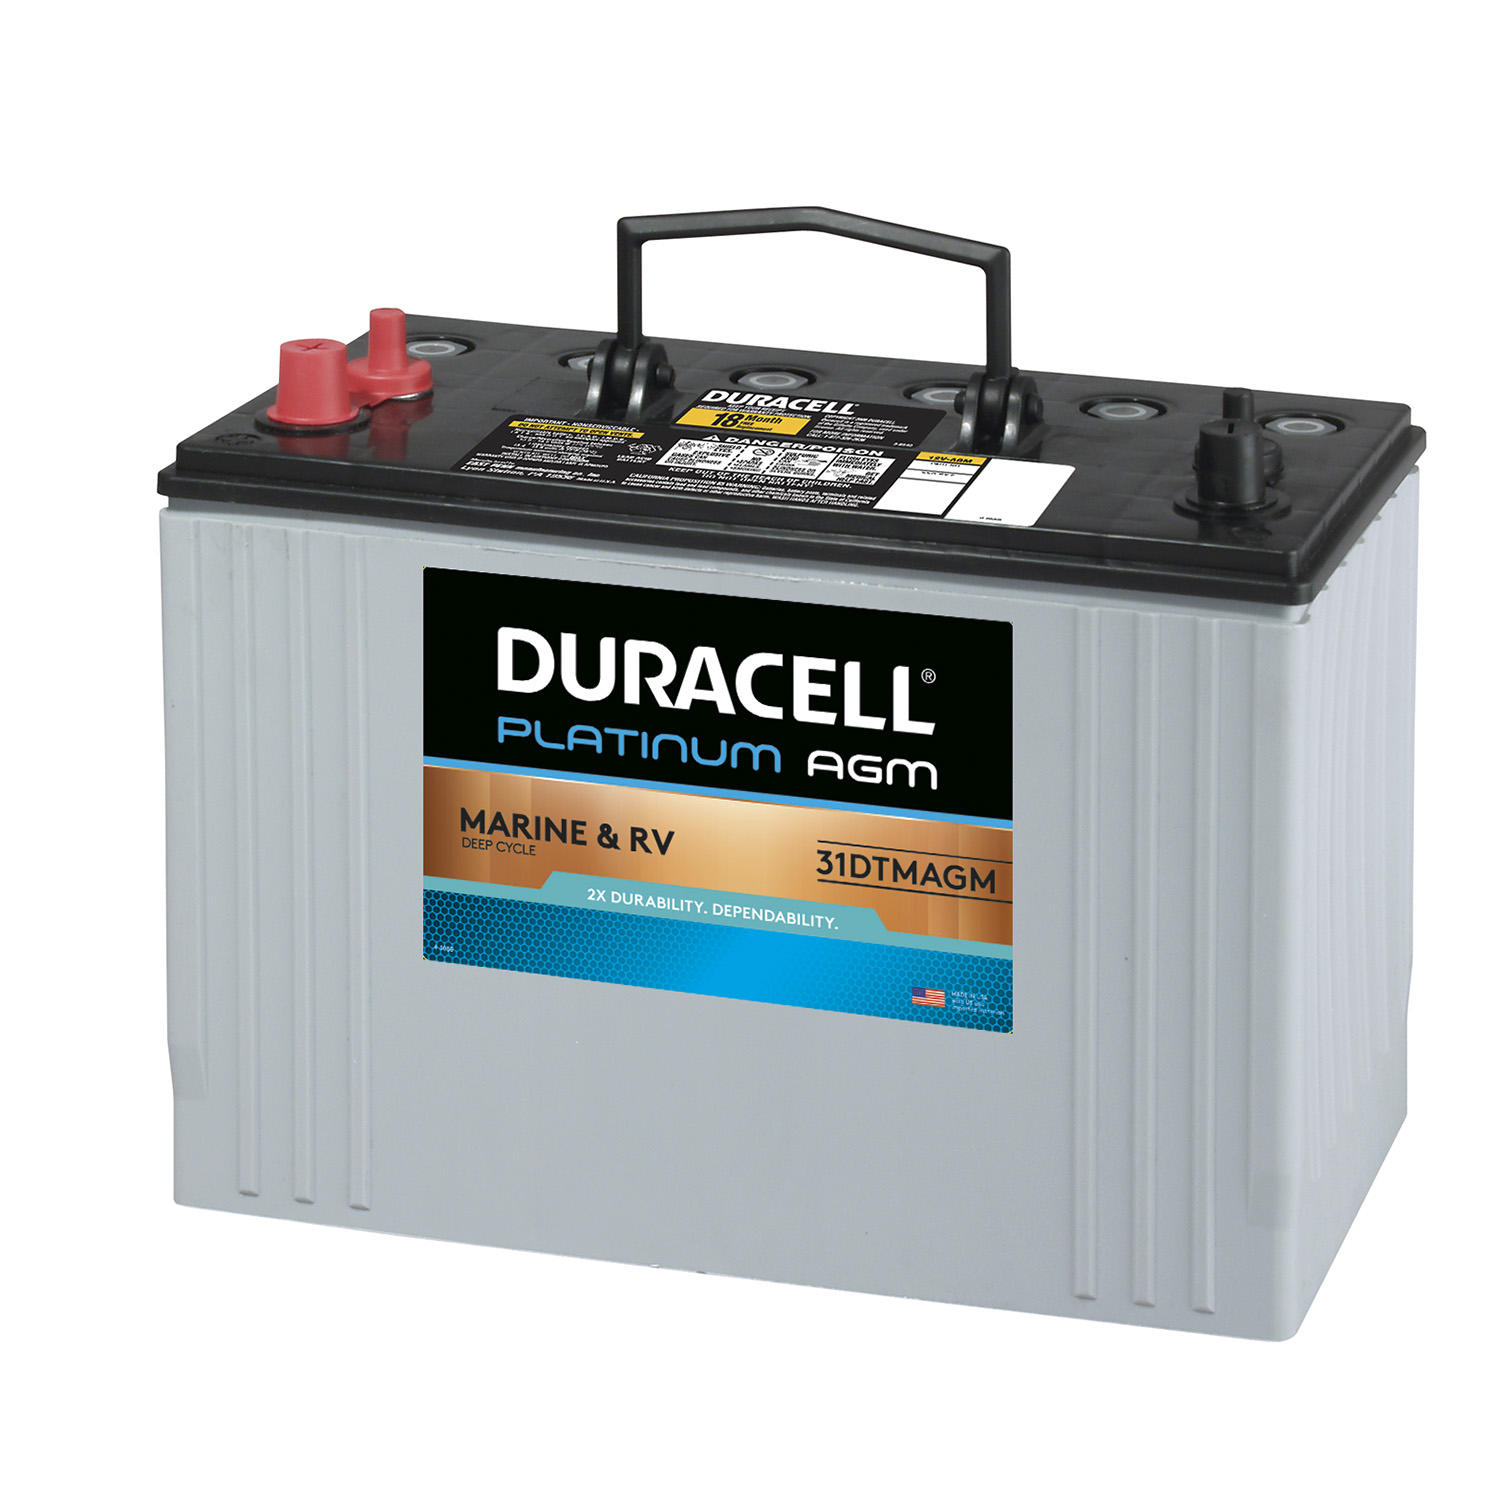
Replace all 3 batteries with group 31 Duracells!
More USB charging stations.
and and and....
0008399630001_A

4366.jpg
 
This battery is no longer available at Sam's Club in the Utah and Colorado area. There's been a lot of recommendations to get it at $179. Out of stock and no update on restocking. Can't find it at a Sam's Club within a 7 hour driving distance from my home.

0008399630001_A

I've been searching at local resources like Napa, Auto Zone, Walmart, Sam's Club and not so local, Amazon. Napa, Auto Zone and Walmart are near my boat and make returning the core easy.

Napa has a group 27 AGM rated at 92 amp hours in stock. $259
Sam's Club has the group 27 version of the above pictured battery. 92 amp hours. $158
Auto zone has the Optima Bluetop D34M group 34(currently own and replacing), 55 amp hours. $289
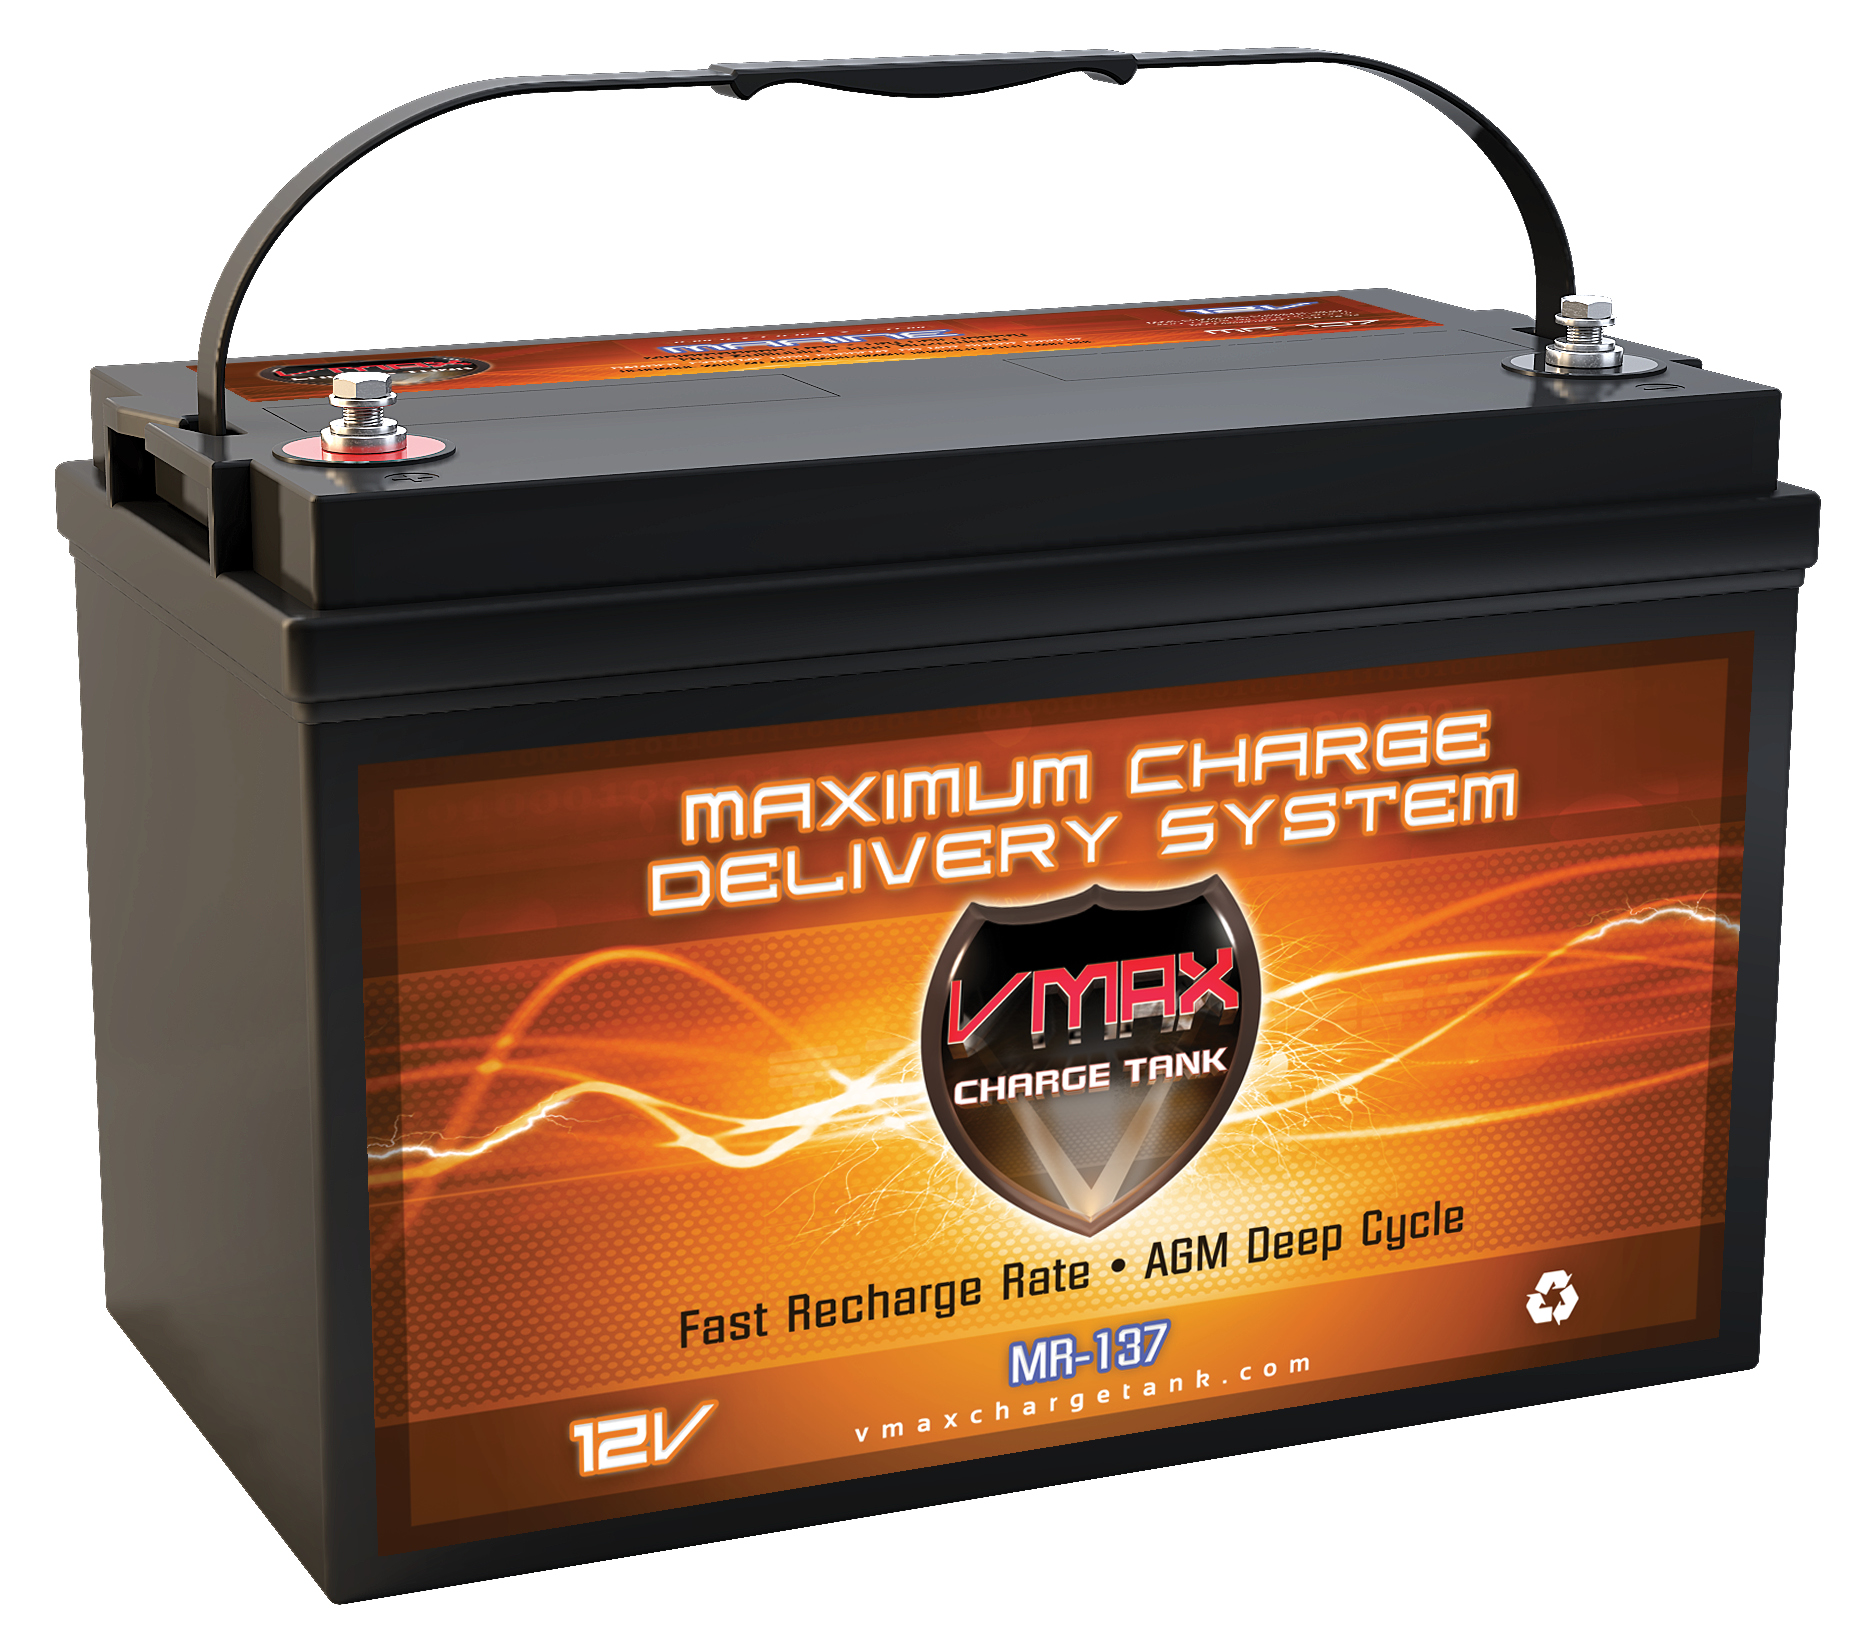
Walmart has the VMAX MR-137 group 31 AGM, pick up not available shipped only. 120 amp hours. $280
Amazon has the same battery as Walmart. $289

906cb7f9-3fa9-47b4-b87e-749a5c6ee0e6_1.48b6a65d795af9eca1004c8e22aca747.jpeg


I need my house bank to last as long as possible. I spend multiple days at a time out at various beaches and would like to run the genny as little as possible. In the future I'll be looking at solar charging systems to help with that goal.

The Optima's were installed in 2014 and are ready to be replaced. After running the genny for an hour during dinner, if I run nothing other than the fridge and some cabin lights and charge some phones overnight, the house bank dips below 11v when we wake up in the morning. I'm really over having power issues. I need to check how many amps that ancient fridge is drawing. Seems like the compressor is turning on and off all the time...
 
Last edited:
The old Y2K era audio system works. Noting like what you get today, but at this point I'd rather be putting my money into maintaining systems critical to the boat's performance.

A 6 disk CD changer! Cassette tape player!

I have a CD player cleaning disk, I rescued it from the dusty depths of junk I have stashed away and put it in use to improve playback.

I found a device that that allows me to connect via Bluetooth through the cassette player!

I'm going to make this ancient audio system work for me just a while longer! And, it's nice to use the remote control at the helm to control the system.

I have a ton of CD's that are just collecting dust that I'll bring back to life....winner!

https://smile.amazon.com/gp/product/B089CM4XPY/ref=ppx_yo_dt_b_search_asin_title?ie=UTF8&psc=1

searaycassette.jpg


searaycassette2.jpg


searaycassette3.jpg
 
Capt kirk,
Awesome job. Can see ya love it. Just a fyi i had the exact same radio and cd player. I replaced with Fusion MS-RA70I bluetooth radio, installed a USB adapter for thumbdrive music and a i pod wire. added 5 bluetooth remotes all over the boat ( admiral request) boxed out the old cd changer hole for a storage spot. Can even download fusion to phone for a extra remote or music great update for a couple boat bucks
Screenshot_20210404-200753_eBay.jpg
Screenshot_20210404-200813_eBay.jpg
Screenshot_20210404-200837_eBay.jpg
 

Forum statistics

Threads
113,120
Messages
1,426,609
Members
61,037
Latest member
wojozobl
Back
Top