460 DA Owners Thread

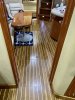
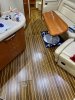
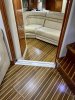
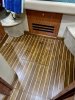
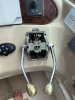
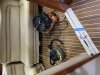
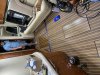
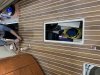
You do know these boats well Wolf. Pulled out the panel. No leaks. There is a board on the bottom with 2 screws. It seems to be really sealed in. Do you know what is below that? The tubes for the heater and washer go forward and then wrap around to the port side. But I think they go below the floor so pulling the refrigerator will probably not help. Any idea how to access that area?

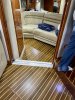
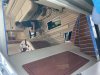
So, the water lines do run forward behind the W/D then the go forward behind the fridge until they turn to STBD. and go under the floor to that small storage area in front of the fridge. Taking the fridge out allows access to the “pressure” tank and behind the W/D. If the hot water heater were to be leaking, it wouldn’t go that way.

The panel below the water heater…??? I’m guessing just an enlarged surface for the heater. What a total PIA it would be to replace the heater!!!!!

All that being said, if the heater relief valve isn’t leaking and no signs of water on the face, I’m a little perplexed as to where the water is coming from.

Pull the fridge and check the washer/wrinkler lines?

PS: Another thing I just thought of. If you had a consistent leak, you would hear your pump running periodically. Unless you are on the city water connection.
 
Last edited:
Has anyone ever had issues with the throttle body on older style (2001-2003) DAs? My throttle (stainless with gold balls) is incredibly stiff and is that way even with the cables disconnected so isolating it to the throttle box itself. Is there a way to grease the internals of the unit and does anyone have a recommendation on replacement if it needs to be scrapped? Would ideally get the same one but don't see a part number or markings anywhere.
 
Has anyone ever had issues with the throttle body on older style (2001-2003) DAs? My throttle (stainless with gold balls) is incredibly stiff and is that way even with the cables disconnected so isolating it to the throttle box itself. Is there a way to grease the internals of the unit and does anyone have a recommendation on replacement if it needs to be scrapped? Would ideally get the same one but don't see a part number or markings anywhere.

if you take the cover off you’ll find a set screw that applies friction to the lever itself. I would try backing that screw off a little bit and see if that helps.
 
Which one?
 

Attachments

  • set.jpg
    set.jpg
    91.8 KB · Views: 85
Which one?
Sorry. I was sitting on my boat looking at my throttle controls at the helm and didn’t realize I need to explain myself. If you have the silver cover over the throttle control assembly at the helm there’s a screw on the sides that allow you to pull the cover off. Under the cover is the actual assembly and a friction screw that you can loosen. That would be my first place to start.
 
Well guys, seems like we just met. After about 3 years in the 460 family, we’ve moved on to a Tiara 50 Coupe.

Brought new boat back from Lake Ontario, Welland canal was an adventure.

I’ll be around the forum because Tiara has nothing like this community.
 

Attachments

  • 91553698-25F9-4795-8A98-02912B63F602.jpeg
    91553698-25F9-4795-8A98-02912B63F602.jpeg
    171.6 KB · Views: 75
Soo
Which one?
Sorry, I didn't see this post or Picture. If I remember correctly, one side is the top screw and the other is the bottom screw. Just loosen one up and you will know immediately. You should be able to see the cable on the top side of one and that would be the screw to turn to tighten or loosen the shifter.
 
I’ll try to get a couple better shot of it when I get to the boat today. The built took me about 10-15 hours total. 2-3 hours at a time. Removed the couch by sliding out from the wall, remove the back from the frame. Then you can get under it to remove the wood pedestal from the floor (4 L-brackets). Flip it over and remove the bottom east from the frame. Take all three pieces out. Next is a carpeted cover that runs the length of the room in the cover where floor meets the back wall. Feel in the carpet to find those screws to remove. The the corner couch (hardest part). Back cushion lifts off. The rest of it you just have to start pulling it apart with a pry bar. I framed the bed out of 1x1 and 2x1. Using a level often. Just “wing’d it” as I went along. I knew I wanted the width of the bed to fit between the closet and back wall. And wanted a shelf. Then just worked my way out. 3/4” sheet of smooth plywood. Piano hinge. Painted everything with black floor paint. Used some faux leather and foam from hobby lobby to wrap 1/4” wood panels. Screwed them down from behind. Used some child safety foam for the edging. Like you put on a coffee table. Just glued it down. Had a piece of scrap granite cut from a local shop for the shelf. I was only a few hundred bucks in until it came to the mattress. It’s about 5” short in width from being a standard full. So ordered a custom. Ouch. I’ve had guys tell me that they buy Foam ones and cut them down and reupholster for a lot cheaper. But whatever. Won’t be the last time I spend stupid money on something for the boat.
Hope that helps. Good luck to anyone that wants to give a try. Feel free to reach out!

We had a 5 night trip with friends last week, and they both couldn't sleep in the aft cabin together because the forward section of the folded down "bed" slopes forward quite a bit. Before i grab my crowbar and do something drastic like this, does everyone have this issue? If not, where do I start figuring out the fix? If it were me, I'd leave it as a bed, but the much better half of this partnership prefers a couch...she wins every time!
 
We had a 5 night trip with friends last week, and they both couldn't sleep in the aft cabin together because the forward section of the folded down "bed" slopes forward quite a bit. Before i grab my crowbar and do something drastic like this, does everyone have this issue? If not, where do I start figuring out the fix? If it were me, I'd leave it as a bed, but the much better half of this partnership prefers a couch...she wins every time!
I had the same problem in the main salon and used some wedges to angle the base towards the starboard side to flatten it out. Toughest part of the job is getting behind the couch to access the bolts. I also got tired of the uncomfortable bed in the aft cabin and removed the entire couch and chair and put in a regular double mattress - far more comfortable and we never used the couch anyway!
 
Sorry no one has responded Jeff. Many of the neeer boats have them but I’m not sure it’s really worth the trouble to refit a 460 unless you are doing major plumbing changes.

We are installing teak and holly sole in our interior. We are also fitting new teak trim. It should be done next week but thought I would share a few pics. We still need to mortise pulls in the hatches and varnish but I think you get the idea.
 

Attachments

  • 6EDC79E7-8445-4A77-BA55-12482C6C9E99.jpeg
    6EDC79E7-8445-4A77-BA55-12482C6C9E99.jpeg
    191.7 KB · Views: 95
  • 4A96752E-1738-4C64-9235-C26CC3C56645.jpeg
    4A96752E-1738-4C64-9235-C26CC3C56645.jpeg
    188.8 KB · Views: 87
  • E17E88F0-F11F-4231-8AE1-D17EAD7D5308.jpeg
    E17E88F0-F11F-4231-8AE1-D17EAD7D5308.jpeg
    203.8 KB · Views: 89
  • 34E2E927-9B43-4388-BF69-75D305337951.jpeg
    34E2E927-9B43-4388-BF69-75D305337951.jpeg
    272.6 KB · Views: 88
  • 3772AD6E-D176-4240-8AF9-1719335CAF28.jpeg
    3772AD6E-D176-4240-8AF9-1719335CAF28.jpeg
    232.9 KB · Views: 88
Sorry no one has responded Jeff. Many of the neeer boats have them but I’m not sure it’s really worth the trouble to refit a 460 unless you are doing major plumbing changes.

We are installing teak and holly sole in our interior. We are also fitting new teak trim. It should be done next week but thought I would share a few pics. We still need to mortise pulls in the hatches and varnish but I think you get the idea.
The new floor looks great!!

When I did my floor a few years ago I used these for the ring pulls. They looked great and matched the floor nicely as opposed to the standard chrome lifts. (oil rubbed bronze)
Just in case you were still deciding on what lift to get. :)
https://www.signaturehardware.com/search/result/?kw=&q=916141
IMG_2902.jpg

Here is a pic with the chrome lifts before I changed them out.
IMG_2751.jpg
 
I do like those pulls. We have a Boatwright who is doing it so I just left it to him actually. Your floor looks good. Trimming the hatches is tough
 
I do like those pulls. We have a Boatwright who is doing it so I just left it to him actually. Your floor looks good. Trimming the hatches is tough
Yes, trimming the hatches is a real PIA. I trimmed them on my 370 years ago when I did that flooring but on the 460 I opted to go without trim and get the hatch as tight as I could without it binding in the opening.(obviouxly...LOL)

We thought it came out really nice but it did take some time and planning to get it to be nearly invisible.
Yours is looking really good!
Photo upload tip:
To get the photos to look proper and not be left or right 90° I do the following:
1. Right click on the picture in whatever folder it is stored in.
2. Select "edit"
3. It should open in Paint.
4. Select from the top menu "Re-size"
5. Uncheck the box that says 'Maintain aspect ratio". You want to change one of the dimensions.
6. Select at the top Pixels
7. Change the larger dimension down a couple hundred values. In this case I would re-type 1816 in lieu of 2016.
8. Select save and then you should be able to upload the image to CSR in the proper alignment so that you don't have to look at it sideways.
upload_2022-10-8_7-15-13.png

I don't know why CSR manipulates the photos as it does if you maintain the proper aspect ratio, but this little trick helps. It may be slightly out of skew but at least the pictures can be viewed properly.

Just my 2 cents worth for everyone. :)
Have a GREAT weekend!
 
Forward head shower drain is draining very slowly. Ideas on how to clean it? Don't want to wreck the shower sump float or pump.
 
So rebuilt my toilets last week and my buddy needed his done also. Thought they would be the same but they are different. The 508 version has the funnel up high and pain in the ass. The guys over at EV marine helped out huge. Access to get to the hose clamp on the sewage hose is impossible. You have to pound the funnel out of the housing and it was a bitch. They recommended we upgrade to a 509 version like my boat which mounts the funnel to the boat like mine and make maintenance a lot easier. Couple hundred bucks and 5 hours later updated, rebuilt and done. Amazing how much corrosion on the ball shaft and how the o-rings just wear out like expected.
1329FE09-A35E-4531-8913-12FE043CF11F.jpeg
FE63EA78-44AE-40ED-BF47-F76B98CC5528.jpeg
2D258564-CD8F-45AA-B931-9C943160E684.jpeg
4DD66BEB-B580-4482-9488-CB00107DC634.jpeg
6453CC76-4764-4F4E-98FB-1B2A31AB2491.jpeg
 
Well here it is almost finished. I just t have a couple of spots to address. Took a month to the day and made a huge mess but I think it turned out pretty nice. Happy to answer any questions if y’all have them.
 

Attachments

  • 2BF2FE46-E940-4B14-AFF3-A7476D442C67.jpeg
    2BF2FE46-E940-4B14-AFF3-A7476D442C67.jpeg
    139.2 KB · Views: 84
  • 6768BA92-0613-40E0-A07E-BBEF7C405B90.jpeg
    6768BA92-0613-40E0-A07E-BBEF7C405B90.jpeg
    158.4 KB · Views: 68
  • 1EE091E9-F163-4EB9-8534-6606141B7858.jpeg
    1EE091E9-F163-4EB9-8534-6606141B7858.jpeg
    155.2 KB · Views: 72
  • B6FFC6F6-C1E5-4AC5-A0D6-C9477B73BD89.jpeg
    B6FFC6F6-C1E5-4AC5-A0D6-C9477B73BD89.jpeg
    162.7 KB · Views: 74
  • 72AAE92B-C4DB-4456-B86C-96176727C2BC.jpeg
    72AAE92B-C4DB-4456-B86C-96176727C2BC.jpeg
    150 KB · Views: 72
Well here it is almost finished. I just t have a couple of spots to address. Took a month to the day and made a huge mess but I think it turned out pretty nice. Happy to answer any questions if y’all have them.
BEAUTIFUL!!!
 
Well here it is almost finished. I just t have a couple of spots to address. Took a month to the day and made a huge mess but I think it turned out pretty nice. Happy to answer any questions if y’all have them.


That looks great - now it's about time to trade so you can start all over
 

Forum statistics

Threads
113,124
Messages
1,426,662
Members
61,037
Latest member
wojozobl
Back
Top