Ferris
Member
As we well know the cabin door tracks suck on the 280DA, Mine has been sticking recently then at the start of the season my top track sliders separated from the door and popped out of the track, so I had to tackle this issue. I didn't see much info out there so here is the basic procedure.
First off it's pretty straightforward but a massive PITA, it took me 2 full days. Broken down 2 hours to get it apart, 2 hours cleaning old sealant, 3 hours getting it back together and resealing. A FULL Day to get the alignment right. I got the parts from searay-parts.com / flounder pounder and they were great the parts were perfect but that said if I knew a head of time I'd searched for an alternative to top track sliders. It's a bad design in my opinion. Also I did this in the water so I had to fight the boat rocking.
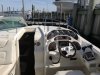
First remove the captain chair.
next remove the starboard windshield, this was easy peasy remove the black filler strip on the outboard side, unscrew and break the sealant, I ran a putty knife along the bottom. The helm brace I left on the helm but unbolted from the windshield. I also put the throttles in full reverse to get them out of my way . I left the wiper in place but in retrospect it would've been smarter to remove it too. The windshield is bulky but fairly light. Eventually you'll need to get it out of the boat as space fills up quickly.
Next remove the panel holding the throttles, I did this after unbolting the helm but realized it was in the way, I left it fully connected and just pushed it out of my way. 5 or so bolts on the front and some sealant.
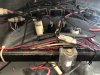
Now remove the helm, This too is pretty straightforward. First remove the panel hatch, that latch stabs you in your back so pull the door, second disconnect the connectors from the boat to the helm, mine were labeled not sure if the factory did it or someone else had it apart, but label them if you need. If you don't it's still fairly easy to figure out. Again you just need to disconnect a few of them from the boat not all of them and cut whatever zipties you need too. Then you pull the steering rack from the pinion. 4 x 11mm bolts, I used locktite when I put them back as it looked like they had some on them. I pushed all the wires and rack behind the door stop to hold them in place. Now unscrew teh front bolt it's near the door edge when fully open, then the 4 or so along the bottom of the helm and 4 up the side. Break the sealant and it should come off no problem, once again it's big but lighter than you think, my wife helped me move it out way.
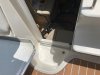
Next I removed the cabin door, unbolt the top track screws on one side then open or close the door to get the others. The door will tip forward and you can still slide it along to unbolt bottom in the same way. I'd remove teh top track from the sliders, just tip it forward (aft which I guess isn't forward now is it?) and pull the track out. The door is heavy you need two people here now the lift the door up and out of the the drain well. The track is on and can scratch things, so be careful. Now you need to find a place to work on the door, I placed mine on the transom with some blankets down. you can pull the track out from the bottom now. The roller plate is held on by a 5 or screws on the face and 2 underneath, just unscrew them. The FP kit didn't come predrilled so drill and counter sink holes and bolt on to bottom of the door. I Also the FP bottom plate was taller than the factory so I just drilled brandy new holes without trying to reuses any.
Drop the door back in the well, there is a slanted lip it sits on you'll see it. Also fill in the old holes with sealant as you'd probably not reuse them.
Now comes the nightmare......
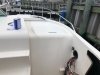
At first I tried to put the new top sliders in exact same location thinking it would just go together. This was a mistake. My top tracks had 4 washers each to shim and the bottom track had composite shim. I originally tried keeping this configuration and it didn't work at all. There is no adjustments other than how you align it. After fighting I removed the bottom shim and let it sit without it. I put the track on the top just sitting(not bolted) and the slider in place but not screwed in I just wanted it to sit and see how it sat. I then figure out a good placement for the bottom track sliding it a few pubes fore and aft on the lip. Then once I found a good spot I put two screws in one on each on the opposite ends. make sure the track is straight on the lip, you don't want it slanted it'll bite you later. now you need to figure out the top track. I put slider on in the stock location, but don't assume it's right here, measure the two sides and set the depth properly I used a shim with mark using the door edge as my guide. The sliders are tight and if they're angled it'll bind. I then did the other slider in a similar fashion but let it sit where ever I measured, the stock location was wrong here for me. Then I I drilled a hole in the track where the stock hole was and bolted it in and then figured a location for a screw in the other end by closing the door a bit and seeing where it sat. You need to just play and adjust here, I tried not drilling any excess holes for obvious reason. My door rubbed in some spots the binded in others, eventually between the top track and slider adjustments you'll get it. I found it easier to not mess with the bottom at all. It's honestly just trial an error. Once I found the correct position and adjusted the height with washers on the sliders I bolted the bottom track in fully 6 or so screws. then I did the same with the top, trying the door each time I put a new screw in. The track is al and can deflect so that's why I tested everytime.
Don't forget to seal all the screws....
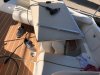
Then just put back together in reverse order and reseal everything. I found turpentine will remove light Aluminum rubs in the gel coat. Also you can see my door rubbed along the top when it finally came off the tracks, that cleaned up too.
First off it's pretty straightforward but a massive PITA, it took me 2 full days. Broken down 2 hours to get it apart, 2 hours cleaning old sealant, 3 hours getting it back together and resealing. A FULL Day to get the alignment right. I got the parts from searay-parts.com / flounder pounder and they were great the parts were perfect but that said if I knew a head of time I'd searched for an alternative to top track sliders. It's a bad design in my opinion. Also I did this in the water so I had to fight the boat rocking.
First remove the captain chair.
next remove the starboard windshield, this was easy peasy remove the black filler strip on the outboard side, unscrew and break the sealant, I ran a putty knife along the bottom. The helm brace I left on the helm but unbolted from the windshield. I also put the throttles in full reverse to get them out of my way . I left the wiper in place but in retrospect it would've been smarter to remove it too. The windshield is bulky but fairly light. Eventually you'll need to get it out of the boat as space fills up quickly.
Next remove the panel holding the throttles, I did this after unbolting the helm but realized it was in the way, I left it fully connected and just pushed it out of my way. 5 or so bolts on the front and some sealant.
Now remove the helm, This too is pretty straightforward. First remove the panel hatch, that latch stabs you in your back so pull the door, second disconnect the connectors from the boat to the helm, mine were labeled not sure if the factory did it or someone else had it apart, but label them if you need. If you don't it's still fairly easy to figure out. Again you just need to disconnect a few of them from the boat not all of them and cut whatever zipties you need too. Then you pull the steering rack from the pinion. 4 x 11mm bolts, I used locktite when I put them back as it looked like they had some on them. I pushed all the wires and rack behind the door stop to hold them in place. Now unscrew teh front bolt it's near the door edge when fully open, then the 4 or so along the bottom of the helm and 4 up the side. Break the sealant and it should come off no problem, once again it's big but lighter than you think, my wife helped me move it out way.
Next I removed the cabin door, unbolt the top track screws on one side then open or close the door to get the others. The door will tip forward and you can still slide it along to unbolt bottom in the same way. I'd remove teh top track from the sliders, just tip it forward (aft which I guess isn't forward now is it?) and pull the track out. The door is heavy you need two people here now the lift the door up and out of the the drain well. The track is on and can scratch things, so be careful. Now you need to find a place to work on the door, I placed mine on the transom with some blankets down. you can pull the track out from the bottom now. The roller plate is held on by a 5 or screws on the face and 2 underneath, just unscrew them. The FP kit didn't come predrilled so drill and counter sink holes and bolt on to bottom of the door. I Also the FP bottom plate was taller than the factory so I just drilled brandy new holes without trying to reuses any.
Drop the door back in the well, there is a slanted lip it sits on you'll see it. Also fill in the old holes with sealant as you'd probably not reuse them.
Now comes the nightmare......
At first I tried to put the new top sliders in exact same location thinking it would just go together. This was a mistake. My top tracks had 4 washers each to shim and the bottom track had composite shim. I originally tried keeping this configuration and it didn't work at all. There is no adjustments other than how you align it. After fighting I removed the bottom shim and let it sit without it. I put the track on the top just sitting(not bolted) and the slider in place but not screwed in I just wanted it to sit and see how it sat. I then figure out a good placement for the bottom track sliding it a few pubes fore and aft on the lip. Then once I found a good spot I put two screws in one on each on the opposite ends. make sure the track is straight on the lip, you don't want it slanted it'll bite you later. now you need to figure out the top track. I put slider on in the stock location, but don't assume it's right here, measure the two sides and set the depth properly I used a shim with mark using the door edge as my guide. The sliders are tight and if they're angled it'll bind. I then did the other slider in a similar fashion but let it sit where ever I measured, the stock location was wrong here for me. Then I I drilled a hole in the track where the stock hole was and bolted it in and then figured a location for a screw in the other end by closing the door a bit and seeing where it sat. You need to just play and adjust here, I tried not drilling any excess holes for obvious reason. My door rubbed in some spots the binded in others, eventually between the top track and slider adjustments you'll get it. I found it easier to not mess with the bottom at all. It's honestly just trial an error. Once I found the correct position and adjusted the height with washers on the sliders I bolted the bottom track in fully 6 or so screws. then I did the same with the top, trying the door each time I put a new screw in. The track is al and can deflect so that's why I tested everytime.
Don't forget to seal all the screws....
Then just put back together in reverse order and reseal everything. I found turpentine will remove light Aluminum rubs in the gel coat. Also you can see my door rubbed along the top when it finally came off the tracks, that cleaned up too.